How to Install a Truck Bed Liner
Key Takeaways
- Surface preparation is 80% of the job — skipping sanding and degreasing leads to peeling and bubbling within months.
- Roll-on bed liner kits cost $70–$150 and deliver professional-grade results when applied correctly in two coats.
- Spray-on liners require a compressor and spray gun but create the most uniform, durable finish for long-term protection.
- Temperature matters — apply bed liner between 55°F and 95°F with low humidity for proper curing and adhesion.
- Full cure takes 3–7 days depending on the product, so avoid loading cargo or exposing the bed to moisture during that window.
Types of Truck Bed Liners Compared
Before you start, you need to pick the right liner type for your truck and budget. Each option has trade-offs in durability, cost, and ease of installation.
- Spray-on (professional): Applied by shops like LINE-X or Rhino Linings. Costs $400–$700 but creates the most durable, permanent bond. Not a DIY option unless you have commercial equipment.
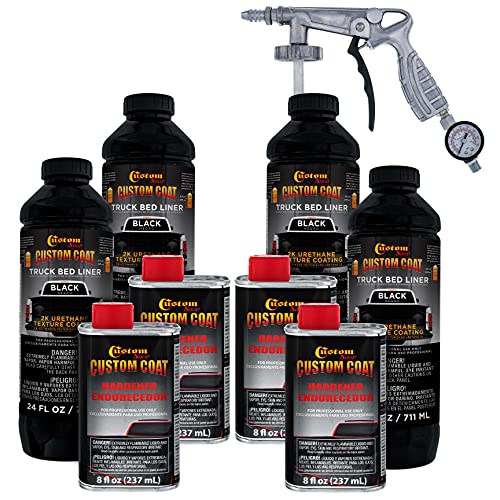
- Spray-on (DIY): Products like the Custom Coat Urethane Spray-On Kit let you achieve near-professional results with a spray gun and compressor. Costs $80–$150 per gallon.
- Roll-on: Brush or roller application. Kits like the Herculiner Roll-On Bed Liner Kit run $70–$120 and require no special equipment beyond a roller and brush.
- Aerosol spray cans: Best for touch-ups or small areas. A single can covers 6–7 square feet, so you'll need multiple cans for a full bed.
- Drop-in liners: Pre-molded plastic shells that sit in the bed. Easy to install but can trap moisture underneath, causing hidden rust.
- Bed mats: Rubber or plastic mats that lay flat on the bed floor. Zero installation — just drop them in. They protect the floor but not the sidewalls.
For most DIY truck owners, a roll-on or DIY spray-on kit offers the best balance of cost, durability, and ease of application. Roll-on is more forgiving for beginners, while spray-on delivers a smoother, more uniform finish.
If you're also planning to add a tonneau cover later, make sure the liner won't interfere with the mounting clamps — most roll-on and spray-on liners are thin enough that they won't cause issues.
HERCULINER HCL1B8 Roll-on Bed Liner Kit
The most popular DIY roll-on kit. Includes everything you need — liner, roller, and brush — for a full-size truck bed in two coats. Great for beginners.
Check Price On AmazonIf you click this link and buy, we earn a commission at no additional cost to you.

Tools and Materials You'll Need
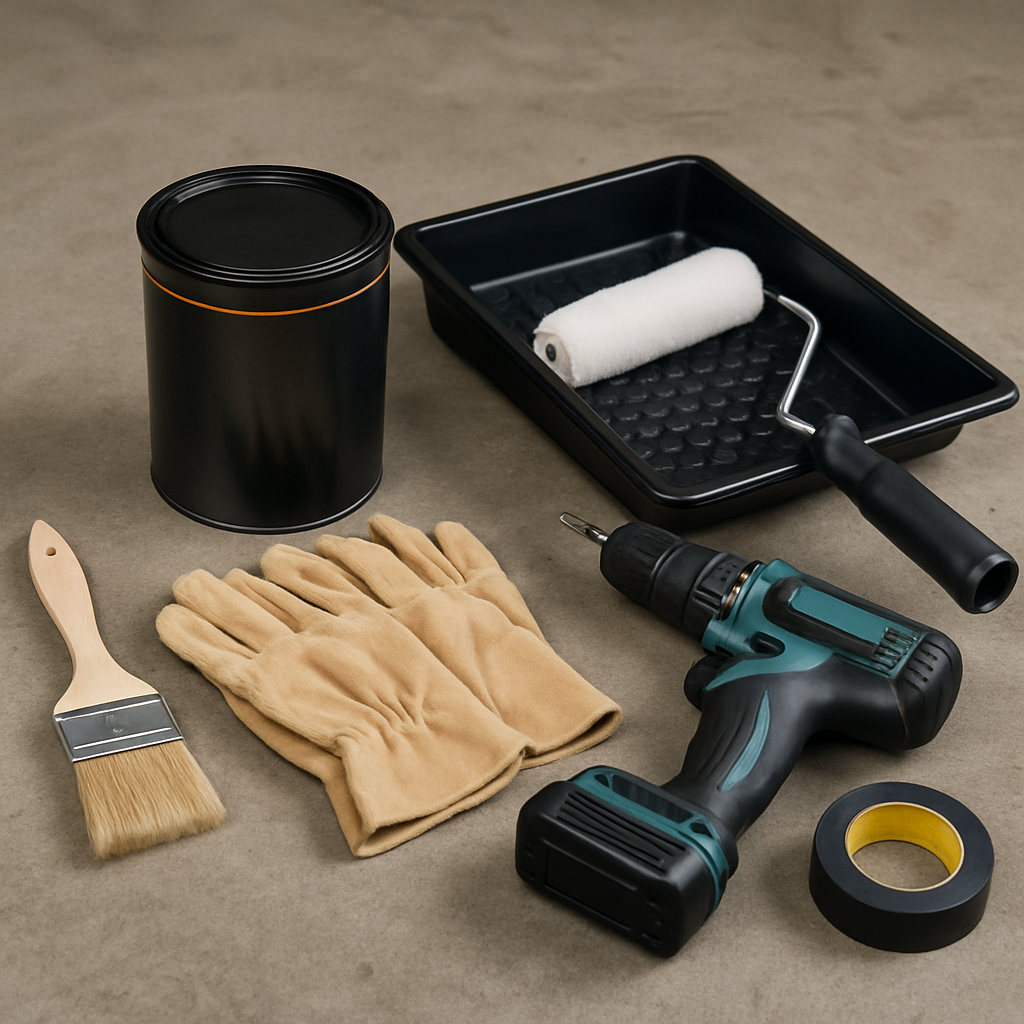
Gather everything before you start. Running to the hardware store mid-project while your bed is degreased and drying is a recipe for contamination. Here's your complete checklist.
- Bed liner kit: Roll-on or spray-on, at least 1 gallon for a full-size truck bed
- 80-grit sandpaper or sanding disc: For scuffing the paint surface to improve adhesion
- Orbital sander or sanding block: Makes surface prep significantly faster
- Wax and grease remover: Acetone or dedicated automotive degreaser
- Painter's tape (2-inch): For masking edges, tie-down hooks, and stake pockets
- Plastic sheeting or newspaper: To protect areas you don't want coated
- Lint-free cloths or shop towels: For degreasing and wiping
- Roller and brush: Included in most roll-on kits; use a 3/8" nap roller for texture
- Spray gun and compressor: Required for spray-on kits (40–60 PSI typical)
- Respirator mask: Essential — bed liner fumes contain isocyanates that are harmful to lungs
- Chemical-resistant gloves: Nitrile or similar; bed liner bonds to skin permanently
- Safety glasses: Non-negotiable for spray application
For roll-on application, budget about $80–$130 total including the liner kit and supplies. Spray-on kits run $100–$200 once you factor in the spray gun if you don't already own one.
One often-overlooked item is a work light or drop light. You'll be reaching into the front corners of the bed where shadows hide missed spots. Good lighting prevents thin patches that wear through first.
Custom Coat Urethane Spray-On Truck Bed Liner Kit
Professional-grade urethane spray-on kit with an easy 3:1 mix ratio. Includes spray gun and regulator for the smoothest DIY finish possible.
Check Price On AmazonIf you click this link and buy, we earn a commission at no additional cost to you.
Preparing the Truck Bed Surface
This is the most critical step. Surface prep determines 80% of your liner's longevity. Rush this, and the liner peels within months. Do it right, and it lasts years.
Start by removing everything from the truck bed — toolboxes, bed mats, tonneau cover rails, and any bolt-on accessories. If you have a tonneau cover installed, check our guide on how to remove a tonneau cover before proceeding.
- Wash the bed thoroughly: Use a pressure washer or garden hose with automotive soap. Remove all dirt, mud, grease, and debris. Pay special attention to the corrugation channels where grime collects.
- Let it dry completely: Wait at least 2–4 hours in warm weather, or use compressed air to speed drying. Any trapped moisture will cause bubbling.
- Sand the entire surface: Use 80-grit sandpaper on every surface you plan to coat — floor, sidewalls, front wall, tailgate, and bed rails. The goal is to scuff the factory paint so the liner can grip. You're not removing the paint, just creating micro-scratches.
- Wipe with degreaser: Saturate a lint-free cloth with acetone or wax-and-grease remover. Wipe every sanded surface. Use a fresh cloth for each pass — you're removing contaminants, not spreading them around.
- Final inspection: Run your hand over the surface. It should feel uniformly rough with no slick or glossy spots. Any shiny areas need more sanding.
This prep phase takes 1.5–2 hours for a full-size bed. Don't cut corners — a properly scuffed and degreased surface creates a mechanical bond that holds up under heavy loads, UV exposure, and temperature swings.
Masking and Protecting Surrounding Areas
Bed liner is permanent. Once it cures on a surface, it's not coming off without heavy sanding or chemical stripping. Protect everything you don't want coated.
- Tailgate latches and hinges: Wrap with painter's tape and plastic. Liner buildup can prevent the tailgate from latching properly.
- Tie-down hooks and cleats: Tape around the base so they still function. Some owners coat them intentionally for a uniform look — your choice.
- Stake pocket holes: Plug them with balled-up newspaper and tape over the top. These holes are used for mounting accessories and installing tonneau covers, so keep them clear.
- Bed rail edges: Apply tape along the outer edge of the bed rail so liner doesn't drip onto the exterior paint. Create a clean, sharp line.
- Tailgate seal area: Mask the rubber gasket contact zone. Excess liner here prevents a proper seal and allows water intrusion.
- License plate light wiring: If accessible from the bed, cover the wiring harness and light housing.
Use plastic sheeting to drape over the exterior sides of the truck near the bed rails. Overspray from spray-on kits can drift onto your paint, and removing cured bed liner from clear coat often requires professional buffing.
Take your time with masking — it typically takes 30–45 minutes but saves hours of cleanup. Step back and check your tape lines from multiple angles before opening the liner kit. Crooked masking lines are obvious once the liner cures and look unprofessional.
Applying the Bed Liner: Step-by-Step
With your bed prepped and masked, you're ready for the main event. The application method differs based on your kit type, so follow the approach that matches your product.
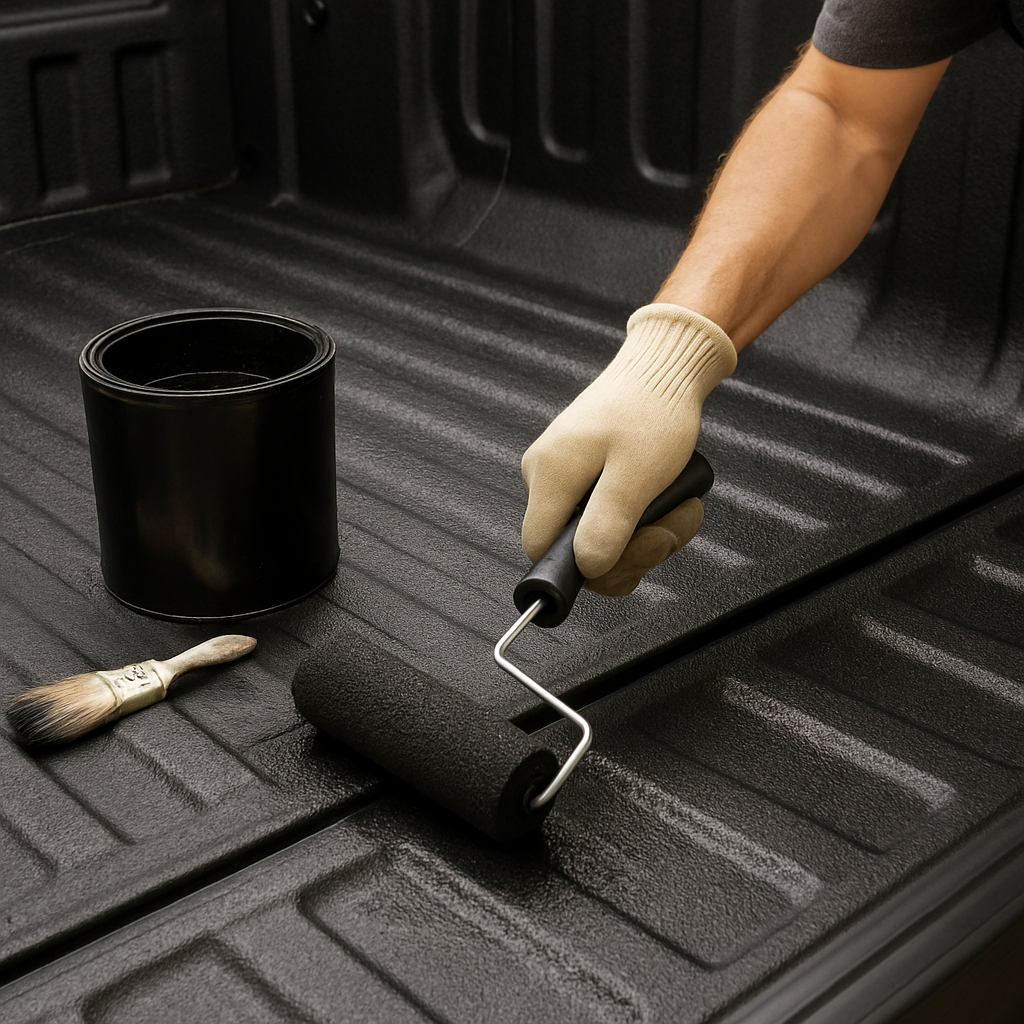
For roll-on application:
- Stir the liner thoroughly: Products like the Herculiner Roll-On Kit contain rubber granules that settle to the bottom. Stir for 3–5 minutes until the mixture is uniform.
- Start with the brush: Cut in all edges, corners, and hard-to-reach areas with the included brush. Get into the corrugation channels and around bolt heads.
- Roll the flat surfaces: Load the roller evenly and apply in overlapping strokes. Work from the front of the bed toward the tailgate so you're not reaching over wet liner.
- Apply thin, even coats: Don't glob it on. Two thin coats are far better than one thick coat. Thick application traps solvents, slows curing, and can crack.
- Wait between coats: Allow 4–6 hours between coats (check your product label). The first coat should be dry to the touch but not fully cured.
- Apply second coat: Roll perpendicular to your first coat direction. This ensures even coverage and fills any thin spots.
For spray-on application:
- Mix according to directions: The Custom Coat spray-on kit uses a 3:1 mix ratio. Measure precisely — incorrect ratios affect curing and durability.
- Set your spray gun: Adjust to 40–60 PSI with a wide fan pattern. Test on cardboard first to dial in your spray distance and overlap.
- Spray in overlapping passes: Hold the gun 12–18 inches from the surface. Overlap each pass by 50% for uniform thickness.
- Two to three coats: Allow 15–30 minutes between spray coats. Build up thickness gradually.
Total application time: 2–3 hours including dry time between coats for roll-on, or 1–2 hours for spray-on.
RAPTOR Roll-On Bed Liner Kit
Premium 1-gallon kit known for exceptional durability and UV resistance. A top choice for truck owners who want long-lasting protection.
Check Price On AmazonIf you click this link and buy, we earn a commission at no additional cost to you.

Curing Time and Aftercare
Your bed liner looks done, but it's not ready for use yet. Proper curing is essential for maximum durability and adhesion. Here's what to expect.
- Touch dry: 4–6 hours for roll-on, 1–2 hours for spray-on
- Light use (no cargo): 24–48 hours — you can close the tailgate and drive, but don't load anything
- Full cure: 3–7 days depending on product, temperature, and humidity
- Maximum hardness: Some urethane liners reach peak hardness at 14 days
During the curing window, follow these rules:
- Keep the bed dry: No rain, no dew, no washing. If rain is forecast, park in a garage or cover the bed with a tarp (without letting it contact the surface).
- Maintain temperature: Curing slows dramatically below 55°F. If you applied in cool weather, park in a heated garage if possible.
- No heavy cargo: Sliding heavy items across a partially cured liner can gouge through to bare metal, requiring a complete redo of that area.
- Ventilate: Leave the tailgate down for the first 24 hours to allow solvent gases to escape. This speeds curing and prevents soft spots.
After full cure, your bed liner requires almost zero maintenance. Wash it with soap and water when it gets dirty. For stuck-on debris, a stiff bristle brush works without damaging the texture. Avoid petroleum-based solvents on roll-on liners as they can soften the coating.
If you notice a thin spot or missed area after curing, lightly sand the area with 80-grit, degrease, and apply a touch-up coat. Herculiner aerosol spray cans are perfect for small touch-ups without mixing a full batch.
Common Mistakes to Avoid
Even experienced DIYers make these errors. Avoiding them saves you time, money, and the frustration of stripping a failed liner and starting over.
- Skipping the sanding step: This is the number one cause of peeling. Factory paint is too smooth for bed liner to grip. Sand every surface — no exceptions.
- Applying in bad weather: High humidity (above 80%) traps moisture in the liner. Direct sunlight overheats the surface, causing the liner to skin over before it bonds. Temperature below 55°F prevents proper chemical curing.
- Applying too thick: A single heavy coat looks great for about a week, then cracks and peels. The solvents can't escape from a thick layer, leaving a gummy underlayer that never fully hardens.
- Not degreasing after sanding: Sanding creates dust that mixes with oils from your hands. If you don't wipe with degreaser after sanding, you've created a contamination layer between the bed and the liner.
- Ignoring corrugation channels: The grooves in the bed floor collect water and debris. If you don't coat them thoroughly, rust starts there first and spreads under the liner.
- Forgetting the tailgate: Many truck owners coat the bed but skip the tailgate interior. This creates an unprotected zone that rusts and looks inconsistent.
- Loading too soon: Patience is hard, but sliding a toolbox across a 2-day-old liner can gouge right through to metal. Wait the full recommended cure time.
One more tip: don't cheap out on the kit. Budget liners with low solids content require three or four coats to achieve adequate thickness, which costs more in time and product than starting with a quality kit like the RAPTOR Roll-On Bed Liner Kit.
Troubleshooting Bed Liner Problems
If something goes wrong during or after application, don't panic. Most issues are fixable without a complete redo.
- Peeling or flaking: Almost always a prep issue. Sand the affected area down to bare metal, feather the edges, degrease, and recoat. If peeling is widespread, you may need to strip and start over.
- Bubbling: Caused by trapped moisture or applying over a contaminated surface. Pop any bubbles while the liner is still wet, let it dry, sand smooth, and apply a thin patch coat.
- Uneven texture: Common with roll-on application. The second coat usually evens out the first. If texture is still uneven after two coats, lightly sand the high spots and add a targeted third coat.
- Runs and drips: Happens with spray-on when you hold the gun too close or move too slowly. Let the drip dry, sand it flat with 80-grit, and respray that section.
- Soft or tacky spots: The liner hasn't cured, usually due to cold temperatures or thick application. Give it more time in warm, dry conditions. If still tacky after 7 days, the area needs to be removed and reapplied.
- Color inconsistency: Different batches or improper mixing can cause slight color variation. This is mostly cosmetic and fades as UV exposure evens out the color over time.
For large repairs, approach them like a fresh install — sand, degrease, mask, apply. For small touch-ups under 2 square feet, an aerosol spray can is the easiest option.
If you're also thinking about other truck bed upgrades like fender flares, mud flaps, or exterior trim, check out our guide on installing fender flares — many owners tackle both projects on the same weekend.
Related Articles
- Best Tonneau Covers for Trucks — Referenced when discussing compatibility between bed liners and tonneau cover mounting hardware
- How to Remove a Tonneau Cover — Linked in surface prep section — readers need to remove tonneau covers before applying bed liner
- How to Install a Tonneau Cover: Complete Step-by-Step Guide — Referenced when discussing masking stake pockets used for tonneau cover installation
- How to Install Fender Flares on Your Truck — Mentioned as a complementary weekend project in the troubleshooting section
- Best Portable Air Compressors for Trucks — The surface prep step mentions using compressed air to speed drying — a natural spot to link readers to compressor recommendations
- Best Tailgate Locks for Trucks — The masking section warns about protecting tailgate latches from liner buildup — relevant for readers who care about tailgate security
- How to Install Mud Flaps on a Truck — The troubleshooting section already mentions tackling other upgrades on the same weekend — mud flaps fit naturally alongside fender flares as a common companion project
- Best Truck Bed Lights for Nighttime Cargo — The article recommends having a work light when applying bed liner in dark bed corners — readers needing truck bed illumination would naturally benefit from permanent bed light options.
Conclusion
Recommended Products
HERCULINER HCL1B8 Roll-on Bed Liner Kit
The most popular DIY roll-on kit. Includes everything you need — liner, roller, and brush — for a full-size truck bed in two coats. Great for beginners.
Check Price On AmazonIf you click this link and buy, we earn a commission at no additional cost to you.
Custom Coat Urethane Spray-On Truck Bed Liner Kit
Professional-grade urethane spray-on kit with an easy 3:1 mix ratio. Includes spray gun and regulator for the smoothest DIY finish possible.
Check Price On AmazonIf you click this link and buy, we earn a commission at no additional cost to you.
RAPTOR Roll-On Bed Liner Kit
Premium 1-gallon kit known for exceptional durability and UV resistance. A top choice for truck owners who want long-lasting protection.
Check Price On AmazonIf you click this link and buy, we earn a commission at no additional cost to you.
Frequently Asked Questions
How long does it take to install a truck bed liner yourself?
Is a DIY bed liner as good as a professional spray-on?
Can you apply bed liner over existing paint?
What happens if it rains before the bed liner cures?
Do I need to remove rust before applying bed liner?
How many cans of spray bed liner do I need for a full truck bed?
Can I put a tonneau cover over a bed liner?
Is roll-on or spray-on bed liner better for beginners?
Affiliate Disclosure: This article contains affiliate links. If you purchase through these links, we may earn a commission at no extra cost to you.