How to Install a Tonneau Cover: Complete Step-by-Step Guide
Key Takeaways
- Most tonneau covers install in 20-30 minutes with basic hand tools and zero drilling required.
- Clamp-on mounting systems are the most common and easiest to install — they grip your bed rails without permanent modification.
- Proper bed rail cleaning and clamp positioning are the two factors that determine whether your cover seals correctly and lasts.
- Folding and roll-up covers share nearly identical installation steps, while retractable covers require extra rail assembly time.
- Always do a final tailgate seal check and water test before loading cargo to catch alignment issues early.
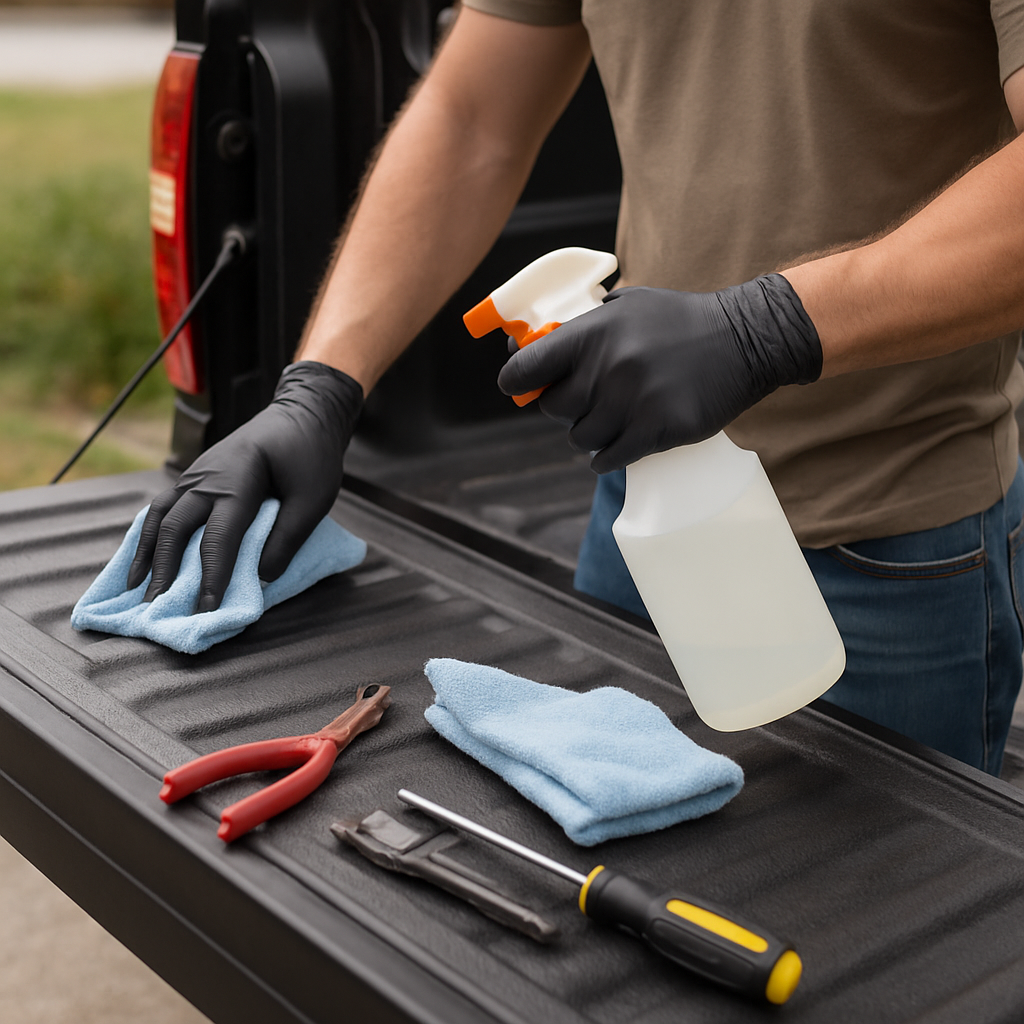
Tools and Materials You'll Need
Before you start, gather everything so you're not hunting for tools mid-install. The good news is that most tonneau covers require minimal tools — and many include what you need in the box.
- Socket wrench set — 10mm, 13mm, and 17mm sockets cover 90% of tonneau hardware
- Tape measure — for verifying clamp positions and centering the cover
- Rubbing alcohol or degreaser — to clean bed rails before mounting
- Clean microfiber cloths — for wiping down rails and removing residue
- Soft-jaw pliers — helpful for adjusting tension on roll-up covers
- Step stool or ladder — unless you're tall enough to comfortably reach across the bed
Some covers also include seal tape or foam strips that go between the clamp and the bed rail. Don't skip these — they prevent scratches and improve the weather seal.
Optional but helpful extras include:
- Painter's tape — to mark clamp positions before tightening
- A second pair of hands — especially useful for hard tri-fold and retractable covers that are heavy
- Torque wrench — if your instructions specify a torque value (most don't)
Total cost for tools if you're starting from scratch is about $25-40. But most truck owners already have everything they need in the garage. Check your cover's instruction manual for any model-specific tools — some brands include proprietary L-keys or specialty bolts.
Step 1: Prepare Your Truck Bed
Preparation is the step most people skip — and it's the reason most tonneau covers don't seal properly. Take 10 minutes here to save yourself frustration later.
Start by lowering your tailgate completely and removing any bed accessories that might interfere with the install:
- Bed rail caps or covers — remove these if your clamps mount on top of the rail
- Tie-down anchors — relocate any that sit where clamps need to go
- Bed liners — over-the-rail liners may need trimming near clamp points
- Cargo bars or bed dividers — pull these out temporarily
Next, clean both bed rails thoroughly. Use rubbing alcohol or a degreaser and wipe the entire top surface of each rail from the cab to the tailgate. You're removing dirt, wax, and any residue that would prevent a good seal.
If you have a spray-in bed liner that coats the top of the rails, pay extra attention. The textured surface can trap grime that prevents clamps from gripping properly. Scrub it with a stiff brush if needed.
While you're at it, inspect the bed rails for dents or damage. Even a small dent can cause a gap in your cover's seal. If you find one, note its location — you may need extra seal tape there.
- Time for this step: 5-10 minutes
- Most common mistake: Skipping the cleaning and getting a poor seal
- Pro tip: Do this in a shaded area — direct sunlight makes alcohol evaporate before it can cut through grime
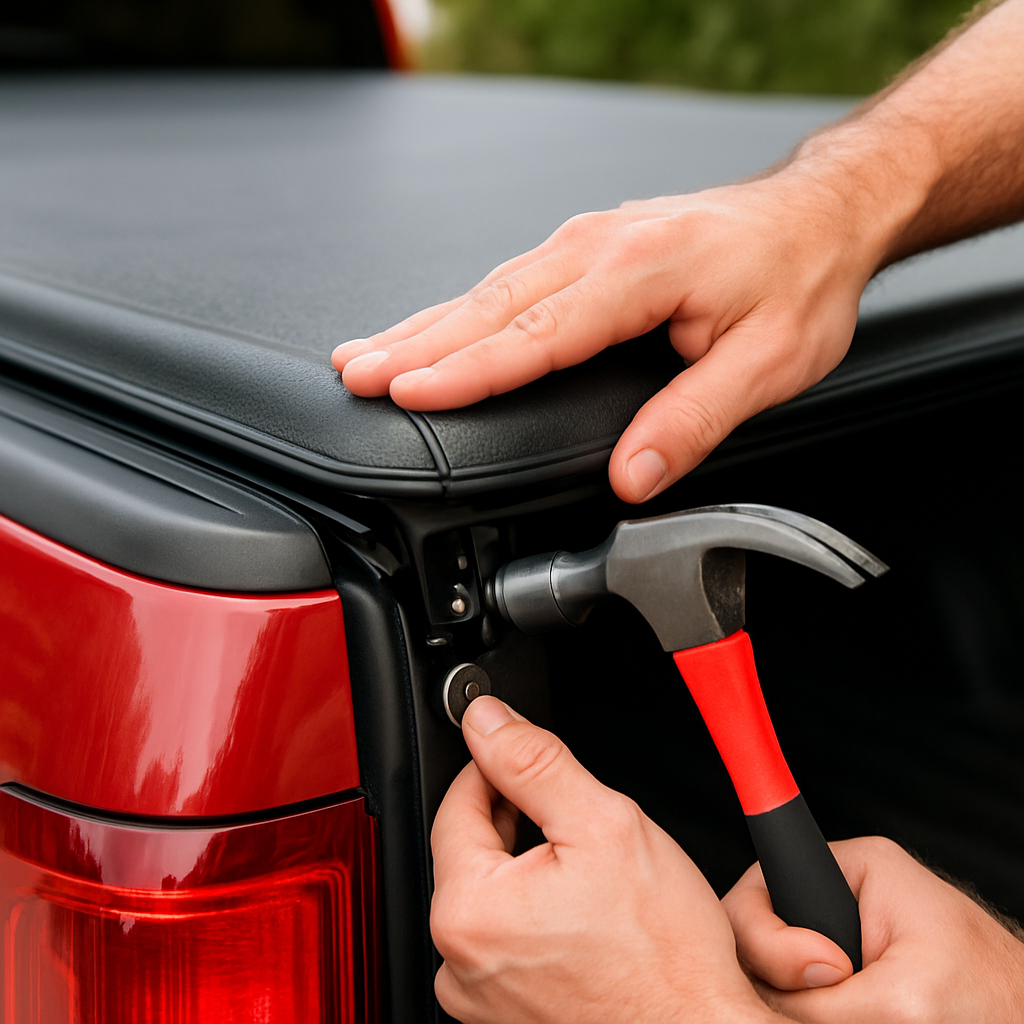
Step 2: Position and Attach the Front Clamps
The front of the cover — the part closest to the cab — always goes on first. This is your anchor point, and everything else aligns from here.
Start by unpacking the front header rail or seal. For most covers, this is a long aluminum bar with a rubber seal that presses against the bulkhead (the front wall of the bed).
- Set the header rail across the bed — rest it on top of both bed rails, pushed snug against the bulkhead
- Center it side to side — measure the overhang on each side and adjust until it's even, typically within 1/8 inch
- Attach the front clamps — slide the U-shaped clamps under the bed rail lip and hand-tighten the bolts
- Check the seal against the bulkhead — the rubber strip should make even contact across the entire width
- Tighten the clamps — snug them firmly with your socket wrench, but don't overtighten or you'll deform the rail
Most covers use two front clamps — one on each side. Some heavy-duty or retractable covers may use four.
- Important: The clamp should grip the underside of the bed rail — not pinch the rail cap or liner
- If your clamps slip: Add the included foam padding or wrap the contact point with electrical tape for extra grip
- Finger-tight first: Always position everything before fully tightening — you may need to adjust
Double-check that the header rail is level and parallel to the cab. If it's crooked at this stage, your entire cover will be misaligned.
Step 3: Install the Side Rails and Rear Clamps
With the front secured, it's time to run the side rails from front to back and lock down the rear. This step varies slightly by cover type, but the fundamentals are the same.
For roll-up and folding covers:
- The side rails typically snap or bolt into the header rail at the front
- Run each rail along the top of the bed rail toward the tailgate
- Most side rails have pre-marked clamp positions — align the clamps with these marks
- Hand-tighten each clamp as you go, starting from front to back
For retractable covers:
- Side rails are usually two-piece track systems that bolt together
- The canister mounts at the cab end, and the tracks run to the tailgate
- Follow the manufacturer's sequence exactly — these are less forgiving of out-of-order assembly
When attaching rear clamps, make sure the cover's back edge aligns with the tailgate. You want a consistent gap of about 1/4 inch between the cover and the tailgate when closed.
- Position the rear clamps on both sides
- Adjust the cover length if your model has adjustable rear bars
- Tighten the rear clamps to match the front — snug, not gorilla-tight
Once all clamps are hand-tight, go back and do a final tightening pass from front to back on both sides. This ensures even pressure and prevents the cover from shifting during use.
- Time for this step: 10-15 minutes
- Watch for: Side rails that bow outward — this means clamps are too loose
Step 4: Adjust Tension, Alignment, and Seals
Your cover is mounted, but you're not done yet. The adjustment phase is what separates a sloppy install from a professional-looking one.
For roll-up covers:
- Unroll the cover fully toward the tailgate
- Check for even tension across the width — if one side is tighter, the cover will pull to that side
- Use the tension adjuster (usually a knob or bolt at the rear) to equalize both sides
- The cover should lay flat with no wrinkles or sagging
For folding covers:
- Unfold all panels and lay the cover flat
- Check that each panel sits flush with the bed rails on both sides
- If panels gap on one side, loosen the clamps and shift the entire assembly slightly
- Verify the hinge points fold and unfold smoothly without catching
For all cover types, check these alignment points:
- Front seal: Even contact with the bulkhead, no gaps wider than 1/16 inch
- Side seals: Rubber strips should compress slightly against the bed rails
- Rear seal: Consistent gap with the tailgate — should not rub or leave a 1-inch gap
- Latch engagement: All latches should click firmly without excessive force
If your cover has drain tubes, connect them now. Most covers channel water to drain holes near the tailgate. Route the tubes so they exit through the bed's existing drain holes — don't let them kink or sag where water can pool.
Take a step back and look at the cover from behind the truck. It should be perfectly centered and level. If one side sits higher, a clamp needs adjusting.
Step 5: Test the Cover and Do a Final Inspection
Before you call it done, run through a complete function test. This takes five minutes and catches problems that are easy to fix now but annoying to deal with later.
Function checks:
- Open and close the cover 3-4 times — it should move smoothly with no binding or catching
- Test all latches — they should lock and release with one hand
- Open and close the tailgate — verify it doesn't contact the cover
- Check the cab seal — close the cover and look for daylight at the front edge from inside the bed
Next, do a water test. Use a garden hose to spray the cover for 2-3 minutes, focusing on the seams, edges, and the front seal area. Then check inside the bed for leaks.
- Small drips at corners are normal for soft covers — they're water-resistant, not waterproof
- Streams of water along the side rail mean your seal isn't compressed enough — tighten the nearest clamp
- Water at the front means the header rail needs to push tighter against the bulkhead
Finally, take the truck for a short drive — just around the block at various speeds up to highway speed if possible. When you get back, check:
- Has anything shifted or loosened?
- Does the cover flap or flutter at speed? (Increase tension if so)
- Are all clamps still tight?
If everything checks out, you're done. The entire process — from unboxing to test drive — should take about 20-30 minutes for a roll-up cover and 30-45 minutes for folding or retractable models.
Installation Tips by Cover Type
While the basic steps are the same, each tonneau cover type has its own quirks. Here's what to watch for with each style.
Soft roll-up covers:
- The easiest to install — most take under 20 minutes
- Tension is everything — too loose and it sags, too tight and it's hard to latch
- The vinyl can be stiff when cold — install in temperatures above 50°F for easier handling
- Some models let you roll from either end — check before you commit the orientation
Hard tri-fold and quad-fold covers:
- Heavier — expect 40-80 lbs depending on the model, so have a helper
- Panel alignment is critical — if the first panel is off, every panel after it will be worse
- Prop rod pockets should face up, not down (common mistake)
- Some hard folds require you to install the cover as one assembled unit — don't unfold it until it's clamped
Retractable covers:
- Most complex install — budget 45-90 minutes
- The canister is heavy and awkward — two people minimum
- Track alignment must be perfect or the cover will bind when retracting
- Some models require minor drilling for the canister brackets — check before you buy if you want a no-drill install
Hinged one-piece covers:
- Simple clamp install but very heavy — 60-100+ lbs
- You'll need the gas struts installed before mounting or the lid won't stay open
- Hinge alignment is the trickiest part — take your time here
Troubleshooting Common Installation Problems
Even straightforward installs can hit snags. Here are the most common issues and how to fix them fast.
Problem: Cover doesn't sit flush on one side
- Cause: Uneven clamp pressure or a bent bed rail
- Fix: Loosen all clamps, reposition the cover centered, and retighten evenly from front to back
Problem: Latches won't engage at the tailgate
- Cause: Cover is too far forward or the rear bar needs adjustment
- Fix: Slide the entire cover back 1/4 inch by loosening the front clamps, or adjust the latch strike plate
Problem: Water leaks along the side rails
- Cause: Seals aren't compressed enough against the bed rails
- Fix: Tighten the side clamps one quarter-turn at a time until the seal compresses evenly
Problem: Cover flaps or vibrates at highway speed
- Cause: Insufficient tension (roll-up covers) or loose panels (folding covers)
- Fix: Increase tension using the rear adjuster, or check that all panel latches are fully locked
Problem: Clamps won't grip the bed rail
- Cause: Over-the-rail bed liner is too thick, or rail shape doesn't match clamp design
- Fix: Trim the bed liner at clamp points, or contact the manufacturer for alternative clamp brackets
Problem: Tailgate hits the cover when closing
- Cause: Rear of cover extends too far back
- Fix: Adjust the rear crossbar position forward, or check if the tailgate seal is unusually thick
If you're stuck on a model-specific issue, check the manufacturer's installation video — most brands have them on YouTube. It's often faster than re-reading the paper manual.
Related Articles
- Best Tonneau Covers for Trucks — Comprehensive review of the top-rated tonneau covers across all truck models
- How to Install a Truck Bed Liner — Article mentions spray-in bed liners affecting clamp grip during install — links to the bed liner installation guide for readers who need to address their liner first
- How to Remove a Tonneau Cover — Readers replacing an existing tonneau cover need to remove the old one first — this link naturally fits where the article discusses removing bed accessories before installation
- Best Tailgate Locks for Trucks — After installing a tonneau cover, securing the tailgate with a lock is a natural next step for cargo security — this link fits where the article checks tailgate function
Conclusion
Frequently Asked Questions
Can I install a tonneau cover by myself?
Do you need to drill holes to install a tonneau cover?
How long does it take to install a tonneau cover?
Will a tonneau cover work with a bed liner?
Are tonneau covers waterproof after installation?
Can I still use my truck bed normally with a tonneau cover?
What if my tonneau cover doesn't fit my truck?
Do tonneau covers improve gas mileage?
Affiliate Disclosure: This article contains affiliate links. If you purchase through these links, we may earn a commission at no extra cost to you.