How to Install Mud Flaps on a Truck
Key Takeaways
- Most truck mud flap installations take 30-60 minutes with basic hand tools and no drilling required for factory-prepped mounting points.
- Universal mud flaps require trimming and test-fitting before installation — always measure your wheel well clearance first.
- Position mud flaps so the bottom edge sits 6-8 inches above the ground to prevent dragging while still blocking road debris.
- Stainless steel hardware resists corrosion far better than zinc-plated bolts, saving you from replacements within a year.
- Anti-seize compound on mounting bolts makes future removal and adjustment significantly easier, especially in salt-belt regions.
Types of Mud Flaps and Which One Fits Your Truck
Before you grab a wrench, you need the right mud flaps for your truck. The type you choose affects both the installation process and long-term durability.
- Custom-molded flaps: Designed for a specific make and model. These bolt directly into factory mounting points with no trimming or drilling. Easiest to install.
- Universal flaps: One-size-fits-most design that requires trimming to fit your wheel well. More affordable but takes extra time to install. The ZIMISI 4-piece universal mud flaps are a solid budget option that include fastener clips for quick mounting.
- Hitch-mounted flaps: Attach to your receiver hitch to protect trailers and towed vehicles. No wheel well modification needed.
- Semi truck flaps: Larger, heavier flaps designed for commercial vehicles. Require hangers and specialized mounting hardware.
For most pickup truck owners, custom-molded flaps are the best choice. They fit precisely, look factory-installed, and typically include all necessary hardware. Universal flaps work well if you want maximum coverage or have an aftermarket suspension lift that changes your wheel well geometry.
If you tow frequently, consider adding hitch-mounted mud flaps in addition to your wheel well flaps. These protect whatever you are towing from highway debris kicked up by your rear tires.
Measure your wheel well height and width before ordering. You want flaps that extend at least 2 inches beyond the tire tread on each side for proper coverage.
ZIMISI 4PCS Universal Car Mud Flaps
A complete 4-piece universal mud flap set with fastener rivet clips included. Fits most pickups and SUVs with flexible, bendable material that's easy to trim to size.
Check Price On AmazonIf you click this link and buy, we earn a commission at no additional cost to you.

Tools and Materials You Need
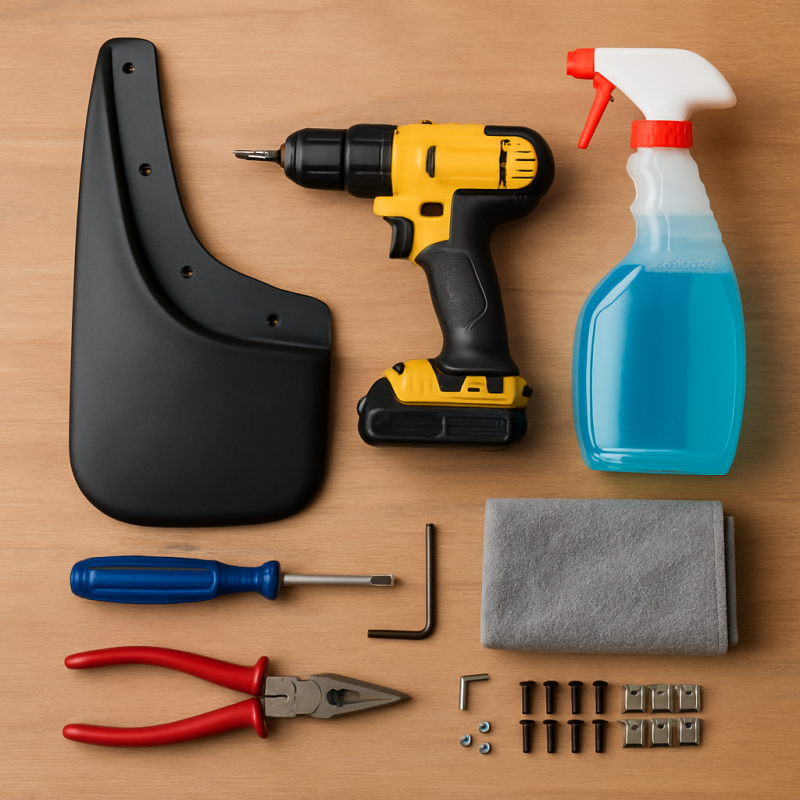
Gathering everything before you start prevents frustrating trips to the hardware store mid-install. Here is what you need to install mud flaps on a truck.
- Socket wrench set: 10mm, 12mm, and 13mm sockets cover most trucks
- Phillips and flathead screwdrivers: for plastic fastener clips
- Power drill with bits: only needed if your truck lacks factory mounting holes
- Trim removal tool: to pop out plastic push clips without breaking them
- Tape measure: for positioning and clearance checks
- Marker or grease pencil: to mark drill points on universal flaps
- Anti-seize compound: prevents bolts from seizing due to corrosion
- Wire brush: to clean existing mounting points of rust and dirt
For hardware, your mud flap kit should include bolts, nuts, and washers. If it does not — or if you are replacing worn-out hardware on a semi truck — pick up a dedicated mud flap bolt kit with stainless steel fasteners that resist rust.
You do not need a vehicle lift or jack stands for most installations. Mud flap mounting points are accessible from outside the wheel well. However, turning the steering wheel to full lock gives you more room to work on front flaps.
Total cost for a DIY mud flap install runs $30-$80 for the flaps plus $10-$15 in hardware if not included. Compare that to $100-$200 at a shop.
Semi Trucks Mud Flap Bolt Kit - Pack of 8
Stainless steel bolt kit specifically designed for mud flap mounting. Resists corrosion far better than standard zinc-plated hardware — essential for trucks in wet or salt-heavy regions.
Check Price On AmazonIf you click this link and buy, we earn a commission at no additional cost to you.

Preparing Your Truck for Installation
Proper preparation makes the actual install go smoothly and ensures your mud flaps stay put for years.
- Park on a flat, level surface. This ensures accurate positioning and prevents the truck from rolling.
- Clean the wheel wells thoroughly. Use a pressure washer or garden hose to remove mud, salt, and debris. Dirty surfaces prevent proper fitment and can hide existing mounting holes.
- Locate factory mounting points. Most trucks built after 2010 have pre-drilled holes or plastic plugs in the wheel well liner where mud flaps attach. Check your owner's manual for locations.
- Remove plastic push clips. If your truck has plugs covering the mounting holes, pop them out with a trim removal tool. Save these — you may need them if you ever remove the flaps.
While you are down there inspecting your wheel wells, it is a good time to check for rust or damage. If you notice paint chips or bare metal around the fender area, consider addressing those before installing flaps. Just like installing fender flares, proper surface prep prevents moisture from getting trapped behind your new accessories and accelerating corrosion.
For trucks with aftermarket lifts or leveling kits, measure the distance from the bottom of the fender to the ground. Stock mud flaps may be too short after a lift. You will need longer universal flaps or extension brackets to maintain proper coverage.
Turn your front wheels to full lock (left for driver side, right for passenger side) to maximize access to the front mounting area. This simple step saves significant time and frustration.
Step-by-Step Installation for Pickup Trucks
With your truck prepped and tools ready, here is how to install mud flaps on a pickup truck. This process covers the most common bracket-mount style. Estimated time: 30-45 minutes for all four.
- Start with the rear flaps. They are easier to access and let you practice before tackling the fronts. Hold the mud flap bracket against the wheel well liner, aligning it with the factory mounting holes.
- Hand-thread the bolts first. Insert all bolts through the bracket and flap, threading them into the mounting points by hand. Do not tighten yet — you need alignment flexibility.
- Check clearance and positioning. The flap should hang vertically with the bottom edge 6-8 inches above the ground. It should extend at least 2 inches beyond the tire tread width on each side.
- Tighten bolts in a star pattern. Use your socket wrench to snug each bolt, alternating between top and bottom to distribute pressure evenly. Torque to approximately 15-20 ft-lbs — tight enough to hold, but not so tight you crack plastic brackets.
- Move to the front flaps. Turn the steering wheel to expose the mounting area. Front flaps often use a combination of bolts through the fender liner and clips that grip the fender edge.
- Test wheel clearance. Turn the steering wheel lock-to-lock with the front flaps installed. Verify that the flap does not contact the tire at full turn. If it does, reposition the bracket further from the tire.
- Apply anti-seize compound to all bolt threads before final tightening. This is especially important in regions with road salt.
After all four flaps are mounted, take the truck for a slow test drive around the block. Listen for rubbing or flapping sounds that indicate a clearance issue or loose mounting.
Installation Tips for Semi Trucks and Heavy-Duty Vehicles
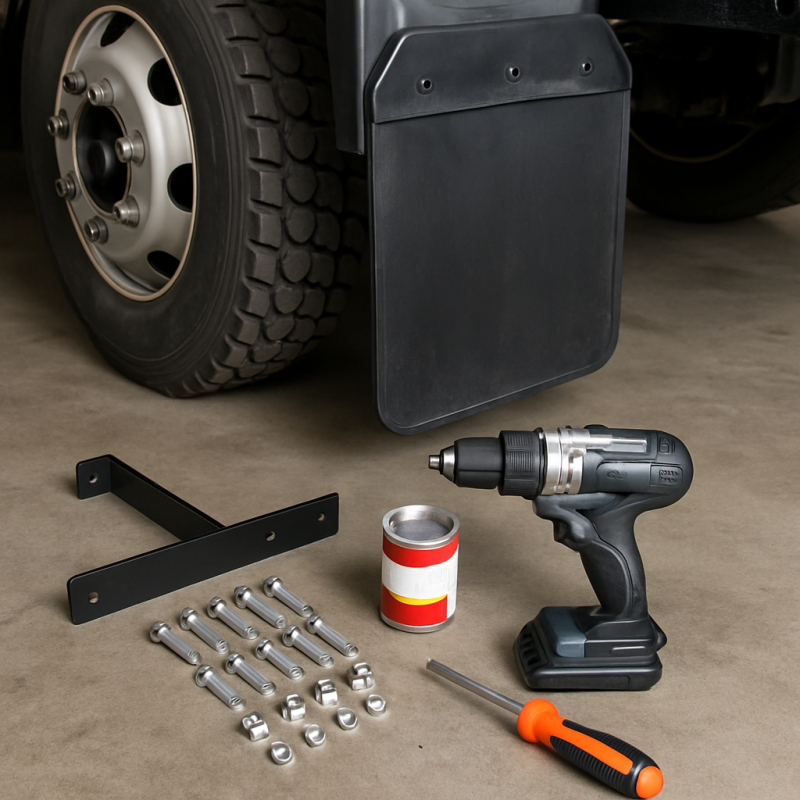
Semi trucks and heavy-duty commercial vehicles use a different mud flap mounting system than pickups. Instead of bolting directly to the wheel well, they use hanger brackets that mount to the truck frame or fender supports.
- Hanger types: The two most common are straight bar hangers and angled-down bar hangers. Angled hangers position the flap closer to the tire at the bottom, improving debris deflection.
- Spring-loaded hangers: These allow the flap to flex on impact rather than tearing off. Essential for trucks that go off-pavement or navigate construction zones.
- Weight matters: Semi flaps are significantly heavier than pickup flaps. Use a helper or prop the flap in position while you secure the top mounting bolts.
For commercial installations, the IBESTWOLF angled-down bar hanger kit provides everything you need including reflector plates and mounting hardware. These square-arm hangers handle both polymer and rubber flaps.
If you need to secure flaps on a dump truck or work truck, stainless steel mud flap clamps are a better option than traditional bolt-through mounting. They grip the flap edge without requiring holes, making swaps and replacements faster.
- DOT regulations: Commercial vehicles must have mud flaps that cover the full tread width. Maximum ground clearance varies by state but is typically 8 inches or less from the bottom of the flap to the road surface.
- Reflectors: Many states require reflective tape or reflector plates on rear mud flaps for commercial vehicles. Check your local regulations before installation.
Semi truck flap installation takes 45-90 minutes depending on hanger complexity and whether you are replacing old hardware or doing a fresh install.
IBESTWOLF Angled Down Bar Mud Flap Hangers Kit
Complete hanger kit for semi trucks with angled-down bar design, reflector plates, and all mounting hardware. Handles both polymer and rubber mud flaps up to 1/2 inch thick.
Check Price On AmazonIf you click this link and buy, we earn a commission at no additional cost to you.

Common Mistakes to Avoid
Even a simple install can go wrong if you overlook these common pitfalls. Here is what experienced truck owners wish they knew before their first mud flap installation.
- Skipping the test fit: Always hold the flap in position before drilling or tightening. What looks right on the ground can be completely off once mounted.
- Over-tightening bolts: Plastic fender liners and brackets crack easily. Use a torque wrench or just snug the bolts — they do not need to be gorilla-tight.
- Ignoring tire clearance: Front mud flaps can contact the tire during sharp turns. Always test full steering lock before calling the job done.
- Using cheap hardware: Zinc-plated bolts rust within months in wet climates. Spend the extra few dollars on stainless steel fasteners.
- Mounting too low: Flaps that hang too close to the ground catch on speed bumps, parking blocks, and driveways. Maintain that 6-8 inch ground clearance minimum.
- Forgetting anti-seize: Without anti-seize on the bolt threads, corrosion can bond the bolt to the nut within a single winter. Future removal becomes a nightmare involving drill-outs and broken studs.
Another mistake is neglecting the rest of your truck's exterior protection. Mud flaps handle debris below the bumper line, but your truck bed liner handles protection from above. Both work together to keep your truck looking new.
If you are working on a truck with aftermarket wheels or wider tires, factory mud flap kits may not provide adequate coverage. Measure the distance from the fender edge to the outer tire sidewall. If the tire protrudes more than half an inch beyond the fender, you need wider universal flaps or a combination of mud flaps and fender flares for full coverage.
Maintenance and Long-Term Care
Mud flaps are low-maintenance, but they are not zero-maintenance. A few minutes of attention every few months keeps them effective and looking clean.
- Monthly inspection: Check for cracks, tears, or loose hardware. Road debris impacts take a toll over time, especially on rubber flaps.
- Quarterly bolt check: Vibration loosens fasteners gradually. Give each bolt a quarter-turn with your socket wrench to verify tightness.
- Seasonal cleaning: Wash behind the flaps where mud and salt accumulate. This trapped moisture is the primary cause of wheel well rust.
- Replace damaged flaps promptly: A cracked or torn flap does not deflect debris properly and can flap at highway speeds, creating drag and noise.
Rubber flaps typically last 3-5 years before UV exposure and road impacts degrade them. Polymer and polyethylene flaps last longer — often 5-8 years — but cost more upfront. Stainless steel flaps on semi trucks can last a decade or more with proper care.
In cold climates, watch for ice buildup between the flap and the tire. Packed ice can push the flap outward, stressing the mounting hardware. Kick the ice off after driving in freezing rain or heavy slush.
If a flap tears at the bolt hole — a common failure point — you can extend its life temporarily with a fender washer that distributes the load over a larger area. However, this is a temporary fix. Plan to replace the flap within a month.
Keep your truck's overall exterior in top shape by pairing mud flap maintenance with other protective accessories. A good tonneau cover protects your bed from the same elements your mud flaps fight at wheel level.
Troubleshooting Installation Problems
Even with careful preparation, you may run into issues during or after installation. Here are the most common problems and how to fix them.
- No factory mounting holes: Some base-model trucks lack pre-drilled holes. Use the mud flap bracket as a template, mark the hole positions with a grease pencil, then drill with a 5/16-inch bit for standard bolts. Apply touch-up paint to bare metal edges to prevent rust.
- Flap vibrates or flaps at highway speed: This usually means the flap is too long or the bottom edge is not weighted. Trim the flap shorter or add a weight bar along the bottom edge. Many universal flaps include a metal strip for this purpose.
- Bolts strip or spin freely: The mounting point has been over-drilled or corroded. Use a larger bolt with a backing plate or nut on the inside of the fender liner. A well nut or rivet nut also works as a permanent fix.
- Front flap rubs on tire during turns: Loosen the mounting bolts and shift the bracket rearward by half an inch. Retighten and test again. If it still rubs, trim the leading edge of the flap at a slight angle.
- Water pooling behind the flap: Ensure the flap is not pressed flat against the fender liner. There should be a slight gap for airflow and drainage. Add a spacer washer between the bracket and the fender if needed.
If your truck has plastic fender liners that flex when you tighten the bolts, sandwich the liner between two large fender washers — one on each side. This prevents the liner from deforming and keeps the mud flap securely mounted.
For persistent vibration issues on highway driving, check that all four flaps are the same length. Mismatched flaps create uneven aerodynamic resistance, which can cause one flap to flutter while others stay stable.
Related Articles
- How to Install Fender Flares on Your Truck — Related exterior protection accessory that pairs well with mud flaps for trucks with wider tires
- How to Install a Truck Bed Liner — Complementary truck protection project that guards the bed while mud flaps protect the exterior
- Best Tonneau Covers for Trucks — Another protective accessory that shields the truck bed from the same road elements mud flaps deflect
Conclusion
Recommended Products
ZIMISI 4PCS Universal Car Mud Flaps
A complete 4-piece universal mud flap set with fastener rivet clips included. Fits most pickups and SUVs with flexible, bendable material that's easy to trim to size.
Check Price On AmazonIf you click this link and buy, we earn a commission at no additional cost to you.
Semi Trucks Mud Flap Bolt Kit - Pack of 8
Stainless steel bolt kit specifically designed for mud flap mounting. Resists corrosion far better than standard zinc-plated hardware — essential for trucks in wet or salt-heavy regions.
Check Price On AmazonIf you click this link and buy, we earn a commission at no additional cost to you.
IBESTWOLF Angled Down Bar Mud Flap Hangers Kit
Complete hanger kit for semi trucks with angled-down bar design, reflector plates, and all mounting hardware. Handles both polymer and rubber mud flaps up to 1/2 inch thick.
Check Price On AmazonIf you click this link and buy, we earn a commission at no additional cost to you.
Frequently Asked Questions
Do I need to drill holes to install mud flaps on my truck?
How long does it take to install mud flaps?
How far should mud flaps hang from the ground?
Are mud flaps required by law on trucks?
Can I install mud flaps on a lifted truck?
What is the difference between rubber and plastic mud flaps?
Do mud flaps affect gas mileage?
How often should mud flaps be replaced?
Affiliate Disclosure: This article contains affiliate links. If you purchase through these links, we may earn a commission at no extra cost to you.