How to Install a Roof Rack on Your Truck
Key Takeaways
- Most no-drill roof rack installations take 30-60 minutes with basic hand tools, while drill-mount systems require 1-2 hours and a helper.
- Always verify your truck's roof load rating in the owner's manual — exceeding it voids your warranty and compromises safety.
- Torque clamps to manufacturer specs (typically 6-8 Nm) to avoid roof dents or loose bars at highway speeds.
- Apply butyl tape or rubber gaskets under every mounting point to prevent water leaks and protect your paint.
- Test your installation with a 30-minute highway drive before loading any gear — listen for wind noise and check clamp tightness.
What Type of Roof Rack Fits Your Truck?
The right roof rack depends on your truck's roof style and what you plan to carry. There are three main mounting systems, and choosing wrong means a return trip to the store — or worse, damage to your roof.
- Clamp-on (no-drill): Hooks onto the door frame or rain gutter using padded clamps. Best for trucks with bare roofs or factory side rails. No permanent modification required.
- Fixed-point mount: Bolts into pre-threaded holes hidden under plastic caps on your roof. Common on newer trucks like the F-150, Tacoma, and Ram 1500. Check your roof for small rectangular covers.
- Drill-mount: Requires drilling holes through the roof or topper shell. Offers the strongest hold and highest weight capacity, but it's permanent.
For most truck owners, clamp-on crossbars are the easiest starting point. They install in under 30 minutes, hold 150-200 lbs, and leave no marks when removed. If you need serious hauling capacity — 500 lbs or more — a drill-mount system on a camper shell is the way to go.
Not sure which style fits your setup? Our review of top-rated truck roof racks breaks down the best options by truck model and use case. If you're running a bed rack instead, the mounting process is completely different — check our overlanding bed rack guide for that approach.
- Bare roof trucks: Use universal clamp-on bars or fixed-point kits
- Trucks with side rails: Use rail-mount crossbars (simplest install)
- Trucks with camper shells: Use topper-specific rack systems (often drill-mount)
What Tools and Materials Do You Need?
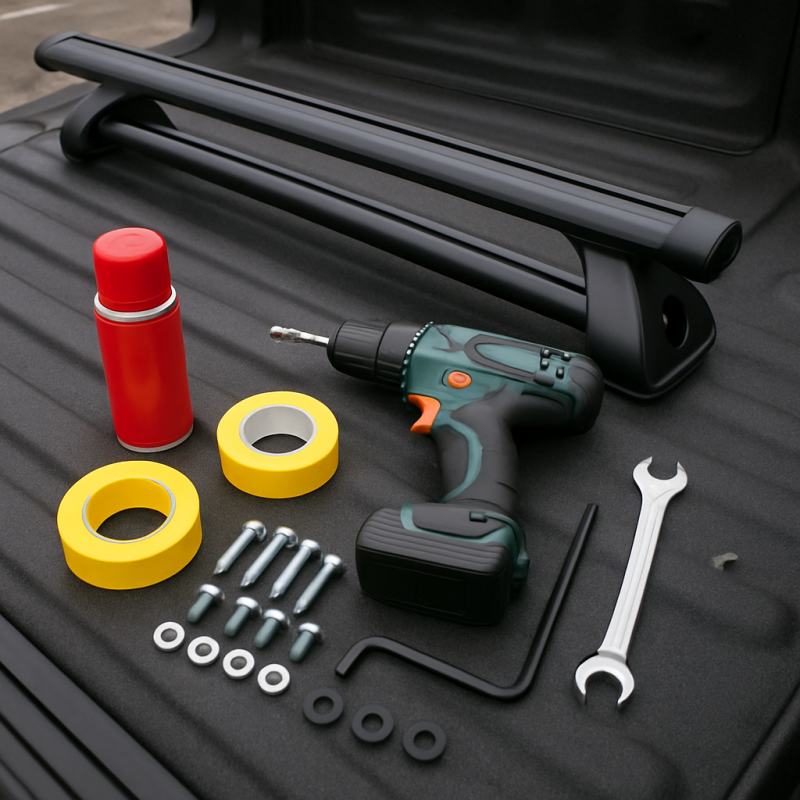
Most roof rack installations require only basic hand tools you probably already own. Gather everything before you start — climbing on and off your truck to hunt for a socket wastes time and risks scratching your paint.
- Socket wrench set: 10mm, 13mm, and 17mm cover most rack hardware
- Allen key set: Many crossbar clamps use 4mm or 5mm hex bolts
- Torque wrench: Essential for hitting manufacturer specs without over-tightening
- Tape measure: For centering bars and matching left-right spacing
- Rubbing alcohol and clean rags: For degreasing mounting surfaces
- Painter's tape: To mark drill locations (drill-mount only)
- Drill with cobalt bits: Only needed for drill-mount installations
- Butyl tape or rubber gaskets: Waterproofing under every clamp or bolt
For drill-mount systems, you'll also need a center punch, deburring tool, and touch-up paint or rust inhibitor for exposed metal edges. A torque wrench is non-negotiable here — overtightened bolts crack fiberglass toppers, and under-tightened bolts work loose on the highway.
If you're tackling other exterior upgrades at the same time, the tool overlap is significant. The same socket set works for installing fender flares and most bolt-on accessories.
Pro tip: Lay a moving blanket or old towel across your hood and fenders before you start. Dropped sockets and crossbars leave dents and scratches on unprotected paint.
How Do You Prepare Your Truck's Roof?
Surface preparation takes 10 minutes and prevents the two biggest problems: paint damage and water leaks. Skip this step and you'll regret it the first time it rains.
Start by washing your truck's roof thoroughly. Road grime, tree sap, and bird droppings trapped under a clamp act like sandpaper — every vibration grinds them into your clear coat.
- Wash the entire roof with car soap and water. Use a microfiber mitt, not a brush.
- Dry completely with a clean microfiber towel. Water under clamps causes rust stains.
- Degrease mounting points with rubbing alcohol or isopropyl wipes. This removes wax and silicone that prevent rubber pads from gripping.
- Inspect for existing damage. Note any dents, chips, or rust spots. Install clamps on clean, undamaged sections only.
- Apply protective film (optional but recommended). Clear PPF strips under each clamp point prevent micro-scratches during install and removal.
For camper shell installations, the prep is even more critical. Fiberglass and aluminum toppers are thinner than your cab roof. According to LEER's maintenance guidelines, you should inspect the shell for hairline cracks around any area where you plan to drill.
- Fiberglass shells: Check for delamination by tapping — a hollow sound means weak spots
- Aluminum shells: Look for corrosion around existing bolt holes
- Painted shells: Use painter's tape around drill locations to prevent chipping
How Do You Install a No-Drill Clamp-On Roof Rack?
Clamp-on installation is the most popular method because it takes 30-45 minutes, requires no permanent modification, and works on nearly every truck. Here's the complete process.
- Unbox and inventory all parts. Lay out crossbars, clamps, rubber pads, bolts, and end caps. Compare against the parts list — missing hardware means a stalled install.
- Determine crossbar placement. Most manufacturers recommend spacing bars 24-36 inches apart, centered over the cab roof. Measure from the front edge of the roof to find center, then mark equal distances forward and back.
- Attach clamp assemblies to crossbars. Slide the clamp feet onto each end of the crossbar and hand-tighten. Don't lock them yet — you'll adjust side-to-side positioning on the roof.
- Set the first crossbar on the roof. Open all four doors for access. Hook the clamp feet onto the door frame lip, ensuring rubber pads sit flat against the roof edge.
- Center the bar. Measure from each end of the bar to the nearest roof edge. Adjust until both sides are equal — even a half-inch offset creates uneven loading.
- Tighten clamps to spec. Use a torque wrench set to the manufacturer's recommendation (typically 6-8 Nm). Alternate between left and right sides, tightening in small increments.
- Repeat for the second crossbar. Maintain your measured spacing from step 2.
- Install end caps and rubber strips. These reduce wind noise and protect the bar ends from corrosion.
Universal crossbar sets like the Seah Hardware Universal Roof Rack Cross-Bars come with adjustable clamps that fit most truck cab widths. For a slightly wider fitment with aerodynamic shaping, the DREAMIZER Universal Roof Rack Cross Bars offer a 54-inch span that covers full-size trucks.
Seah Hardware Universal Roof Rack Cross-Bars 2 PC.
Affordable universal crossbar set with adjustable clamps that fit most truck cab widths. Ideal for first-time installers who want a no-drill solution.
Check Price On AmazonIf you click this link and buy, we earn a commission at no additional cost to you.

How Do You Install a Drill-Mount Rack on a Camper Shell?
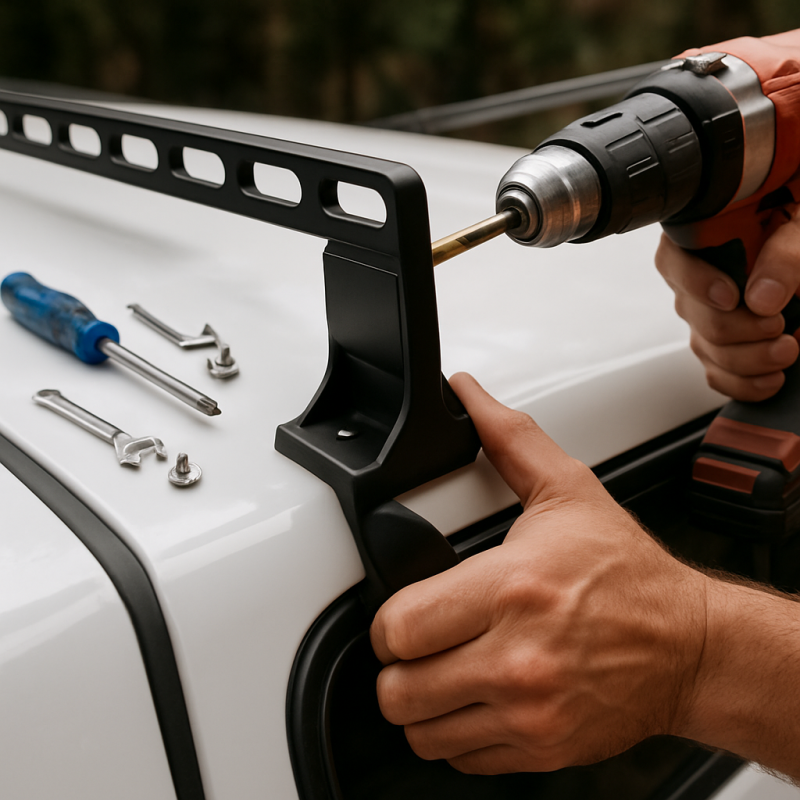
Drill-mount racks offer the highest weight capacity (400-1,000 lbs) and the most secure attachment, but they require permanent holes in your topper. Take your time — a misplaced hole can't be undone.
- Position the rack on the shell. Set both crossbars on the topper roof with a helper holding them steady. Center front-to-back and side-to-side using a tape measure.
- Mark all drill locations. Use painter's tape under each mounting foot, then mark through the pre-drilled holes in the mounting brackets with a center punch. Double-check every mark before you drill.
- Drill pilot holes. Start with a small pilot bit (1/8") and step up to the final diameter specified in your rack's instructions. For fiberglass shells, use slow speed and light pressure to prevent cracking.
- Deburr all holes. Use a deburring tool or larger drill bit twisted by hand to remove sharp edges. This prevents gaskets from tearing.
- Apply sealant. Run a bead of marine-grade silicone or butyl tape around each hole on both the inside and outside of the shell. This is your primary water barrier — don't skimp.
- Mount the rack. Insert bolts from the top, add washers and backing plates on the underside, and hand-tighten. Have your helper hold the backing plate while you tighten from above.
- Torque to spec. Follow the manufacturer's torque values exactly. Over-tightening cracks fiberglass; under-tightening allows movement that enlarges holes over time.
- Apply touch-up paint to any exposed metal edges around the drill holes.
For heavy-duty topper installations, the MELIPRON 60" Truck Topper Roof Rack is built specifically for camper shells with a 500 lb capacity and aluminum construction that won't rust. If you need even more capacity, the Mountainpeak 500LB Pickup Truck Topper Ladder Rack delivers similar performance with easy-to-align mounting brackets.
The F150Forum accessories section has detailed install threads with photos for nearly every topper brand — worth checking for model-specific tips.
MELIPRON 60" Truck Topper Roof Rack for Pickup Truck Cap
Heavy-duty aluminum rack built specifically for camper shells with 500 lb capacity. The go-to choice for topper owners who need serious load support.
Check Price On AmazonIf you click this link and buy, we earn a commission at no additional cost to you.

Can You Install a Rack Without Drilling or Clamps?
Yes — bed-rail-mounted ladder racks skip the roof entirely and clamp onto your truck's bed rails instead. They're ideal if you don't want to touch your cab roof or camper shell at all.
These racks use J-hooks or C-clamps that grip the inner and outer edges of your bed rail. No drilling, no roof contact, and they can be removed in minutes. The trade-off is height — your cargo sits higher than cab-mounted racks, which increases wind resistance and raises your total vehicle height for garage clearance.
- Best for: Hauling ladders, lumber, kayaks, and long cargo
- Weight capacity: 500-1,000 lbs depending on model
- Install time: 20-30 minutes
- No drill, no clamp on roof: All hardware attaches to bed rails only
The installation process is straightforward:
- Set the uprights on the front and rear bed rails
- Adjust the width to match your specific bed rail spacing
- Tighten the J-hook clamps with a socket wrench
- Lay the crossbars across the uprights and secure
The VEVOR Extendable Steel Truck Ladder Rack adjusts from 46 to 71 inches, covering short and long beds, with an 800 lb capacity — all without a single drill hole. For even heavier loads and adjustable width from 43 to 63 inches, the VEVOR 1,000 LBS Truck Ladder Rack offers both drilling and non-drilling installation options.
These bed-rail systems pair especially well with other exterior accessories. Adding mud flaps behind your rear wheels helps protect gear stored low on the rack from road spray.
VEVOR Extendable Steel Truck Ladder Rack - 800 lbs Capacity
Adjustable bed-rail-mounted rack that extends from 46 to 71 inches — fits short and long beds without drilling. Perfect for hauling ladders and kayaks.
Check Price On AmazonIf you click this link and buy, we earn a commission at no additional cost to you.

How Do You Reduce Wind Noise and Vibration?
Wind noise is the number-one complaint after roof rack installation. The crossbars act like guitar strings at highway speed, creating a low-frequency hum that drives passengers crazy. Here's how to fix it.
- Aerodynamic crossbar profile: Oval or teardrop-shaped bars produce far less noise than round bars. If you haven't purchased yet, prioritize this shape.
- Wind fairing: A plastic deflector mounted on the front crossbar redirects airflow over the bars. Reduces noise by 60-80% and slightly improves fuel economy.
- Crossbar padding or wrap: Foam pipe insulation or aftermarket bar wraps break up the airflow pattern that causes humming. A cheap fix — $5 at any hardware store.
- Bar spacing adjustment: Moving bars closer together or farther apart can eliminate harmonic resonance. If the hum only happens at specific speeds, try shifting bars 2-3 inches.
Vibration and rattling usually come from loose hardware — not defective products. After your first highway drive, re-torque every bolt and clamp. Materials compress and settle during initial use, and what felt tight in the driveway may need another quarter-turn after 50 miles.
According to Car and Driver's rack overview, even factory-installed racks can produce noise — it's inherent to having bars exposed to airflow. The goal is mitigation, not elimination.
- Check for loose end caps: Missing or cracked caps whistle at speed
- Inspect rubber pads: Worn or shifted pads allow metal-on-metal contact
- Load distribution matters: Unevenly loaded bars vibrate more than balanced ones
DREAMIZER Universal Roof Rack Cross Bars, 54"
Wide 54-inch aerodynamic crossbars with glossy black finish. The teardrop profile reduces wind noise — a smart pick for full-size truck owners.
Check Price On AmazonIf you click this link and buy, we earn a commission at no additional cost to you.

What Are the Most Common Installation Mistakes?
Even experienced DIYers make preventable errors with roof rack installations. Here are the top mistakes that lead to damage, noise, or dangerous cargo loss — and how to avoid each one.
- Exceeding roof load capacity: Your truck's roof has a dynamic load rating (while driving) and a static load rating (while parked). The dynamic rating is always lower — often 100-200 lbs total including the rack's own weight. Check your owner's manual or the NHTSA vehicle safety resources for guidance.
- Forgetting to re-torque: Clamps loosen after the first few drives. Schedule a re-check at 50 miles, 200 miles, and then monthly.
- Skipping waterproofing: Every bolt hole and clamp point needs a rubber gasket or butyl tape. Water finds its way in through the smallest gap and causes rust, mold, and headliner stains.
- Wrong crossbar spacing: Bars too close together won't support long cargo. Bars too far apart put uneven stress on the mounting points. Follow the manufacturer's recommended spacing range.
- Ignoring vehicle height increase: A loaded roof rack adds 6-12 inches to your truck's total height. Park in multi-story garages or go through drive-throughs at your own risk.
One frequently overlooked issue is paint protection. Even "no-drill" clamp systems can mark your paint over time if you don't use protective film or keep rubber pads clean. Inspect under the clamps every time you remove the rack.
Finally, never install a roof rack alone if it requires roof-top work. Dropping a 15-pound aluminum crossbar onto a painted roof causes instant damage. A second pair of hands makes the job faster and safer — especially for truck cabs where the roof is 5-6 feet off the ground.
The same careful approach applies to any bolt-on truck accessory. If you're planning more exterior mods, quality wind deflectors complement a roof rack setup nicely and help with cab airflow.
Related Articles
- Best Truck Roof Racks for Camping Gear — Comprehensive review of top-rated truck roof racks, helping readers choose the right rack before installation
- Best Truck Bed Racks for Overlanding — Alternative rack mounting approach using bed rails instead of the cab roof
- How to Install Fender Flares on Your Truck — Related exterior installation project that uses similar tools
- How to Install Mud Flaps on a Truck — Complementary exterior accessory that protects gear from road spray
- Best Truck Wind Deflectors for Rain & Wind — Wind deflectors complement roof racks by improving cab airflow and reducing overall noise
Conclusion
Recommended Products
Seah Hardware Universal Roof Rack Cross-Bars 2 PC.
Affordable universal crossbar set with adjustable clamps that fit most truck cab widths. Ideal for first-time installers who want a no-drill solution.
Check Price On AmazonIf you click this link and buy, we earn a commission at no additional cost to you.
MELIPRON 60" Truck Topper Roof Rack for Pickup Truck Cap
Heavy-duty aluminum rack built specifically for camper shells with 500 lb capacity. The go-to choice for topper owners who need serious load support.
Check Price On AmazonIf you click this link and buy, we earn a commission at no additional cost to you.
VEVOR Extendable Steel Truck Ladder Rack - 800 lbs Capacity
Adjustable bed-rail-mounted rack that extends from 46 to 71 inches — fits short and long beds without drilling. Perfect for hauling ladders and kayaks.
Check Price On AmazonIf you click this link and buy, we earn a commission at no additional cost to you.
DREAMIZER Universal Roof Rack Cross Bars, 54"
Wide 54-inch aerodynamic crossbars with glossy black finish. The teardrop profile reduces wind noise — a smart pick for full-size truck owners.
Check Price On AmazonIf you click this link and buy, we earn a commission at no additional cost to you.
Frequently Asked Questions
How much weight can a truck roof rack hold?
Can you install a roof rack without drilling?
Do roof racks damage your truck's paint?
How long does it take to install a roof rack on a truck?
Why does my roof rack make a humming noise at highway speed?
Do I need a roof rack with side rails or without?
Can a roof rack affect my truck's fuel economy?
What's the difference between a roof rack and a ladder rack?
Affiliate Disclosure: This article contains affiliate links. If you purchase through these links, we may earn a commission at no extra cost to you.