How to Wire Auxiliary Lights on Your Truck
Key Takeaways
- Wiring auxiliary lights takes 2-4 hours and requires a 30-40 amp relay-based wiring harness for any light over 5 amps.
- Always connect the positive lead directly to the battery through an inline fuse — never tap into existing vehicle circuits.
- Use 14 AWG wire for runs under 15 feet and 12 AWG for longer runs to prevent voltage drop and overheating.
- Mount the relay within 12 inches of the battery and route wires away from heat sources like the exhaust manifold.
- Test each connection with a multimeter before final assembly to catch shorts, bad grounds, and reversed polarity early.
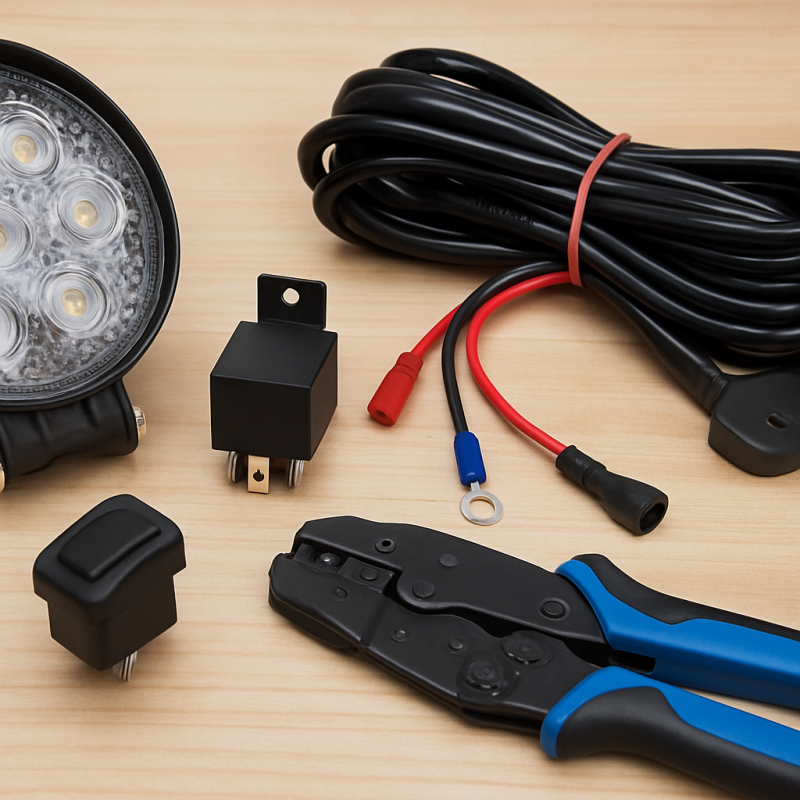
What Tools and Materials Do You Need?
Before you touch a single wire, gather everything you need. Most auxiliary light installs use the same core supplies regardless of whether you're wiring pod lights, ditch lights, or a full light bar.
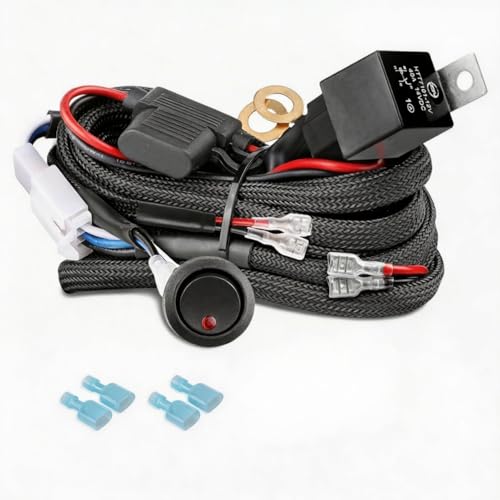
- Wiring harness with relay: A pre-built kit like the Nirider 12V 40A relay harness includes everything pre-terminated
- 14 AWG primary wire: For runs from the relay to lights under 15 feet
- Heat shrink tubing and crimp connectors: Marine-grade adhesive-lined for outdoor durability
- Inline fuse holder: Sized to match your light's amperage draw plus 25%
- Wire loom or split tubing: Protects wires from chafing on metal edges
You'll also need basic hand tools: a wire crimper, wire strippers, heat gun, multimeter, and a 10mm socket for battery terminals. A test light is helpful but not mandatory if you have a multimeter.
- Drill and step bit: Only if you need to make a new firewall pass-through
- Zip ties (UV-rated): At least 30 — you'll use them all
- Dielectric grease: Apply to every connection exposed to weather
For longer light bar runs or A-pillar installs, the Nilight 14 AWG 10-foot extension kit saves time over building extensions from scratch. If you're wiring multiple light circuits or running custom lengths, pick up a spool of 14 AWG 2-conductor wire in 30-foot length.
Budget $40-$80 for a complete setup if you don't already have the tools. Total install time runs 2-4 hours for a first-timer.
Nirider 12V 40A Rocker Switch Relay Wiring Harness Kit
Complete pre-terminated harness with relay, fuse, and rocker switch — the easiest way to wire any LED light up to 480 watts safely. Includes everything needed for a single-circuit install.
Check Price On AmazonIf you click this link and buy, we earn a commission at no additional cost to you.

How Does a Relay-Based Wiring Harness Work?
A relay is an electromagnetic switch that lets a small current control a much larger one. This protects your dashboard switch from the high amperage your lights draw and prevents wiring fires.
Here's the simplified flow: when you flip the cab switch, a small signal current energizes the relay coil. That coil pulls a contact closed, which then allows full battery current to flow through heavy-gauge wire directly to your lights.
- Pin 30: Constant power input from battery (through main fuse)
- Pin 87: Switched power output to your lights
- Pin 86: Trigger signal from your switch (positive)
- Pin 85: Ground for the relay coil
Why does this matter? A 180-watt LED light bar pulls roughly 15 amps at 12 volts. Running that through a typical dashboard rocker switch rated for 5-10 amps will melt the switch contacts within weeks. A relay isolates that high current entirely.
The YCHOW-TECH 40A wiring harness handles up to 480 watts of LED lighting safely. According to Blue Sea Systems' marine wiring standards, 14 AWG wire safely carries 15-20 amps over short runs — perfect for most pod and ditch light setups.
If you want a wireless option without running switch wires through the firewall, the Nilight remote wiring harness uses an RF key fob to trigger the relay — ideal for renters or anyone avoiding interior trim removal.
YCHOW-TECH 12V 40A Wiring Harness Kit
Robust nylon-jacketed harness with weatherproof connectors. A great budget alternative for installers who want quality components without premium pricing.
Check Price On AmazonIf you click this link and buy, we earn a commission at no additional cost to you.
Nilight Wireless Remote Wiring Harness
Includes RF remote control so you can skip running a switch wire through the firewall. Perfect for renters or anyone wanting a no-drill install.
Check Price On AmazonIf you click this link and buy, we earn a commission at no additional cost to you.

How Do You Mount the Lights and Plan the Wire Route?
Before pulling out the crimpers, figure out exactly where your lights will live and how the wires will get there. Planning the route now saves an hour of re-routing later.
Common mounting locations and their wire path requirements:
- Bumper-mounted pods: Run wires up behind the bumper, along the frame rail, into the engine bay
- A-pillar ditch lights: Route through the door jamb seal or factory firewall grommet
- Roof-mounted light bar: Run wires down the windshield A-pillar trim or through the headliner
- Hood-mounted bar: Tuck wires along the hood seam and connect to a hood-side junction
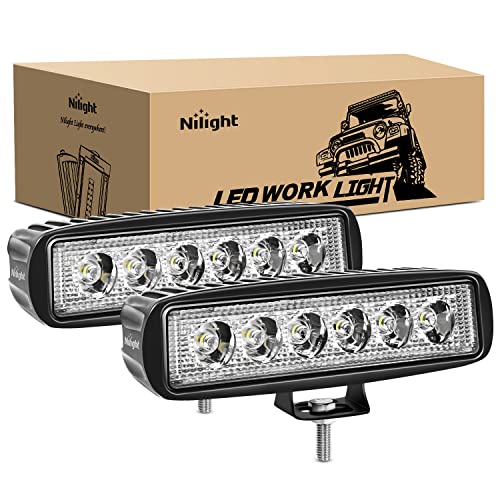
For most truck owners doing their first install, compact pod lights like the Nilight 18W flood pods mount cleanly to bumper brackets or bull bars with the included hardware. They draw just 1.5 amps each, making them ideal for first-time wiring projects.
If you want a tighter beam pattern for distance lighting, the Nilight 18W spot pods use the same wiring approach but throw light 200+ feet downrange.
Always identify your firewall pass-through point before drilling. Most trucks have a factory rubber grommet on the driver's side firewall — pop it out, slice a small X with a utility knife, and feed your switch wire through. This is dramatically cleaner than drilling a new hole. For more lighting placement ideas, our guide on choosing the right LED light bar covers beam pattern, lumens, and form factor in depth.
Nilight 18W Flood LED Pods (Pair)
Compact, low-draw flood pods perfect for first-time wiring projects. Drawing just 1.5 amps each, they work with virtually any relay harness.
Check Price On AmazonIf you click this link and buy, we earn a commission at no additional cost to you.
How Do You Wire the Relay and Battery Connections?
This is where most installs go wrong. Take your time and follow the sequence exactly — wire the battery connection last, after everything else is in place.
Step-by-step relay wiring sequence:
- Mount the relay within 12 inches of the battery using a self-tapping screw or zip tie to a solid surface — never near the exhaust
- Connect Pin 87 (output) to your light's positive lead, routing through your planned wire path
- Connect Pin 85 (ground) to a clean, paint-free chassis ground point
- Connect Pin 86 (trigger) to your dashboard switch's output terminal
- Connect Pin 30 (power) through an inline fuse to the battery positive terminal
The inline fuse is non-negotiable. The National Electrical Code principles require overcurrent protection on every circuit — for auxiliary lights, place the fuse within 6 inches of the battery so a chafed wire short can't ignite before the fuse blows.
- For lights under 5 amps total: Use a 7.5A fuse
- For 5-10 amp loads: Use a 15A fuse
- For 10-20 amp loads (light bars): Use a 25-30A fuse
- For loads over 20 amps: Upgrade to 12 AWG wire and a 40A fuse
Your switch trigger wire (Pin 86) needs a switched 12V source for ignition-controlled operation, or you can run it to a constant power source if you want the lights to work with the engine off. Most factory fuse boxes have an empty "add-a-fuse" slot that's switched with the ignition — perfect for tying in the trigger wire.
How Do You Route Wires Through the Firewall?
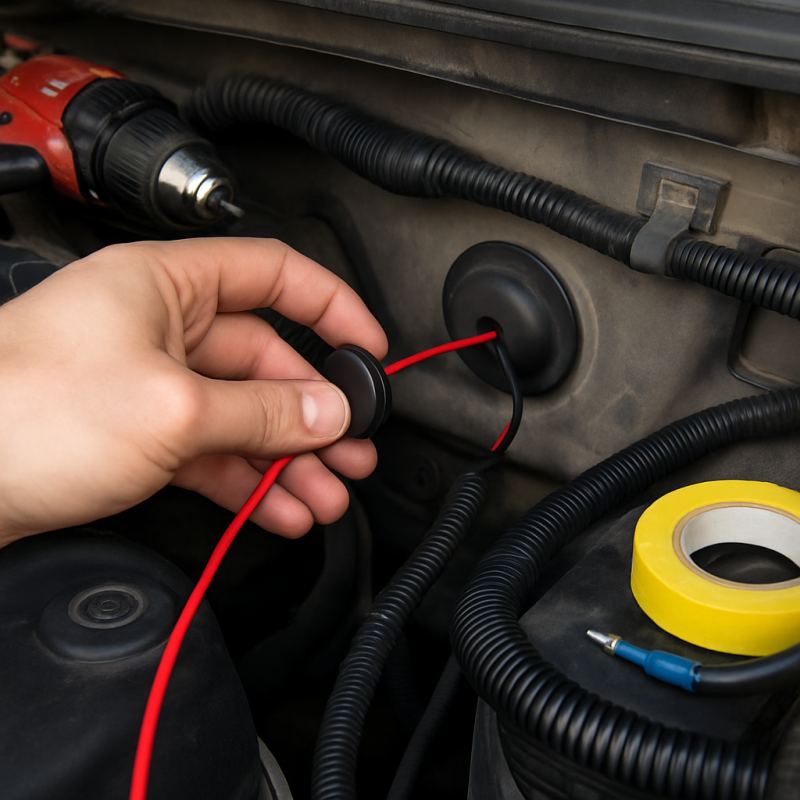
The firewall pass-through is the trickiest part of any install. Done right, it's invisible and weatherproof. Done wrong, you get water leaks, exhaust fumes in the cabin, or chafed wires shorting against sheet metal.
Always use an existing factory grommet when possible. Look for a large rubber plug on the driver's side firewall, usually behind the brake booster or near the steering column.
- Pull the grommet out from inside the cab using needle-nose pliers
- Cut a small X with a utility knife — just big enough for your wire
- Feed a stiff wire or coat hanger through first to act as a fish tape
- Tape your trigger wire to the fish and pull it through
- Reseal with silicone or dielectric grease around the entry point
If no factory grommet exists, you'll need to drill. Use a step bit to make a clean 3/8" hole, install a rubber grommet, then run your wire through. Always sand the hole edges and apply touch-up paint to prevent rust.
Inside the cab, route the trigger wire under the carpet edge or behind the kick panel — never across the floor or around pedals where it can snag. Mount your switch in an empty dash blank or a panel-mount location within easy reach but not where it'll be hit accidentally.
For complex multi-light setups, our walkthrough on installing truck bed lights covers similar wire routing techniques you can apply to bed-mounted auxiliary lighting too.
Nilight 14 AWG Wiring Harness Extension Kit
Pre-terminated 10-foot extension with weatherproof connectors. Saves time when running lights to A-pillar or roof-mounted locations.
Check Price On AmazonIf you click this link and buy, we earn a commission at no additional cost to you.

How Do You Ground the System Properly?
Bad grounds cause more auxiliary light failures than any other single issue. A loose or corroded ground will make lights flicker, dim, or fail completely — even when every other connection is perfect.
Two grounding rules to follow religiously:
- Always ground to bare metal: Sand off paint, primer, and undercoating until you see shiny steel
- Use a star washer: The teeth bite through any oxidation that forms over time
Never ground to a bumper bolt, license plate bracket, or anything that bolts through plastic or rubber. These create high-resistance connections that work fine when new but fail within months. Instead, use a dedicated chassis ground point — typically a frame rail bolt, the engine block, or the negative battery terminal directly.
- Drill or locate a clean ground point near your light
- Sand a 1-inch circle around the bolt down to bare metal
- Crimp a ring terminal onto your ground wire
- Stack the ring terminal with a star washer between it and the chassis
- Apply dielectric grease over the finished connection
For long wire runs over 20 feet, voltage drop becomes a real problem. West Marine's wire sizing reference shows that 14 AWG over 25 feet at 15 amps drops nearly 1 full volt — enough to noticeably dim LED outputs. For runs over 20 feet, upgrade to 12 AWG wire on both the positive and ground sides.
If you're adding multiple lighting circuits, consider running a single heavy ground wire from the battery to a distribution block in the engine bay, then ground each circuit there. This eliminates ground loop issues across multiple auxiliary systems.
HONENCN 14 AWG 2-Conductor Wire (30 ft)
Bulk wire for custom-length runs and multiple light circuits. Flexible PVC jacket holds up well in engine bay and chassis routing.
Check Price On AmazonIf you click this link and buy, we earn a commission at no additional cost to you.

How Do You Test the Installation Before Final Assembly?
Resist the urge to button everything up and flip the switch. Testing each stage catches mistakes while they're still easy to fix.
Test sequence using a multimeter:
- Continuity check: With the battery disconnected, verify continuity from the relay output to each light's positive terminal
- Ground check: Verify continuity from each ground wire to the battery negative post — should read under 0.5 ohms
- Polarity check: Reconnect the battery and use the multimeter on DC volts to confirm 12V at the light connector when the switch is on
- Amperage check: Use a clamp meter on the positive lead — verify draw matches the light's spec (within 10%)
- Function check: Power the lights and confirm full brightness with no flickering
Common test failures and fixes:
- Lights don't come on: Check the relay clicks when switched — if not, trigger wire is bad
- Lights are dim: Voltage drop from undersized wire or bad ground
- Fuse blows immediately: Short circuit somewhere in the positive line — inspect for pinched wires
- Lights flicker: Loose connection or marginal ground point
- Lights work but won't turn off: Relay contacts welded shut from undersized relay
Once everything tests clean, secure all wires with UV-rated zip ties every 8-12 inches. Wrap any wires near heat sources with split loom or high-temp fiberglass sleeving. Finally, take a photo of your finished wiring with the relay and fuse locations — future-you will thank present-you when something needs troubleshooting two years later.
What Are the Most Common Wiring Mistakes to Avoid?
After you've installed a few sets of auxiliary lights, you start to see the same mistakes repeatedly. Avoid these and your install will outlast the truck itself.
- Skipping the relay: Wiring lights directly to a switch will melt the switch and potentially start a fire
- Using the wrong wire gauge: Undersized wire overheats; oversized wire is wasteful but at least safe
- No fuse near the battery: Without a fuse within 6 inches of the battery, a short anywhere in the run becomes a fire
- Tapping into existing circuits: Factory wiring is sized for factory loads — adding lights overloads it
- Using wire nuts or electrical tape: These fail under vibration and moisture; always use crimps with adhesive heat shrink
Another common error: mounting the relay in the engine bay where it gets soaked or roasted. Find a spot that stays dry and below 180°F — typically the inner fender well or a sheltered spot near the firewall.
Don't forget to check your local laws. NHTSA regulations and most state vehicle codes require auxiliary lights to be covered or aimed downward when driving on public roads. Many states also prohibit forward-facing colored lights other than amber. A simple light cover or wiring through a dedicated "off-road only" switch keeps you compliant.
Finally, don't undersize your install for future expansion. If there's any chance you'll add more lights later, run a 40A relay and 12 AWG wire from day one. Upgrading the wiring later means redoing everything. For comparison shopping on different light styles before you commit, browse our roundup of top off-road driving lights and the best fog lights for safe driving to see which lighting configuration best fits your needs.
Related Articles
- Best LED Light Bars for Trucks — Detailed guide to choosing the right LED light bar by beam pattern, lumens, and mounting style
- How to Install Truck Bed Lights — Companion install guide covering similar wire routing techniques for bed-mounted lighting
- Best Off-Road Driving Lights for Trucks — Roundup of the top driving lights to wire into your new auxiliary circuit
- Best Truck Fog Lights for Safe Driving — Reviews of fog lights compatible with the relay-based wiring approach in this guide
Conclusion
Recommended Products
Nirider 12V 40A Rocker Switch Relay Wiring Harness Kit
Complete pre-terminated harness with relay, fuse, and rocker switch — the easiest way to wire any LED light up to 480 watts safely. Includes everything needed for a single-circuit install.
Check Price On AmazonIf you click this link and buy, we earn a commission at no additional cost to you.
YCHOW-TECH 12V 40A Wiring Harness Kit
Robust nylon-jacketed harness with weatherproof connectors. A great budget alternative for installers who want quality components without premium pricing.
Check Price On AmazonIf you click this link and buy, we earn a commission at no additional cost to you.
Nilight Wireless Remote Wiring Harness
Includes RF remote control so you can skip running a switch wire through the firewall. Perfect for renters or anyone wanting a no-drill install.
Check Price On AmazonIf you click this link and buy, we earn a commission at no additional cost to you.
Nilight 18W Flood LED Pods (Pair)
Compact, low-draw flood pods perfect for first-time wiring projects. Drawing just 1.5 amps each, they work with virtually any relay harness.
Check Price On AmazonIf you click this link and buy, we earn a commission at no additional cost to you.
Nilight 14 AWG Wiring Harness Extension Kit
Pre-terminated 10-foot extension with weatherproof connectors. Saves time when running lights to A-pillar or roof-mounted locations.
Check Price On AmazonIf you click this link and buy, we earn a commission at no additional cost to you.
HONENCN 14 AWG 2-Conductor Wire (30 ft)
Bulk wire for custom-length runs and multiple light circuits. Flexible PVC jacket holds up well in engine bay and chassis routing.
Check Price On AmazonIf you click this link and buy, we earn a commission at no additional cost to you.
Frequently Asked Questions
Do I need a relay to wire auxiliary lights?
What gauge wire should I use for auxiliary lights?
Can I wire auxiliary lights to my high beams?
How long does it take to wire auxiliary lights?
Where should I mount the relay?
Do I need a fuse if my wiring harness already has a relay?
Can auxiliary lights drain my battery?
Are auxiliary lights legal on public roads?
Affiliate Disclosure: This article contains affiliate links. If you purchase through these links, we may earn a commission at no extra cost to you.