How to Install Truck Bed Lights
Key Takeaways
- Most LED truck bed light kits install in 30-60 minutes with basic hand tools and no drilling required.
- Always disconnect your truck's battery before starting any electrical work to prevent shorts and shocks.
- Route wiring through existing rubber grommets or factory plugs to keep your bed watertight.
- Mounting lights along the upper bed rail or under the rail lip provides the most even illumination.
- A switched circuit tied to an ignition-hot source prevents accidental battery drain when parked.
Tools and Materials You'll Need
Before you start, gather everything so you're not running back to the garage mid-install. The exact tools depend on your kit type, but this list covers 99% of LED bed light installations.
- Socket set or wrench set: 10mm socket for battery terminal removal
- Wire strippers and crimpers: for making clean, reliable connections
- Electrical tape and heat-shrink tubing: to weatherproof every splice
- Test light or multimeter: to verify power sources before tapping in
- Zip ties: for routing and securing wiring along the frame
- Rubbing alcohol and clean rags: to prep surfaces for adhesive mounting
- Drill with small bit (optional): only if you need to pass wires through a panel
- Rubber grommets: to seal any holes you drill
For the lights themselves, a purpose-built kit is the easiest route. Pod-style kits like the Nilight 8-piece LED rock light kit come with everything you need — pods, wiring harness, and a switch. Strip-style kits are another solid option if you want more even light distribution.
If your kit doesn't include a switch, pick up a simple SPST rocker switch and an inline fuse holder with a 5-amp fuse. You'll also want a few butt connectors and ring terminals on hand for clean electrical connections.
Nilight 8PCS 24LED Rock Light Truck Bed Kit
A reliable 8-pod white LED kit with both adhesive and screw mounting options. Includes wiring harness, switch, and inline fuse — everything you need for a complete install.
Check Price On AmazonIf you click this link and buy, we earn a commission at no additional cost to you.

Planning Your Light Layout
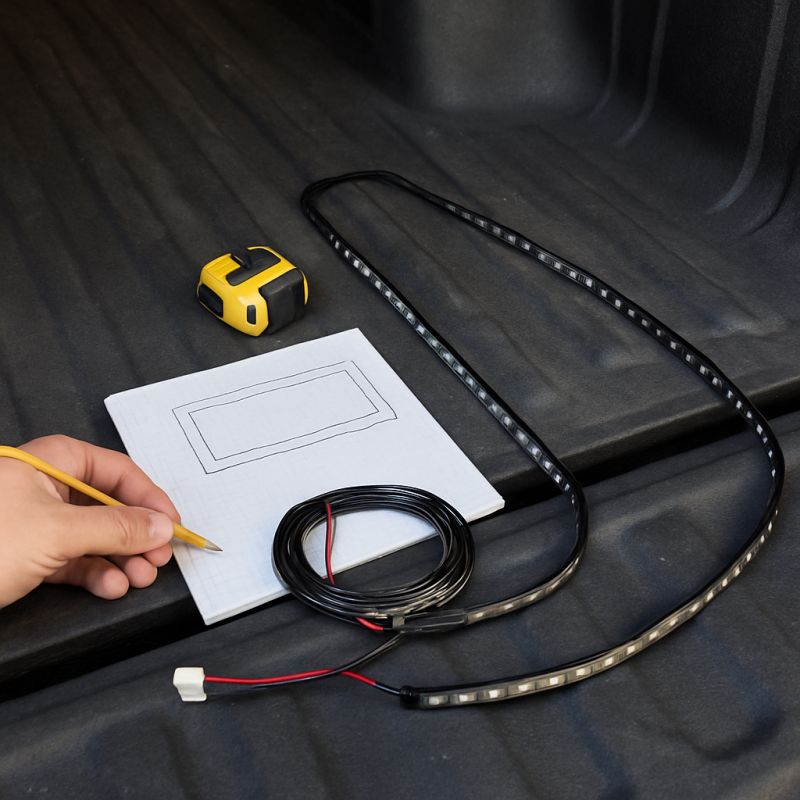
Resist the urge to just start sticking lights wherever. Spending 10 minutes on layout planning saves you from uneven coverage, wasted wire, and re-dos.
The goal is even illumination across the entire bed floor with no dark spots. Here's how to think about placement:
- Pod-style lights (rock lights): Mount 2-4 pods per side along the upper bed rail, spaced evenly. Most 8-piece kits give you 4 per side, which covers a standard 5.5- to 6.5-foot bed perfectly.
- LED strip lights: Run one strip along each upper bed rail. For wider beds, add a third strip across the front wall beneath the cab window.
- Tailgate area: Place at least one pod or short strip near the tailgate for loading zone illumination.
Before mounting anything, lay the lights in position with the wiring loosely routed and test-fit the entire run. Check that the harness reaches your power source with some slack. Mark each mounting position with painter's tape.
Consider how you use your bed. If you frequently haul tall items, mount lights under the bed rail lip so they're protected from cargo contact. If your bed has a protective bed liner, you can mount directly onto it — the textured surface actually holds adhesive well once cleaned.
Also think about where you'll route the main harness wire from the bed into the cab or engine bay. Look for existing rubber grommets behind the tail lights or along the bed floor near the cab — these are your best friends for clean wire routing.
Disconnecting the Battery and Prep Work
This step is non-negotiable. Always disconnect the negative battery terminal before doing any electrical work on your truck. A single accidental short can blow fuses, fry modules, or worse.
- Pop the hood and locate the negative (−) battery terminal — it's marked with a minus sign and usually has a black cable.
- Use a 10mm socket to loosen the terminal clamp nut. You don't need to fully remove the nut — just loosen until the clamp slides off.
- Tuck the cable aside so it can't accidentally contact the terminal. Wrap it with a rag if needed.
- Wait 2-3 minutes before starting work. This lets residual capacitance in the system discharge.
With the battery disconnected, prep your bed surfaces. Adhesive-backed lights need clean, dry, grease-free surfaces to bond properly. Here's the prep process:
- Clean each mounting location with rubbing alcohol and a lint-free cloth
- Let the alcohol fully evaporate before applying any adhesive (about 60 seconds)
- Check the temperature: most 3M adhesive tape needs surfaces above 50°F to bond properly. If it's cold out, use a hair dryer to warm the mounting area.
If your truck has a spray-in bed liner, the textured surface works well with adhesive. Drop-in plastic liners are trickier — the smooth surface can cause lights to pop off. For plastic liners, consider using the included screws or adding a small dot of silicone adhesive as a backup. Some truck owners also use rubber bed mats and mount pods along the rail above the mat line to avoid interference.
Mounting the LED Light Pods or Strips
With your layout planned and surfaces prepped, it's time to mount. The process differs slightly between pod-style and strip-style kits, but the principles are the same.
For pod-style rock lights:
- Peel the adhesive backing on the first pod and press it firmly into your marked position. Hold for 30 seconds.
- If using screws: hold the pod in place, mark the screw holes with a pencil, drill pilot holes with a small bit, and drive the included screws. Use a rubber grommet or dab of silicone on each screw to prevent water intrusion.
- Repeat for each pod, working front to back on one side before switching to the other.
- Tuck the lead wire from each pod behind the bed rail or into the gap between the bed wall and liner.
The Xprite 8-piece LED bed light kit is a popular pod-style option that includes both adhesive tape and screws, giving you mounting flexibility regardless of your bed surface.
For LED strip lights:
- Measure and cut the strip to length if needed — only cut at the marked cut points.
- Clean the mounting channel along the top of the bed rail.
- Peel and stick the adhesive strip in a straight line, pressing firmly every few inches.
- Secure with zip ties every 12 inches through the strip's mounting clips for extra hold.
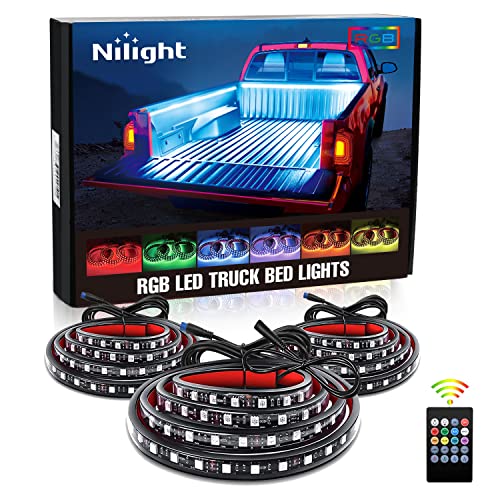
If you want color-changing options, RGB strip kits like the Nilight 3-piece RGB truck bed light strip kit install the same way but add a control module you'll mount inside the bed rail channel. The included RF remote lets you switch colors without phone pairing.
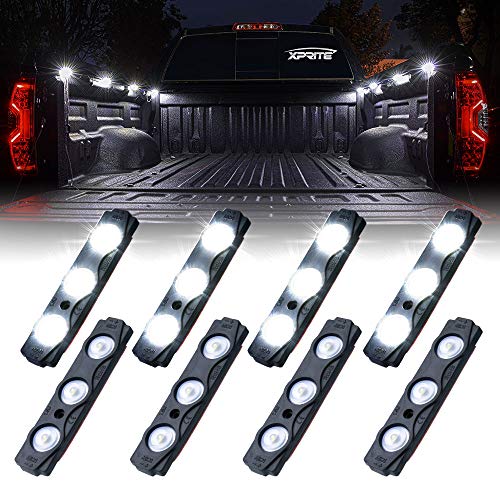
Xprite White 24 LED Truck Bed Light Kit
Versatile 8-piece pod kit that works for truck beds, cargo areas, and under-vehicle accent lighting. Dual mounting options and a compact pod design make installation straightforward.
Check Price On AmazonIf you click this link and buy, we earn a commission at no additional cost to you.
Wiring and Routing the Harness
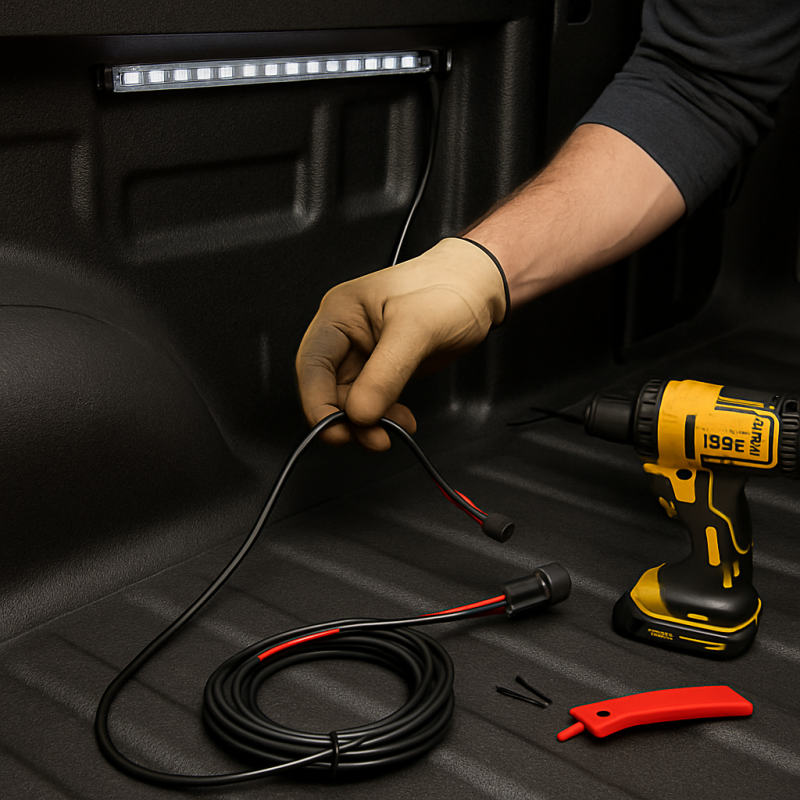
Clean wiring separates a professional-looking install from a hack job. Take your time here — it's the most important step for long-term reliability.
Step 1: Gather the pod wires into the main harness.
- Run each pod's lead wire along the bed rail toward the front of the bed
- Bundle wires together with zip ties every 8-12 inches
- Keep wires tucked behind the bed rail lip or under the rail cap where they're protected from cargo
Step 2: Route the harness into the cab or engine bay.
- Best option: Find an existing rubber grommet on the cab wall behind the bed. Many trucks have a factory grommet near the driver's side tail light area. Poke a small hole through it, feed the wire, and seal with silicone.
- Alternate option: Route the wire under the truck along the frame rail to the engine bay. Use zip ties to secure it to existing wiring looms or brake lines every 12 inches. Keep wire away from exhaust components.
Step 3: Make your connections.
For a basic switched setup, you need three connections:
- Power (positive): Connect to an ignition-hot fuse slot using an add-a-fuse adapter, or run a dedicated wire to the battery through the included inline fuse
- Ground (negative): Attach a ring terminal to the ground wire and bolt it to a clean, bare-metal point on the chassis
- Switch: Wire the included toggle or rocker switch inline on the positive wire, mount it in a convenient dash location
Every connection should be crimped, soldered, or both — never just twist and tape. Slide heat-shrink tubing over each splice before crimping, then shrink with a lighter or heat gun. This weatherproofs the joint and prevents corrosion. For more on truck lighting upgrades, check out our roundup of the best truck bed lights to see how different kits compare.
Connecting Power and Testing
With everything mounted and wired, it's time to power up. This is the moment of truth — but don't rush it. Double-check every connection before reconnecting the battery.
- Verify all splices are insulated — no bare copper visible anywhere
- Confirm the inline fuse is installed (most kits include a 3A or 5A fuse)
- Check that the switch is in the OFF position
- Reconnect the negative battery terminal and tighten the 10mm nut snugly
Now flip the switch. All pods or strips should illuminate evenly. If they do — congratulations, you're nearly done. If not, see the troubleshooting section below.
Test these specific scenarios:
- Switch on/off: Lights should respond immediately with no flickering
- Engine off test: If wired to an ignition-hot source, lights should NOT work with the key off (this prevents battery drain)
- Engine running test: No dimming or flickering at idle — this confirms a solid ground connection
- Vibration check: Close the tailgate firmly and drive around the block. Re-check that no pods have shifted
If you wired directly to the battery (always-hot), your lights will work regardless of key position. This is fine as long as you remember to turn them off. For a more foolproof setup, use an add-a-fuse adapter on an ignition-switched fuse — typically the accessory or radio fuse in your under-hood or kick-panel fuse box.
Once everything checks out, do a final tidy-up pass: snip excess zip tie tails, tuck any loose wire, and make sure nothing hangs below the frame where it could snag.
Choosing Between Pod Lights and Strip Lights
Not sure which style is right for your truck? Both get the job done, but they have distinct advantages. Here's a quick breakdown to help you decide.
| Feature | Pod-Style Lights | LED Strip Lights |
|---|---|---|
| Installation Ease | Very easy — stick or screw | Easy — peel and stick |
| Light Distribution | Focused bright spots | Even, diffused glow |
| Durability | Excellent — thick housing | Good — flexible but exposed |
| Color Options | Usually white only | RGB options available |
| Price Range | $15-$40 | $25-$60 |
| Best For | Work trucks, utility use | Show trucks, custom looks |
Pod-style lights like the NBWDY 48 LED truck bed light kit are the workhorse choice. Their compact housings resist impact from cargo, and the focused output makes them ideal for illuminating specific zones. Most kits give you 8 pods, which is plenty for full-bed coverage.
LED strip lights deliver a more uniform glow and look cleaner in beds without liners. They're the better pick if aesthetics matter to you or if you want RGB color-changing features for shows or camping setups. The SWATOW Industries RGB LED bed light kit even offers Bluetooth smartphone control for color changes on the fly.
For pure work use — loading tools, checking cargo at night, illuminating a campsite — white pod lights win on durability and value. For a truck that pulls double duty between work and weekend play, an RGB strip kit gives you versatility. Either way, installation follows the same basic steps outlined in this guide. For a side-by-side look at top-rated options, check out our review of the best LED light bars for trucks.
Nilight 3PCS 60 Inch RGB Truck Bed Light Strip Kit
Color-changing RGB strip kit with 270 LEDs and RF remote control. Perfect for truck owners who want both functional white light and customizable accent colors for shows or camping.
Check Price On AmazonIf you click this link and buy, we earn a commission at no additional cost to you.
Troubleshooting Common Issues
Even a clean install can hit a snag. Here are the most common problems and how to fix them fast.
No lights come on at all:
- Check the fuse: The inline fuse is the first thing to inspect. Pull it and look for a broken filament. Replace with the same amperage.
- Test the switch: Bypass it temporarily by connecting the two wires directly. If lights work, the switch is faulty.
- Verify power at source: Use a test light on the fuse tap or battery terminal connection. No power means a wiring issue upstream.
- Check ground: A loose or corroded ground connection is the #1 cause of LED lighting failures. Sand the grounding point down to bare metal and retighten.
Lights flicker or dim:
- Bad ground connection: This causes about 80% of flickering issues. Remove the ring terminal, clean the contact area, and retighten.
- Loose splice: Check every butt connector and crimp. A weak crimp can pass enough current to light up but creates intermittent contact under vibration.
- Voltage drop: If you ran a very long wire (over 15 feet), use a thicker gauge. 18-gauge wire is fine for most kits, but runs over 20 feet should use 16-gauge.
Some pods work, others don't:
- Check individual connections: Follow the harness to the dead pod and inspect the connector. Many kits use plug-in connectors that can work loose.
- LED failure: Rare but possible. Swap the non-working pod to a known-good location. If it still doesn't light, the pod itself is defective — contact the manufacturer for warranty replacement.
Lights stay on when truck is off:
- You wired to a constant-hot source instead of an ignition-switched source. Move the power tap to an ignition-hot fuse slot, or simply remember to use the switch.
If you're also upgrading other lighting on your truck, our guide to the best truck tail lights covers compatible upgrades that complement bed lighting installs.
Related Articles
- Best Truck Bed Lights for Nighttime Loading — Comprehensive review of top-rated truck bed light kits, directly relevant to readers choosing a kit before installation
- Best Truck Bed Liners for Protection — Bed liners affect mounting method and adhesive performance for bed light installations
- Best Truck Bed Mats for Every Pickup — Bed mats can interfere with light pod placement, relevant to mounting considerations
- Best LED Light Bars for Trucks — Related truck lighting upgrade that readers interested in bed lights may also consider
- Best Truck Tail Lights for Safe Towing — Complementary lighting upgrade often done alongside bed light installations
Conclusion
Recommended Products
Nilight 8PCS 24LED Rock Light Truck Bed Kit
A reliable 8-pod white LED kit with both adhesive and screw mounting options. Includes wiring harness, switch, and inline fuse — everything you need for a complete install.
Check Price On AmazonIf you click this link and buy, we earn a commission at no additional cost to you.
Xprite White 24 LED Truck Bed Light Kit
Versatile 8-piece pod kit that works for truck beds, cargo areas, and under-vehicle accent lighting. Dual mounting options and a compact pod design make installation straightforward.
Check Price On AmazonIf you click this link and buy, we earn a commission at no additional cost to you.
Nilight 3PCS 60 Inch RGB Truck Bed Light Strip Kit
Color-changing RGB strip kit with 270 LEDs and RF remote control. Perfect for truck owners who want both functional white light and customizable accent colors for shows or camping.
Check Price On AmazonIf you click this link and buy, we earn a commission at no additional cost to you.
Frequently Asked Questions
How long does it take to install truck bed lights?
Do I need to drill holes to install bed lights?
Will truck bed lights drain my battery?
Can I install bed lights on a truck with a tonneau cover?
What gauge wire should I use for truck bed lights?
Are LED truck bed lights waterproof?
Can I wire bed lights to my existing bed light switch?
How many lumens do I need for truck bed lights?
Affiliate Disclosure: This article contains affiliate links. If you purchase through these links, we may earn a commission at no extra cost to you.