How to Set Up Campsite Lighting From Your Truck
Key Takeaways
- A basic campsite lighting setup using rechargeable LED lights takes under 15 minutes and requires no wiring or electrical knowledge.
- 12V LED lights connected directly to your truck battery provide the brightest, most reliable campsite illumination but require a secondary battery or isolator to prevent drain.
- Positioning lights at multiple heights — truck bed, tailgate, and overhead canopy — eliminates shadows and covers your entire campsite.
- Solar-charged and USB-rechargeable lights work as excellent backup options and reduce dependency on your truck's electrical system.
- Always carry a voltage monitor or battery disconnect switch to protect your truck's starting battery when running campsite lights overnight.
What Tools and Materials Do You Need?
Setting up campsite lighting from your truck requires minimal tools and materials. Most setups take 15-30 minutes depending on whether you're using plug-and-play rechargeable lights or hardwiring 12V fixtures.
Here's everything you'll need for a complete campsite lighting setup:
- LED light strips or porch lights: 12V DC-powered units rated IP65 or higher for weather resistance
- Power source: your truck's 12V outlet, a portable power station, or direct battery connection
- Wiring supplies (for hardwired setups): 16-gauge wire, inline fuse holder, ring terminals, and heat shrink tubing
- Mounting hardware: magnetic mounts, clamps, zip ties, or 3M adhesive strips
- Wire strippers and crimping tool: for making clean electrical connections
- Voltage multimeter: to check battery health and verify connections
- Extension cord (12V): cigarette lighter extension or SAE cable for reaching distant light positions
For a no-tools approach, rechargeable LED lights like the SUNPIE Rechargeable Truck Bed Lights come with magnetic mounts and built-in batteries, so you can skip the wiring entirely. These are ideal for beginners or anyone who wants a quick campsite lighting solution.
If you already have truck bed lights installed, you're halfway there — those same 12V circuits can power additional exterior lights with a simple splitter.
SUNPIE Rechargeable Truck Bed Lights
Rechargeable LED lights with magnetic mounts and built-in Type-C battery — perfect for beginners who want a no-wiring campsite lighting solution that sets up in minutes.
Check Price On AmazonIf you click this link and buy, we earn a commission at no additional cost to you.

How Does Your Truck's Electrical System Power Campsite Lights?
Your truck's 12V electrical system is essentially a portable power plant. The battery stores energy, the alternator recharges it while driving, and the existing wiring provides multiple access points for campsite lighting. Understanding this system helps you set up lights safely without risking a dead battery.
There are three main ways to tap into your truck's power for campsite lighting:
- 12V cigarette lighter outlet: the easiest option — plug in and go. Most outlets provide 10-15 amps, enough for several LED light strips. Some trucks have bed-mounted 12V outlets that are even more convenient.
- Direct battery connection: provides the most power and reliability. Wire your lights through an inline fuse directly to the battery terminals. This is the best option for permanent or semi-permanent setups.
- Auxiliary battery system: the gold standard for serious truck campers. A secondary battery isolated from your starting battery powers all accessories without any risk of being stranded.
Most LED campsite lights draw between 1-5 amps, which is minimal compared to your truck battery's typical 60-80 amp-hour capacity. A single 800-lumen LED porch light running at 1 amp could theoretically run for over 60 hours on a full battery — but you should never drain below 50% on a starting battery.
According to Battery University, regularly discharging a lead-acid battery below 50% dramatically shortens its lifespan. This is why an auxiliary battery or solar-powered lighting options make sense for extended camping trips.
How to Choose the Right Lights for Your Campsite
The best campsite lights balance brightness, power efficiency, and weather resistance. LED technology has made this easier than ever — modern 12V LED fixtures produce more light per watt than any other option while generating almost no heat.
Here's what to look for when selecting campsite lights:
- Lumens: aim for 400-800 lumens per light for task areas like cooking and gear organizing. Use 100-200 lumens for ambient or pathway lighting.
- Color temperature: 4000-5000K (neutral white) works best for general campsite use. Avoid anything above 6500K — it attracts more insects and creates harsh shadows.
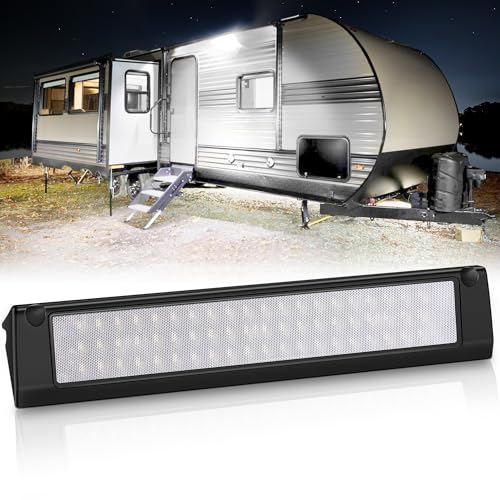
- IP rating: choose IP65 or higher for any light mounted outside your truck. IP67-rated lights like the MICTUNING 13-Inch RV Porch Light can handle rain, dust, and even temporary submersion.
- Power draw: LED lights drawing under 2 amps each let you run multiple fixtures without stressing your electrical system.
- Mounting style: magnetic, clamp-on, or adhesive-backed lights offer the most flexibility for truck camping.
For a complete campsite, plan on three lighting zones:
- Task lighting (bright): 600-800 lumens aimed at your cooking area, tailgate workspace, or gear storage
- Area lighting (medium): 300-500 lumens washing across the general campsite area
- Ambient lighting (soft): 100-200 lumens for pathways, tent entrances, and relaxation areas
Check our roundup of the best truck camping lanterns and lights for specific product recommendations across all three zones.
MICTUNING 13-Inch 90W LED Porch Light
IP67 waterproof aluminum housing with 90W output makes this the ideal permanent-mount task light for serious truck campers who need reliable, bright illumination.
Check Price On AmazonIf you click this link and buy, we earn a commission at no additional cost to you.
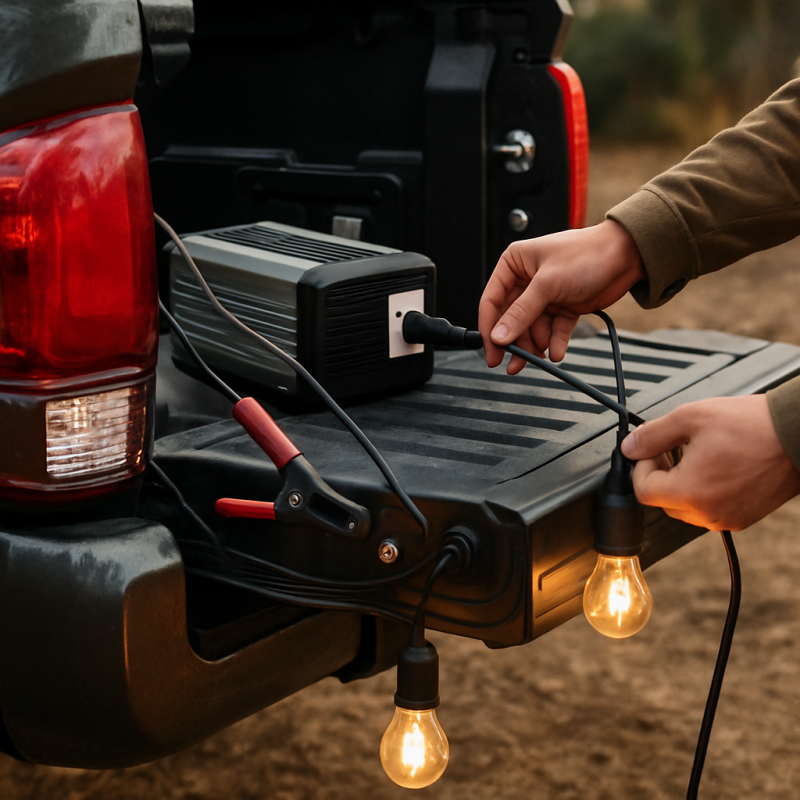
Step-by-Step: Setting Up Battery-Powered Campsite Lights
Battery-powered and rechargeable lights are the fastest way to illuminate your campsite — most setups take under 10 minutes with zero wiring. This method is perfect for weekend trips and casual truck camping.
Step 1: Charge your lights before the trip. Fully charge all rechargeable lights via USB-C or 12V charger the night before. Most quality LED camping lights hold a charge for 8-20 hours depending on brightness setting.
Step 2: Identify your lighting zones. Walk your campsite and decide where you need light. Mark mental positions for your cooking area, the truck bed, pathways to your tent, and your seating area.
Step 3: Mount your primary task light. Attach your brightest light to the truck's tailgate, roof rack, or bed rail using magnetic mounts or clamps. Position it 4-6 feet high and angled slightly downward to cover the largest area without blinding anyone.
Step 4: Place area lights around the campsite perimeter. Hang or clamp secondary lights on nearby trees, your truck's side mirrors, or a canopy frame. Space them 8-10 feet apart for even coverage.
Step 5: Add pathway markers. Place small LED pucks or string lights along the path between your truck and tent. This prevents tripping and makes midnight bathroom runs safer.
Step 6: Adjust brightness levels. Start on the lowest setting and increase only where needed. Lower brightness extends battery life and reduces insect attraction. Most multi-mode lights offer 3-4 brightness levels.
A pair of Dream Lighting RV Porch Lights mounted on the truck's exterior provide excellent area coverage at 250 lumens each while drawing minimal power from a 12V connection.
How to Wire 12V Lights Directly to Your Truck
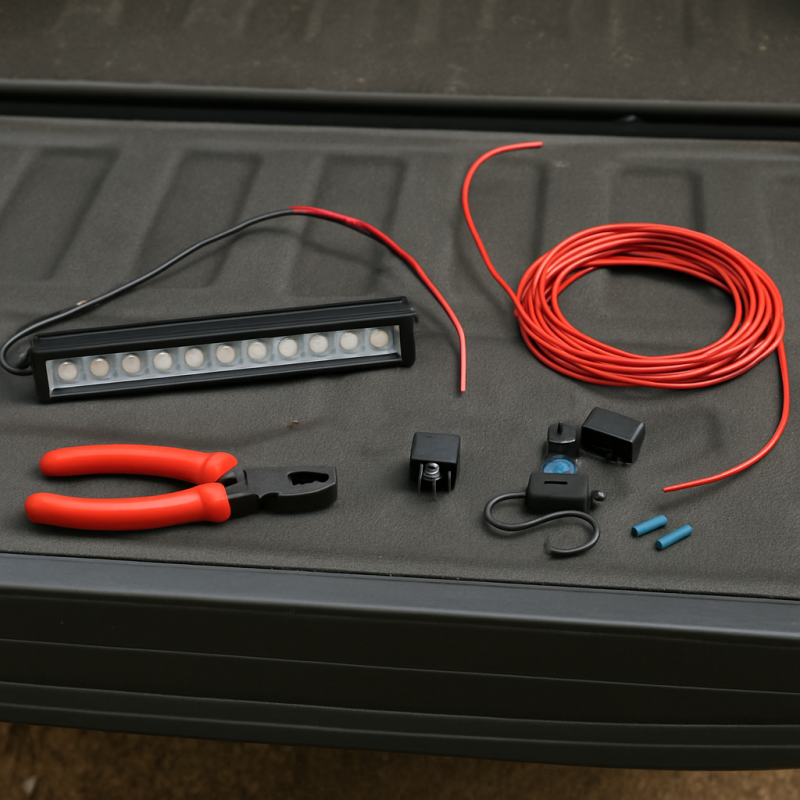
Hardwiring 12V LED lights to your truck creates a permanent, reliable campsite lighting system that turns on with a switch. This method takes 30-60 minutes but delivers the best long-term performance.
Before you start: disconnect your truck's negative battery terminal to prevent shorts while working.
Step 1: Plan your wire routing. Map out where your lights will mount and how wiring will reach them. Route wires along existing harness paths, through rubber grommets, and under bed rail covers whenever possible.
Step 2: Mount your lights. Drill pilot holes or use existing mounting points to secure your 12V LED fixtures. Apply a bead of silicone sealant around any drilled holes to prevent rust and water intrusion. The RV 12V LED Exterior Light Bar at 800 lumens is an excellent choice for permanent mounting — its aluminum housing handles years of outdoor exposure.
Step 3: Run your wiring.
- Use 16-gauge stranded wire for runs under 15 feet
- Use 14-gauge wire for longer runs or multiple lights on one circuit
- Secure wiring with adhesive cable clips every 12-18 inches
- Use split loom tubing where wires are exposed to abrasion
Step 4: Install an inline fuse. Place a 5-amp inline fuse within 12 inches of the positive battery terminal. This protects your truck's electrical system if a short occurs.
Step 5: Add a switch. Install a toggle or rocker switch inside the cab or on the bed rail for easy on/off control. Waterproof switches are recommended for exterior mounting.
Step 6: Connect to power. Crimp ring terminals onto the positive and negative leads. Connect positive through the fuse to the battery's positive terminal, and negative to the chassis ground or battery negative.
If you've already completed a truck bed light installation, you can tap into that existing circuit with a simple Y-splitter instead of running entirely new wiring.
RV 12V LED Exterior Light Bar (800 Lumens)
At 22 inches wide and 800 lumens, this aluminum light bar provides broad coverage for permanent hardwired installations on truck beds, canopies, or roof racks.
Check Price On AmazonIf you click this link and buy, we earn a commission at no additional cost to you.

What Are the Best Mounting Positions for Maximum Coverage?
Strategic light placement is the difference between a well-lit campsite and a collection of bright spots surrounded by dark shadows. The key principle is multiple heights, multiple angles — just like indoor room lighting.
Here are the most effective mounting positions for truck campsite lighting:
- Truck bed rails (2-3 feet high): ideal for illuminating gear inside the bed and providing low, warm light that doesn't blind nearby campers. Mount strip lights or small porch lights along both rails.
- Tailgate underside: a single light here illuminates your primary work area — the tailgate workspace where most cooking and gear prep happens.
- Roof rack or cab roof (5-7 feet high): the best position for broad area coverage. A single 800-lumen light mounted here can illuminate a 15-foot radius, covering your entire campsite.
- Side mirrors or A-pillars: magnetic lights attached here provide side coverage for tent access and pathway illumination.
- Canopy or awning frame: if you run a truck bed canopy or side awning, mount lights along the frame edges for overhead coverage without glare.
For the optimal three-light setup, position lights in a triangle:
- One high-mounted light on the roof rack (area coverage)
- One medium-height light on the tailgate (task lighting)
- One low light near the ground at the campsite perimeter (pathway/ambient)
This triangle pattern eliminates most shadows and provides depth to your lighting. According to REI's campsite lighting guide, overhead lighting creates the most natural feel because it mimics daylight direction — so prioritize that roof rack position first.
The compact MICTUNING 9-Inch LED Porch Light works particularly well for tailgate mounting where space is limited but you still need serious output.
How Do You Avoid Draining Your Truck Battery Overnight?
Running campsite lights off your truck battery without precautions is the fastest way to ruin a camping trip. A dead starting battery miles from civilization is a serious problem. Here's how to keep your lights on without getting stranded.
- Know your power budget: a typical truck battery holds 60-80 amp-hours. Never use more than 30-40 amp-hours (50%) on a starting battery. If your lights draw 3 amps total, you have roughly 10-13 hours of safe runtime.
- Use a battery voltage monitor: a $15 plug-in voltmeter on your 12V outlet shows real-time voltage. When it drops below 12.2V, shut everything off — that's approximately 50% charge.
- Install a battery disconnect switch: a master cutoff switch lets you isolate accessories from the starting battery with one turn. This is cheap insurance against accidental overnight drain.
- Add a dual-battery system: the best long-term solution. An auxiliary battery with an isolator charges while you drive and powers all campsite accessories independently. Your starting battery stays untouched.
- Carry a jump starter: a lithium jump pack weighing under 2 pounds can save you from a dead battery emergency. Consider it mandatory equipment for any truck camping trip.
For extended camping trips, combining your truck's electrical system with solar-powered lights gives you the best of both worlds — bright 12V fixtures for task lighting and self-sustaining solar lights for pathway and ambient illumination.
According to Interstate Batteries, letting a lead-acid battery sit below 12.0V for extended periods causes sulfation — permanent crystal buildup on the plates that reduces capacity. A battery monitor pays for itself the first time it saves you from this damage.
Troubleshooting Common Campsite Lighting Problems
Even the best-planned campsite lighting setup can run into issues. Here are the most common problems and how to fix them fast in the field.
Lights flickering or dimming:
- Check all wire connections for corrosion or looseness — vibration from driving often loosens crimp terminals
- Test battery voltage with a multimeter — anything below 12.4V under load suggests your battery is getting low
- Inspect the inline fuse — a partially blown fuse can cause intermittent flickering
Lights won't turn on at all:
- Verify the 12V outlet is active — some trucks cut power to outlets when the ignition is off (check your owner's manual)
- Test with a different light to rule out a dead fixture
- Check the fuse box for a blown accessory fuse
- Inspect wire connections at both the light and the power source
Lights attracting too many insects:
- Switch to warm white (2700-3000K) or amber-tinted lights — insects are most attracted to cool white and blue spectrum light
- The MICTUNING Amber/White LED Porch Lights offer a switchable amber mode specifically designed to reduce insect attraction while still providing usable illumination
- Position your brightest light away from your seating area to draw insects in the opposite direction
Uneven lighting or harsh shadows:
- Add a second light at a different height or angle to fill shadow gaps
- Use a diffuser — a white plastic bag or frosted sheet over a bright LED softens the beam dramatically
- Bounce light off your truck's tailgate or a white tarp for broader, softer coverage
Magnetic mounts falling off:
- Clean the mounting surface with rubbing alcohol before attaching
- Avoid mounting on curved surfaces where contact area is limited
- Use a secondary retention strap or zip tie as backup for magnets in windy conditions
MICTUNING Amber/White LED Porch Lights (2-Pack)
Switchable amber and white modes let you minimize insect attraction while still getting usable task lighting — ideal for campsite perimeter mounting.
Check Price On AmazonIf you click this link and buy, we earn a commission at no additional cost to you.

Related Articles
- Best Truck Bed Lights for Nighttime Loading — Readers with existing truck bed lights can extend those circuits for campsite lighting
- Best Solar Powered Lights for Truck Camping — Solar lights complement truck-powered lighting for extended camping trips
- Best Truck Camping Lanterns and Lights — Comprehensive product roundup for readers choosing specific campsite lighting products
- How to Install Truck Bed Lights — Related wiring guide that covers truck bed light installation — a natural starting point before extending to campsite lighting
Conclusion
Recommended Products
SUNPIE Rechargeable Truck Bed Lights
Rechargeable LED lights with magnetic mounts and built-in Type-C battery — perfect for beginners who want a no-wiring campsite lighting solution that sets up in minutes.
Check Price On AmazonIf you click this link and buy, we earn a commission at no additional cost to you.
MICTUNING 13-Inch 90W LED Porch Light
IP67 waterproof aluminum housing with 90W output makes this the ideal permanent-mount task light for serious truck campers who need reliable, bright illumination.
Check Price On AmazonIf you click this link and buy, we earn a commission at no additional cost to you.
RV 12V LED Exterior Light Bar (800 Lumens)
At 22 inches wide and 800 lumens, this aluminum light bar provides broad coverage for permanent hardwired installations on truck beds, canopies, or roof racks.
Check Price On AmazonIf you click this link and buy, we earn a commission at no additional cost to you.
MICTUNING Amber/White LED Porch Lights (2-Pack)
Switchable amber and white modes let you minimize insect attraction while still getting usable task lighting — ideal for campsite perimeter mounting.
Check Price On AmazonIf you click this link and buy, we earn a commission at no additional cost to you.
Frequently Asked Questions
Can I run campsite lights off my truck battery without draining it?
What is the best color temperature for campsite lights?
How many lumens do I need for campsite lighting?
Do I need to hardwire lights or can I use plug-in options?
How do I keep bugs away from my campsite lights?
Can I use regular household LED bulbs for truck campsite lighting?
What IP rating should campsite lights have?
How long does it take to set up campsite lighting from a truck?
Affiliate Disclosure: This article contains affiliate links. If you purchase through these links, we may earn a commission at no extra cost to you.