How to Install Seat Covers
Key Takeaways
- Most universal seat covers install in 20-45 minutes per seat using no special tools — custom-fit covers may take up to an hour per seat.
- Always remove the headrest and disconnect seat heater wires before starting to avoid damage to electrical components.
- Tucking excess material into the seat gap with a plastic trim tool creates a factory-installed appearance.
- Hog ring pliers and fastener clips are essential for securing covers on seats with exposed frames underneath.
- Test all seat functions — recline, slide, heat, airbag indicators — after installation to confirm nothing was pinched or disconnected.
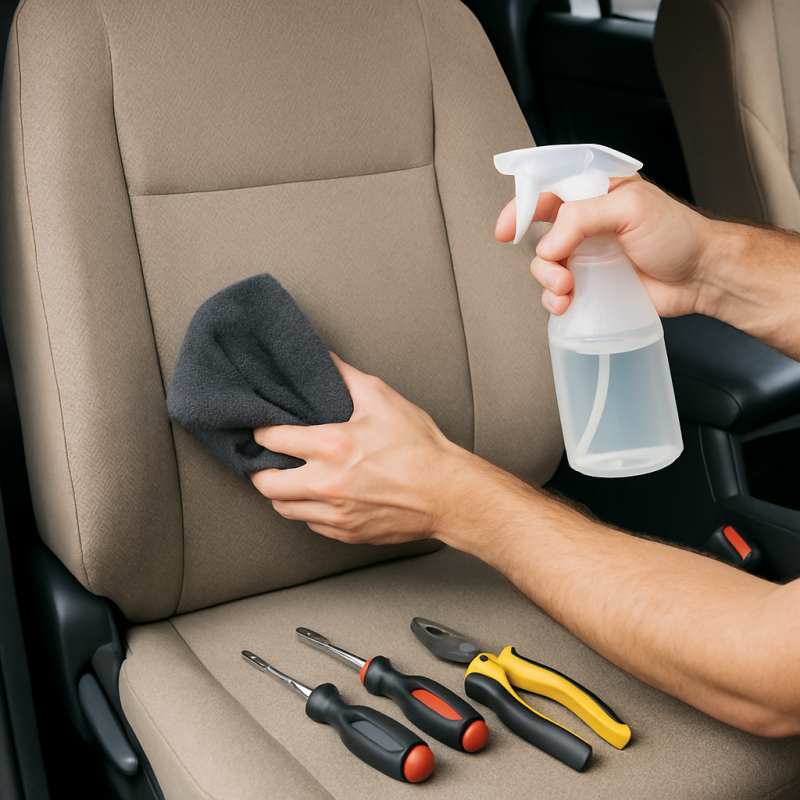
Tools and Materials You'll Need
Before you start, gather everything so you're not hunting for tools mid-install. Most seat covers come with their own fastening hardware, but having a few extras on hand saves time.
- Plastic trim removal tool: for tucking fabric into seat gaps without scratching leather or vinyl
- Hog ring pliers and hog rings: required for seats with exposed metal frames underneath — a kit like the WATERCARBON Hog Ring Upholstery Installation Kit includes pliers plus 100 rings
- Socket wrench set: 10mm, 12mm, and 14mm for removing bolts on seats that need to come out
- Zip ties: useful backup fasteners for straps that don't quite reach
- Flathead screwdriver: for prying headrest release buttons
- Clean cloth and interior cleaner: wipe down seats before covering them
If your seat covers use hook-and-loop straps or elastic bands, no special tools are needed beyond your hands and a trim tool. Custom-fit covers with hog ring attachment points require the pliers — don't skip them.
You may also want replacement seat cover hooks and fastener clips on hand. These small plastic chucks and metal hooks wear out over time, and having spares means you won't stall if one breaks during installation.
Total cost for tools if you don't own them: $15-$30. Most drivers already have everything they need in a basic toolbox.
WATERCARBON Hog Ring Upholstery Installation Kit
Includes hog ring pliers and 100 rings — everything you need to permanently secure custom-fit seat covers to the seat frame for a factory-quality finish.
Check Price On AmazonIf you click this link and buy, we earn a commission at no additional cost to you.

Preparing Your Seats for Installation
Proper preparation takes 10-15 minutes and makes the entire installation smoother. Skipping this step is the number one reason seat covers bunch up or shift after a few weeks.
Step 1: Clean the seats thoroughly. Vacuum crumbs and debris from every crevice, then wipe the surface with an interior cleaner. Seat covers trap dirt against the upholstery, which can cause staining or odor over time.
Step 2: Remove the headrests. Press the release button at the base of each headrest post and pull straight up. Some vehicles require a small tool or paperclip inserted into a pinhole to release the lock mechanism. Set headrests aside — you'll reinstall them last.
Step 3: Slide the seat forward and back. Check the full range of motion and note where straps or hooks will need to route underneath. While you're at it, remove your floor mats temporarily to give yourself more room to work under the seat.
- Heated seats: locate the wiring harness under the seat and ensure straps won't pinch or pull on connectors
- Power seats: disconnect the battery if you'll be reaching near side-mounted airbag modules
- Bench seats: check whether the center armrest folds down or detaches — most covers have a zippered flap for fold-down armrests
- Split-fold rear seats: note the fold ratio (60/40, 40/20/40) so each piece gets the correct cover
Take a photo of your seat before covering it. This helps if you need to reference the original layout later, especially for routing straps around adjustment levers.
Installing Front Seat Covers
Front seats are the most complex because of headrest posts, recline levers, and possible side airbags. Budget 20-30 minutes per seat for universal covers and up to 45 minutes for custom-fit options.
Step 1: Drape the backrest cover. Slide the cover over the top of the seatback like a pillowcase. Align the seams with the edges of the seat — most covers have a tagged seam that indicates the front center.
Step 2: Secure the backrest. Pull the bottom hem down and tuck it into the gap between the seat base and backrest. Depending on your cover type:
- Elastic hem covers: stretch the elastic under the seat bottom and hook the attached clips to the seat frame
- Strap-style covers: route straps around the back of the seat and buckle or tie them snugly
- Hog ring covers: align the cover's attachment loops with the seat frame wires and crimp hog rings with pliers
Step 3: Install the seat bottom cover. Lay the bottom piece over the cushion, tuck the rear flap into the seat gap, and secure the front edge underneath. Pull firmly to eliminate wrinkles — the fabric should be taut but not stretched to its limit.
Step 4: Reinstall headrests. Find the headrest post holes in the cover (pre-cut or marked) and push the posts through. If the holes aren't pre-cut, use scissors to make small X-shaped cuts — don't cut larger than the post diameter.
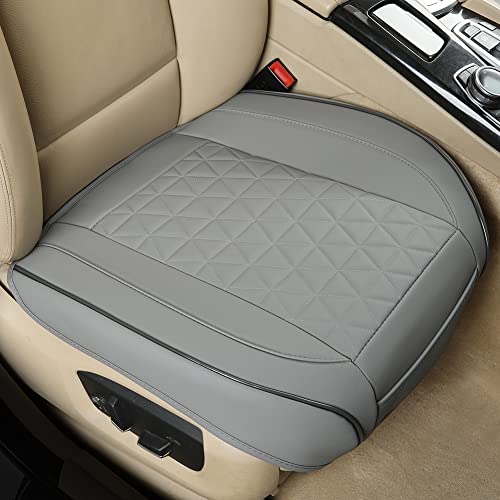
For a clean, professional look, consider a quality cover like the Black Panther Luxury Faux Leather Seat Cover, which wraps around the bottom for a secure, anti-slip fit on most vehicles.
Black Panther Luxury Faux Leather Car Seat Cover
Anti-slip bottom design wraps around the seat cushion for a secure fit without hooks or straps. Great option for drivers who want quick installation with a premium look.
Check Price On AmazonIf you click this link and buy, we earn a commission at no additional cost to you.
Installing Rear Seat Covers
Rear seats are generally easier than fronts because they have fewer mechanical parts. Most rear installations take 15-25 minutes for the complete bench.
Step 1: Remove the bottom cushion. On most trucks and SUVs, the rear bottom cushion lifts out — push back and pull up on the front edge. Sedans may have bolted-down cushions that require a socket wrench.
- Trucks: rear cushion usually unclips with firm upward pressure at the front edge
- SUVs: check for child seat anchor covers that need to be routed through the cover
- Sedans: look for two 12mm bolts at the front edge of the cushion
Step 2: Fit the bottom cover. With the cushion removed, slide the cover over it on a flat surface like your garage floor. This is much easier than trying to install it in place. Secure all straps or hooks, then reinstall the cushion.
Step 3: Install the backrest cover. The rear backrest usually stays bolted in place. Drape the cover from the top, tuck the bottom edge into the gap between the seat base and backrest, and secure with straps underneath.
Step 4: Handle split-fold seats. If your rear seat splits (60/40 or 40/20/40), each section gets its own cover piece. Fold each section down to access the back side and secure fasteners before folding back up.
Make sure all child seat LATCH anchors remain accessible after installation. Most quality seat covers include marked cutouts or flaps for these anchors. If yours doesn't, cut small slits at the anchor points — child seat compatibility is non-negotiable.
If you're upgrading your entire truck interior, seat covers pair well with other protective accessories like a center console organizer to keep the cabin looking sharp.
Tips for a Factory-Installed Look
The difference between seat covers that look aftermarket and ones that look factory is all in the finishing details. Spend an extra 10-15 minutes on these steps and the results are dramatic.
- Tuck aggressively: use a plastic trim tool to push fabric deep into the seat gap between the cushion and backrest — this is the single biggest factor in a clean look
- Smooth wrinkles from center out: start at the center of each panel and push wrinkles toward the edges, then tuck the excess into seams
- Double-check symmetry: step back and compare left and right seats — misaligned seams are immediately noticeable
- Trim excess strapping: if straps hang below the seat, trim them with scissors and seal cut ends with a lighter to prevent fraying
- Use zip ties as backup: for any strap or hook that feels marginal, add a zip tie for extra security
The material you choose matters just as much as installation technique. Understanding the differences between leather and neoprene seat covers helps you pick a material that holds its shape and resists wrinkling over time.
Temperature matters too. Install seat covers in a warm environment (above 60°F) when possible. Materials like neoprene and faux leather are more pliable in warmth, making them easier to stretch into position. If you're installing in cold weather, bring the covers inside overnight before installation.
Finally, sit in each seat and adjust your driving position after installation. Push yourself back into the seat firmly — this helps the cover conform to the cushion shape and reveals any spots that need additional tucking.
Seat Cover Types and Installation Differences
Not all seat covers install the same way. The type you buy determines the tools you need, the time required, and the final fit quality.
| Cover Type | Install Time | Tools Needed | Fit Quality | Price Range |
|---|---|---|---|---|
| Universal slip-on | 10-15 min/seat | None | Loose, may shift | $25-$60 |
| Semi-custom | 20-30 min/seat | Trim tool | Good, minor gaps | $60-$150 |
| Custom-fit | 30-60 min/seat | Hog ring pliers, trim tool | Factory look | $150-$400+ |
| Slip-on bench | 10-20 min total | None | Loose | $30-$80 |
Universal slip-on covers are the easiest to install — they stretch over the seat like a fitted sheet. The trade-off is fit quality. They tend to shift during use and rarely look factory.
Semi-custom covers are made for general seat shapes (bucket, bench, sport) and use elastic hems with hook attachments. These offer the best balance of install ease and fit quality for most drivers.
Custom-fit covers are made from patterns specific to your vehicle's year, make, and model. They attach with hog rings to the seat frame, creating a tight, wrinkle-free fit. The installation is more involved but the result is worth it. If you're shopping for truck seat covers, custom-fit options deliver the most durable and professional result.
- Side airbag compatibility: custom-fit covers always include airbag-compatible stitching — universal covers may not
- Heated seat compatibility: thinner materials work better with heated seats — thick neoprene can block heat transfer
- Leather seats underneath: use breathable covers to prevent moisture trapping, which can cause mold or cracking
Stacool 24PCS Seat Cover Hooks and Fastener Kit
Universal replacement hooks and plastic chucks for seat covers. Keep a set on hand so a broken fastener doesn't derail your installation.
Check Price On AmazonIf you click this link and buy, we earn a commission at no additional cost to you.

Common Mistakes to Avoid
Even experienced DIYers make these mistakes. Avoiding them saves you time and prevents damage to your seats or covers.
- Skipping headrest removal: trying to install the backrest cover without removing headrests leads to bunching at the top — always remove them first
- Ignoring side airbag tags: if your seat has a side airbag, the cover MUST have a compatible seam that tears open on deployment — using non-compatible covers is a serious safety hazard
- Over-tightening straps: straps pulled too tight put stress on hooks and clips, causing them to break within weeks — snug is enough
- Not routing straps properly: straps should go around or under the seat frame, not over adjustment mechanisms or wiring harnesses
- Cutting headrest holes too large: always start with a smaller cut and enlarge gradually — you can't undo an oversized hole
The most common complaint after installation is shifting. Covers that slide around usually have one of these issues:
- Straps aren't attached to the seat frame — they're just wrapped around the cushion foam
- The cover is the wrong size — universal "one-size-fits-all" rarely fits all
- The seat surface is too slippery — add a non-slip mat or rubber mesh between the seat and cover
Another frequent mistake is forgetting to test seat functions after installation. Always verify that the recline lever, seat slide, lumbar adjustment, and seat heaters all work properly. A pinched wire can disable heated seats or, worse, create an electrical short.
Troubleshooting Fit Issues
Even with careful installation, you may run into fit problems. Here's how to solve the most common ones.
Cover won't stretch over the seat:
- Warm the material with a hair dryer for 2-3 minutes to increase pliability
- Confirm you have the correct cover — left and right are often mirror images, not interchangeable
- Check if the seat is in the most upright position, which gives the smallest profile to work with
Wrinkles won't smooth out:
- Untuck and re-tuck from the center outward
- Sit in the seat and shift your weight to help the cover conform
- For leather or vinyl covers, use a heat gun on low setting from 12 inches away to soften and reshape
Cover shifts while driving:
- Add non-slip grip pads between the cover and seat surface
- Replace elastic hooks with hog rings for a permanent attachment
- Check that all attachment points are connected — missing even one strap causes shifting
Headrest cover keeps popping off:
- Most headrest covers are slightly undersized by design — stretch firmly and they'll hold
- Add a zip tie around the base of the headrest posts under the cover for extra grip
Heated seats stopped working:
- Check for pinched wires under the seat — a strap may be pressing on the wiring harness
- Thick covers insulate heat — switch to a thinner material if heat transfer is noticeably reduced
- Verify the seat heater connector wasn't accidentally unplugged during installation
If you've exhausted these fixes and the cover still doesn't fit, the most likely issue is sizing. Measure your seat dimensions and compare them against the manufacturer's spec sheet before considering a return.
Related Articles
- Best Truck Seat Covers — Comprehensive review of top-rated truck seat covers — relevant for readers choosing a cover to install
- Leather vs Neoprene Seat Covers — Comparison of the two most popular seat cover materials — helps readers choose the right material before installation
- Best Truck Floor Mats for All-Weather Protection — Related interior protection accessory — mentioned in context of removing floor mats during seat cover installation
- Best Truck Center Console Organizers — Complementary interior upgrade often done alongside seat cover installation
Conclusion
Recommended Products
WATERCARBON Hog Ring Upholstery Installation Kit
Includes hog ring pliers and 100 rings — everything you need to permanently secure custom-fit seat covers to the seat frame for a factory-quality finish.
Check Price On AmazonIf you click this link and buy, we earn a commission at no additional cost to you.
Black Panther Luxury Faux Leather Car Seat Cover
Anti-slip bottom design wraps around the seat cushion for a secure fit without hooks or straps. Great option for drivers who want quick installation with a premium look.
Check Price On AmazonIf you click this link and buy, we earn a commission at no additional cost to you.
Stacool 24PCS Seat Cover Hooks and Fastener Kit
Universal replacement hooks and plastic chucks for seat covers. Keep a set on hand so a broken fastener doesn't derail your installation.
Check Price On AmazonIf you click this link and buy, we earn a commission at no additional cost to you.
Frequently Asked Questions
How long does it take to install seat covers?
Do I need to remove the seats to install seat covers?
Are seat covers safe with side airbags?
Will seat covers damage my leather seats?
Can I install seat covers over heated seats?
How do I stop seat covers from sliding around?
Do seat covers fit all car models?
Can I machine wash my seat covers?
Affiliate Disclosure: This article contains affiliate links. If you purchase through these links, we may earn a commission at no extra cost to you.