Truck Overlanding Gear Guide
Key Takeaways
- Start with the five essential gear categories before buying specialty equipment: recovery, navigation, shelter, cooking, and storage.
- Budget $2,000–$3,500 for a solid starter overlanding setup, or $5,000–$10,000+ for a fully built-out rig.
- A quality bed rack or roof rack system is the single most impactful upgrade for carrying gear efficiently on the trail.
- Recovery gear — traction boards, a kinetic rope, and a tire repair kit — should be your first purchase before any comfort upgrades.
- Avoid the biggest beginner mistake: overloading your truck beyond its payload capacity with heavy accessories and gear.
What Are the Essential Overlanding Gear Categories?
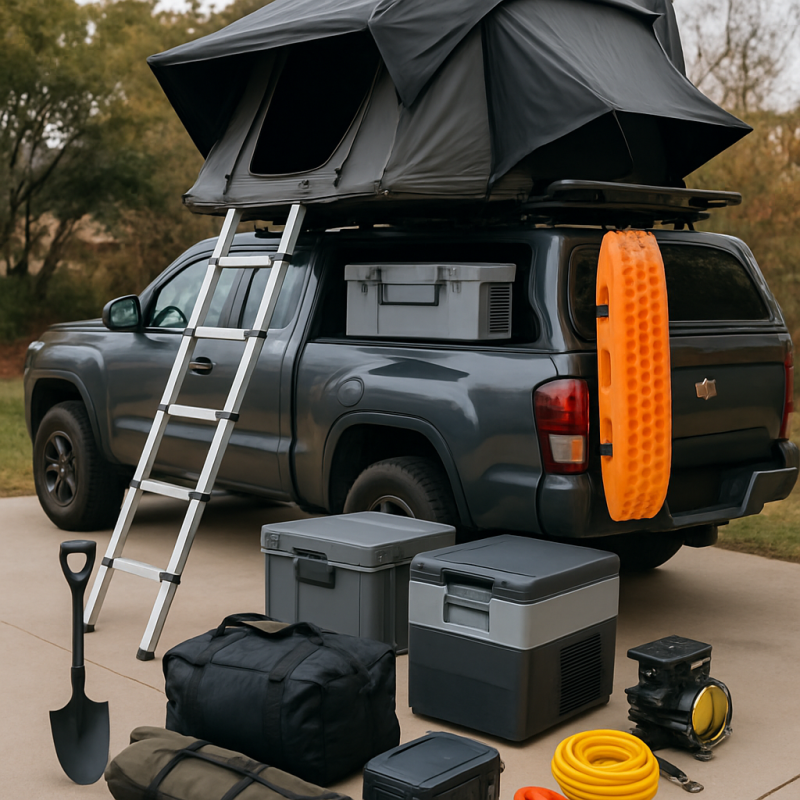
Every truck overlanding setup revolves around five core gear categories: recovery, navigation, shelter, cooking, and storage. Master these five before spending a dollar on accessories or comfort upgrades.
- Recovery gear: Traction boards, kinetic recovery rope, shackles, a tire repair kit, and a portable air compressor. This is your lifeline when things go wrong on the trail.
- Navigation: A dedicated GPS unit or offline maps app, paper backup maps, and a satellite communicator for areas without cell service.
- Shelter: A rooftop tent or quality ground tent, sleeping bags rated for your climate, and weather protection like tarps or awnings.
- Cooking: A portable stove, fuel, cookware, a water filtration system, and a cooler or 12V fridge for food storage.
- Storage and organization: Bed racks, cargo boxes, MOLLE panels, and modular storage systems to keep everything accessible and secure on rough terrain.
The biggest mistake new overlanders make is skipping straight to comfort gear — rooftop tents, fridges, and LED light bars — without first investing in recovery equipment. A compact tire repair kit with MOLLE storage weighs almost nothing but can save a trip when you're miles from the nearest town.
If you're just starting out, check our guide on how to prep your truck for overlanding — it covers the mechanical and structural basics you need before adding any gear.
How Much Does a Full Overlanding Setup Cost?
A functional truck overlanding setup costs $2,000–$3,500 at the entry level, while a fully built-out expedition rig can run $8,000–$15,000+ in gear alone — not counting vehicle modifications. Understanding price tiers helps you prioritize spending where it actually matters.
| Budget Tier | Investment | What You Get | Best For |
|---|---|---|---|
| Starter | $1,500–$3,000 | Basic recovery kit, ground tent, portable stove, cooler, basic storage bins | Weekend warriors, casual trail camping |
| Intermediate | $3,000–$7,000 | Bed rack system, rooftop tent, 12V fridge, quality recovery gear, awning | Regular overlanders, multi-day trips |
| Advanced | $7,000–$15,000+ | Full rack system, hardshell RTT, dual-battery setup, water system, long-range fuel tank | Expedition-level, week-long backcountry trips |
Here's where most people waste money at each tier:
- Starter tier: Buying cheap recovery gear that fails when you need it. Invest in quality traction boards and a real kinetic rope — not a tow strap from the gas station.
- Intermediate tier: Overspending on a rooftop tent before getting a proper rack system. The rack is the foundation — a quality bed rack supports your tent, gear, and storage.
- Advanced tier: Installing every accessory at once without checking payload capacity. A hardshell RTT, full-size fridge, and steel bumpers can easily add 800–1,200 lbs.
Start at the starter tier and upgrade one category at a time based on what you actually need after a few trips.
What Rack System Should You Choose for Overlanding?
Your rack system is the single most important structural upgrade for overlanding. It determines how much gear you can carry, where it sits, and how your truck handles under load. You have two main options: bed racks and roof racks.
| Feature | Bed Rack | Roof Rack |
|---|---|---|
| Weight Capacity | 400–800 lbs (static) | 150–300 lbs (dynamic) |
| Center of Gravity | Lower, more stable | Higher, affects handling |
| Access | Easy from truck bed sides | Requires ladder or step |
| RTT Compatible | Yes — most popular option | Yes — but adds height |
| Price Range | $300–$1,200 | $200–$1,500 |
| Best For | Rooftop tents, heavy gear | Light cargo, kayaks, solar panels |
For most truck overlanders, a bed rack is the better starting point. It keeps weight lower, doesn't affect cab clearance, and provides a solid mounting platform for a rooftop tent. Our top picks for truck bed racks for overlanding cover options from budget to premium.
If you need additional cargo space beyond the bed rack, adding a roof rack for camping gear gives you a secondary platform for lighter items like solar panels, recovery boards, or jerry cans.
- Aluminum racks: Lighter weight (30–50 lbs), corrosion resistant, adequate for most setups. Best for half-ton trucks watching payload.
- Steel racks: Heavier (60–100+ lbs) but stronger, ideal for heavy-duty builds with hardshell tents and multiple accessories.
- Modular systems: Crossbar-based racks with adjustable mounting points. More versatile but usually cost 20–40% more than fixed designs.
What Recovery Gear Do You Actually Need?
Recovery gear keeps you moving when trails get ugly. At minimum, you need five pieces of equipment to handle the most common overlanding situations: getting stuck in mud or sand, flat tires, and winching off obstacles.
- Traction boards: MAXTRAX or similar rated boards ($150–$300/pair). These handle 80% of stuck situations — soft sand, mud, and loose gravel. Non-negotiable for any overlanding trip.
- Kinetic recovery rope: A 20–30 ft kinetic energy recovery rope ($80–$150) stretches under load to pull a stuck vehicle without the jarring shock of a tow strap. Never use a standard tow strap for recovery — they don't stretch and can snap dangerously.
- Soft shackles: Synthetic soft shackles ($15–$40 each) connect your recovery rope to tow points. Safer than metal D-ring shackles because they won't become projectiles if they break under load.
- Tire repair kit: A quality plug-style kit handles most punctures trailside in under 10 minutes. The Boulder Tools Compact Tire Repair Kit includes a MOLLE storage pouch that straps directly to your bed rack or seat back — keeping it accessible without eating storage space.
- Portable air compressor: A 12V compressor ($60–$200) lets you air down for trails and re-inflate for highway driving. Look for units that deliver at least 2.5 CFM for truck-sized tires.
According to Trail Recon, flat tires and getting stuck in soft terrain account for over 70% of all trail recoveries. Carry your recovery gear in a dedicated bag mounted where you can reach it without unpacking your entire bed.
A winch ($300–$1,500) is valuable but not essential for beginners. If you plan to run more technical trails, pair a winch with a solid bull bar or bumper rated for winch mounting.
Boulder Tools Compact Tire Repair Kit with MOLLE Pouch
A heavy-duty universal tire plug kit that handles most trail punctures in under 10 minutes. The included MOLLE storage pouch mounts directly to your bed rack, seat back, or roll bar for instant access.
Check Price On AmazonIf you click this link and buy, we earn a commission at no additional cost to you.

How Do You Choose Shelter and Sleep Systems?
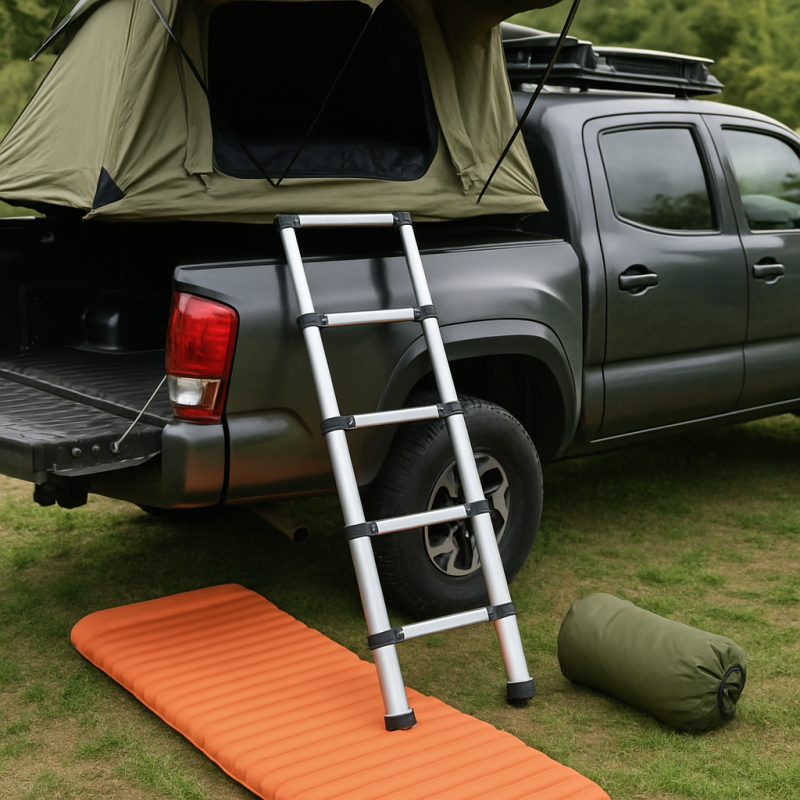
Your shelter choice determines how comfortable — and how quickly — you set up camp each night. Rooftop tents are the most popular overlanding shelter, but they're not always the best option depending on your budget and travel style.
| Shelter Type | Setup Time | Price Range | Weight | Best For |
|---|---|---|---|---|
| Ground tent | 10–20 min | $100–$500 | 5–15 lbs | Budget builds, backpacking hybrids |
| Softshell RTT | 3–5 min | $800–$2,000 | 100–150 lbs | Most overlanders, good value |
| Hardshell RTT | 1–2 min | $2,500–$5,000+ | 130–200 lbs | Frequent travelers, aerodynamic profile |
| Truck bed camper | N/A (permanent) | $1,500–$8,000 | 200–400+ lbs | Cold weather, extended trips |
If you go the rooftop tent route, make sure your rack system is rated for the tent's weight plus two occupants. A softshell RTT with two adults can push 400+ lbs of dynamic load — many budget racks aren't rated for that.
- Sleeping bags: Get one rated 10–15°F below the coldest temperature you expect. Down bags are lighter but useless when wet — synthetic fills work better for humid or rainy conditions.
- Sleeping pads: Most RTTs include a built-in mattress, but ground campers need a quality pad with an R-value of 4+ for three-season use.
- Awnings: A side awning ($150–$500) mounts to your rack and gives you shade and rain protection for cooking and lounging. Not essential, but a huge quality-of-life upgrade on multi-day trips.
Pro tip: before investing $2,000+ in a rooftop tent, do a few trips with a quality ground tent. You might discover you prefer the flexibility of a ground setup — especially if you like to set up a base camp and drive out for day trips.
What Cooking and Water Gear Works Best on the Trail?
Trail cooking doesn't need to be complicated. A reliable two-burner stove, one good pot, and a cast iron skillet handle 90% of overlanding meals. The key is choosing gear that's durable, compact, and works in wind.
- Stove options: Propane two-burner stoves ($50–$150) are the overlanding standard — reliable ignition, adjustable flame, and widely available fuel. Butane canister stoves are lighter but struggle in cold weather below 40°F.
- Cookware: A nesting pot and pan set in stainless steel or hard-anodized aluminum saves space. Avoid non-stick coatings that scratch easily in camp environments.
- Cooler vs. 12V fridge: A quality rotomolded cooler ($150–$350) works for 2–3 day trips with ice. For longer expeditions, a 12V fridge ($400–$1,200) eliminates the ice hassle entirely and keeps food at precise temperatures.
Check out our roundup of the best truck camping stoves and cooking gear for specific product recommendations at every price point.
Water is your most critical consumable. Plan for 1 gallon per person per day for drinking and cooking. Here's how to manage it:
- Jerry cans: Scepter or Wavian military-style cans ($30–$80 each) are the standard. Mount them to your rack or bed rail with proper brackets.
- Gravity filter: A gravity water filter ($50–$100) lets you source water from streams and lakes, extending your range dramatically. REI's water treatment guide covers filtration options in detail.
- Onboard water tanks: For advanced builds, a mounted water tank (5–20 gallons) with a 12V pump gives you running water at camp. Expect to pay $200–$600 for a complete system.
Keep your cooking setup organized in a dedicated chuck box or pull-out kitchen slide. Loose gear rattling around your bed is a recipe for broken equipment and frustration.
How Should You Organize and Store Overlanding Gear?
Organization separates a functional overlanding setup from a chaotic mess. The goal is to access any piece of gear in under 60 seconds — without unpacking everything else. Modular storage systems make this possible.
- Cargo boxes: Weatherproof boxes like Pelican or Plano ($50–$300) protect sensitive gear — electronics, first aid kits, and documents. Stack them on your bed rack with ratchet straps or mounting brackets.
- MOLLE panels: Mount MOLLE panels to your bed rack uprights or tailgate for quick-access items — flashlights, multitools, tire repair kits, and gloves. Everything stays visible and within arm's reach.
- Drawer systems: Bed drawer systems ($300–$1,000) slide out for easy access to tools, cooking gear, and recovery equipment stored underneath your sleeping platform. They're heavy but transformative for organization.
- Soft bags and pouches: Use color-coded dry bags or labeled stuff sacks for clothing, bedding, and consumables. Cheaper than hard cases and easier to pack into odd spaces.
Here's a proven storage layout for a standard 5.5–6.5 ft truck bed:
- Bed floor (drawer system): Recovery gear, tools, spare fluids, cooking equipment
- Mid-level (cargo boxes on rack): Food, water, electronics, first aid
- Rack top: Rooftop tent, traction boards, jerry cans, solar panel
- Tailgate/MOLLE area: Quick-access items — repair kit, flashlight, fire extinguisher
Weight distribution matters more than most people realize. The NHTSA recommends keeping heavy items low and centered over the axle. Loading all your weight on a tall rack raises the center of gravity and makes your truck unpredictable on off-camber trails.
One pro tip: weigh your truck fully loaded at a public scale before your first trip. Compare it to your GVWR (Gross Vehicle Weight Rating) on the door jamb sticker. If you're within 200 lbs of the limit, start cutting gear.
What Mistakes Do New Overlanders Make When Buying Gear?
New overlanders consistently make the same five buying mistakes — and each one costs hundreds of dollars in wasted money or dangerous situations on the trail. Avoiding these pitfalls saves you more than any single gear purchase.
- Exceeding payload capacity: This is the #1 mistake. A rooftop tent (150 lbs), bed rack (60 lbs), fridge (50 lbs), water (65 lbs for 8 gallons), recovery gear (40 lbs), and two passengers can put you 500+ lbs over your payload rating. According to MotorTrend, exceeding payload capacity compromises braking distance, steering response, and suspension travel.
- Buying gear before going on trips: You don't know what you need until you experience what you're missing. Do 3–5 trips with minimal gear before investing heavily. Your "must-have" list will look completely different after real trail time.
- Prioritizing comfort over safety: LED light bars and Bluetooth speakers are fun, but they don't help when you're stuck at 9,000 ft with a flat tire. Always fund recovery and navigation gear before comfort accessories.
- Ignoring front-end protection: Overlanding trails feature rocks, branches, and wildlife. A quality grille guard protects your radiator and headlights from impacts that could end your trip early.
- Skipping suspension upgrades: Adding 500–800 lbs of gear to a stock truck destroys ride quality and handling. Budget for at least a leveling kit or upgraded springs ($200–$800) if you're building a loaded rig.
A smart buying sequence for new overlanders:
- Trip 1–3: Recovery kit, first aid, basic camping gear (ground tent, stove, cooler), navigation
- Trip 4–6: Bed rack, organized storage, upgraded lighting, tire repair and air compressor
- Trip 7+: Rooftop tent, 12V fridge, awning, slide-out kitchen, solar power
This phased approach keeps you from overspending early and ensures every purchase solves a real problem you've encountered on the trail.
Related Articles
- How to Prep Your Truck for Overlanding — Covers the mechanical and structural preparation steps before adding overlanding gear
- Best Truck Bed Racks for Overlanding — Product reviews of top bed rack options for mounting tents, gear, and cargo
- Best Truck Roof Racks for Camping Gear — Reviews of roof rack systems for secondary cargo and light gear mounting
- Best Truck Bull Bars for Front-End Protection — Bull bar options rated for winch mounting and front-end protection on trails
- Best Truck Grille Guards for Front-End Protection — Grille guard reviews for protecting the radiator and headlights on overlanding trails
- Best Truck Camping Stoves and Cooking Gear — Product roundup of portable stoves and cooking equipment for truck camping
Conclusion
Recommended Products
Boulder Tools Compact Tire Repair Kit with MOLLE Pouch
A heavy-duty universal tire plug kit that handles most trail punctures in under 10 minutes. The included MOLLE storage pouch mounts directly to your bed rack, seat back, or roll bar for instant access.
Check Price On AmazonIf you click this link and buy, we earn a commission at no additional cost to you.
Frequently Asked Questions
How much does it cost to set up a truck for overlanding?
What is the most important overlanding gear to buy first?
Do I need a rooftop tent for overlanding?
What size truck do you need for overlanding?
How do I keep my overlanding gear organized?
Is overlanding hard on your truck?
What recovery gear should I carry for overlanding?
Can I overland with a stock truck?
Affiliate Disclosure: This article contains affiliate links. If you purchase through these links, we may earn a commission at no extra cost to you.