How to Prep Your Truck for Overlanding
Key Takeaways
- Start with mechanical reliability — a full inspection of brakes, suspension, fluids, and tires matters more than any aftermarket accessory.
- Budget $2,000–$5,000 for a solid beginner overlanding build, focusing on protection, storage, and recovery gear before comfort upgrades.
- Tire selection is the single biggest performance upgrade — all-terrain tires with a load range E rating handle 90% of overlanding terrain.
- A roof rack or bed rack system is the foundation for hauling gear, mounting lights, and attaching recovery equipment.
- Always carry the five essentials: recovery boards, a first aid kit, a fire extinguisher, extra water, and a tire repair kit.
Why Does Mechanical Reliability Come First?
Your truck's mechanical condition is the foundation of every overlanding trip. No amount of aftermarket gear will save you if your brakes fail on a mountain switchback or your cooling system overheats at 9,000 feet. Before buying a single accessory, invest in a full mechanical inspection.
A pre-overlanding inspection should cover these critical systems:
- Brakes: Replace pads under 40% life remaining and check rotors for warping. Loaded trucks need more stopping power than daily drivers.
- Cooling system: Flush coolant if it's older than two years. Inspect hoses for cracks and test the thermostat. Overheating is the number-one mechanical failure on trails.
- Suspension: Check shocks for leaks and worn bushings. Stock suspension handles most trails, but sagging springs under heavy loads need attention.
- Fluids: Change engine oil, transmission fluid, transfer case fluid, and differential fluid. Use manufacturer-spec weights — don't upgrade to thicker oils unless you're in extreme heat.
- Belts and hoses: Replace any belt with visible cracking. Carry a spare serpentine belt in your tool kit.
The NHTSA recommends inspecting tires for proper tread depth and sidewall damage before any extended off-road travel. Check your spare tire too — many drivers forget their spare hasn't been inflated in years.
Budget $300–$800 for a thorough pre-trip service. That's cheaper than a single tow from a remote trailhead, which often runs $1,000+ in rural areas.
What Tires and Wheels Should You Run?

Tires are the single most impactful upgrade for overlanding capability. The right set transforms your truck's traction, comfort, and confidence on unpaved surfaces. All-terrain (A/T) tires are the sweet spot for most overlanders — they handle gravel, dirt, mud, and sand while still performing well on highway drives between trailheads.
Here's what to look for when choosing overlanding tires:
- Load Range E (10-ply): Handles the extra weight of gear, water, and fuel without excessive sidewall flex. Critical for loaded trucks.
- Aggressive sidewall lugs: These provide traction when you air down on rocks and loose surfaces.
- 3-Peak Mountain Snowflake (3PMSF) rating: Means the tire is certified for severe snow conditions — useful for shoulder-season trips.
- Size: Stick within 1–2 inches of your stock diameter unless you're also upgrading gears. Oversized tires without regearing hurt acceleration and fuel economy.
Popular overlanding tire choices include the BFGoodrich KO2, Falken Wildpeak AT3W, and Toyo Open Country AT3. Expect to pay $200–$350 per tire in common truck sizes (265/70R17 or 275/70R18).
Airing down your tires is one of the most effective techniques for improving off-road traction. Dropping from 35 PSI to 18–22 PSI increases the tire's contact patch by up to 40%, according to testing by TFL Offroad. Carry a set of automatic tire deflators to air down all four tires simultaneously — they save time and ensure consistent pressure across all corners.
AltitudeCraft Automatic Tire Deflators (10-30 PSI)
These adjustable automatic deflators air down all four tires simultaneously to your target PSI, saving time at every trailhead. The brass construction and laser-etched scale provide reliable, repeatable results trip after trip.
Check Price On AmazonIf you click this link and buy, we earn a commission at no additional cost to you.

What Protection Upgrades Does Your Truck Need?
Overlanding trails punish the underside of your truck with rocks, ruts, and debris that highway driving never exposes. Skid plates, bumper protection, and body armor prevent expensive damage that could strand you miles from help.
Prioritize protection upgrades in this order:
- Skid plates: Protect your oil pan, transmission, and transfer case. Aluminum skid plates weigh 15–25 lbs and cost $200–$500. Steel plates are cheaper but add significant weight.
- Front-end protection: A quality bull bar or grille guard shields your radiator and headlights from brush, branches, and wildlife encounters on remote roads.
- Rock sliders: Bolt-on or weld-on sliders protect your rocker panels — the most vulnerable body panel on trails with large rocks or deep ruts.
- Mud flaps: Often overlooked, heavy-duty mud flaps protect your paint and the vehicles behind you on dusty trails.
- Fender flares: If you've upsized your tires, flares prevent tire rub and keep debris from damaging your quarter panels.
Don't go overboard on armor. Every pound of steel you add is a pound of water or food you can't carry. A common mistake is building a truck that's so heavy it struggles on the trails it was built to conquer.
For most beginner overlanders, skid plates and a bull bar are enough. Add rock sliders after your first season if you find yourself on more technical terrain.
How Should You Set Up Storage and Organization?
Poor gear organization is the fastest way to hate overlanding. When everything is crammed into a truck bed with no system, you'll spend 30 minutes digging for a headlamp you need in 30 seconds. A well-organized rig uses a bed rack, modular storage boxes, and a dedicated camp kitchen system.
Start with your truck bed — it's your primary cargo area:
- Bed rack system: A purpose-built bed rack doubles your cargo capacity by creating a second level above your bed. Mount a rooftop tent, solar panels, or Pelican cases up top while keeping the bed floor free for heavy items.
- Drawer systems: Slide-out drawers ($400–$1,200) give you instant access to tools, cooking gear, and recovery equipment without unloading everything.
- Cargo boxes: Waterproof boxes like the Overland Vehicle Systems cargo box kitchen combine storage with a built-in slide-out cooking station — a smart two-in-one solution that saves bed space.
For cab storage, use these strategies:
- Seat-back organizers: MOLLE panels on your rear seats hold first aid kits, maps, and quick-access items.
- Center console organizer: Keeps small essentials (knife, flashlight, charging cables) from rattling around.
- Overhead shelf: Some trucks accept overhead storage shelves for lightweight items like gloves and sunglasses.
Your roof rack handles overflow gear — but remember that weight up high affects your center of gravity. Keep heavy items low in the bed and light items on the roof. The Overland Expo community recommends keeping roof-mounted weight under 150 lbs for most half-ton trucks to maintain safe handling.
Overland Vehicle Systems Cargo Box Kitchen
This all-in-one cargo box includes a slide-out sink, cooking shelf, and work station that transforms your truck bed into a fully functional camp kitchen. Ideal for overlanders who want organized cooking without a separate kitchen setup.
Check Price On AmazonIf you click this link and buy, we earn a commission at no additional cost to you.

What Recovery Gear Should You Carry?
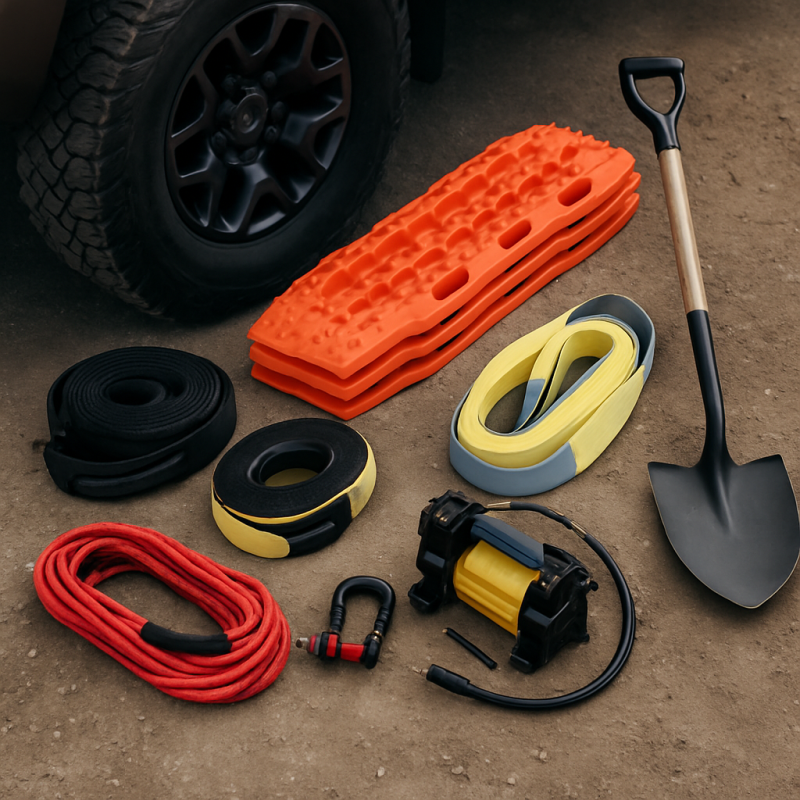
Getting stuck isn't a question of if — it's when. Every overlanding truck needs a basic recovery kit that can handle the three most common scenarios: getting stuck in mud or sand, needing a tire change in rough terrain, and pulling another vehicle.
Here's your essential recovery gear checklist:
- Recovery boards (traction boards): Maxtrax or similar boards cost $250–$350 for a pair. They're the single most useful recovery tool and work in mud, sand, and snow.
- Kinetic recovery rope: A 30-foot, 30,000-lb-rated kinetic rope stretches under load, using energy to pull stuck vehicles free. Never use a tow strap for recovery — they don't stretch and can snap violently.
- Soft shackles: Synthetic shackles rated to 40,000+ lbs are lighter and safer than steel D-ring shackles.
- Hi-lift jack or exhaust jack: Essential for lifting a truck on uneven terrain where a standard jack won't work.
- Tire repair kit: A plug kit handles 90% of trail punctures. Carry a 12V air compressor to reinflate after repairs and after airing back up from trail pressures.
- Shovel: A full-size or folding shovel for digging out tires and clearing trail obstacles. Mount it externally with a shovel rack kit on your roof rack or bed rack to keep bed space clear.
Budget $500–$1,000 for a complete recovery kit. Store it where you can access it without unloading your entire truck — ideally in a dedicated recovery bag near the tailgate.
One often-overlooked item: a fire extinguisher. Mount a 2.5-lb ABC-rated extinguisher inside the cab. Trail fires from electrical shorts, overheated brakes, or campfire mishaps are more common than most overlanders expect.
4 PCS Shovel Rack for Roof Rack
Mount your recovery shovel, axe, or other long-handled tools externally on your roof rack or bed rack. Frees up valuable bed space and keeps recovery gear instantly accessible without digging through cargo.
Check Price On AmazonIf you click this link and buy, we earn a commission at no additional cost to you.

How Do You Handle Water, Power, and Shelter?
Self-sufficiency defines overlanding. Once you leave pavement, you need independent systems for clean water, electrical power, and weather protection. These three systems determine how long you can stay out without resupplying.
Water systems:
- Minimum carry: 1 gallon per person per day for drinking, plus 2–3 gallons for cooking and cleanup. A 3-day solo trip needs at least 7–10 gallons.
- Storage options: Rigid jerry cans (Scepter or Wavian) are durable and stackable. Collapsible containers save space when empty but don't handle rough trails well.
- Filtration: A gravity filter or pump filter lets you refill from streams and lakes, extending your range significantly.
Electrical power:
- Dual-battery system: An auxiliary battery with an isolator runs your fridge, lights, and phone chargers without draining your starter battery. Expect to spend $300–$600 for a basic dual-battery setup.
- Solar panels: A 100W–200W panel on your roof rack keeps your auxiliary battery topped off during multi-day camps. Budget $200–$400 for a quality panel with controller.
- Portable power stations: A simpler alternative to dual-battery setups. Units like the Jackery or EcoFlow range from $300–$1,500 depending on capacity.
Shelter options:
- Ground tent: The budget-friendly option. Quick to set up and easy to pack.
- Rooftop tent: Mounts on your bed rack or roof rack. Sleeps off the ground but adds weight and height — check your garage clearance.
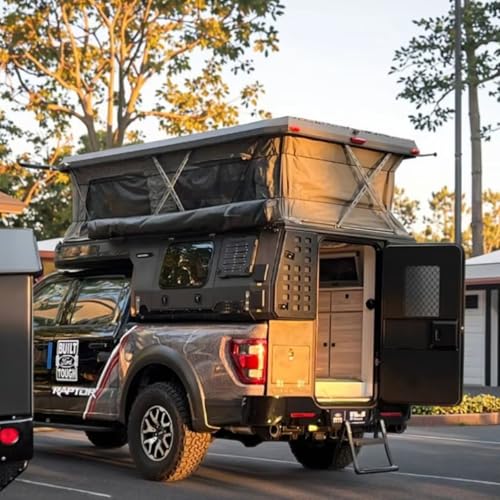
- Truck bed camper: A pop-up truck bed camper provides an insulated, weatherproof cabin that transforms your truck bed into a true living space — ideal for four-season overlanding.
Pickup Truck Pop-Up Bed Camper with Insulated Cabin
An aluminum pop-up camper topper that turns your truck bed into an insulated, weatherproof sleeping cabin. Custom interior layout options make it suitable for four-season overlanding and extended road trips.
Check Price On AmazonIf you click this link and buy, we earn a commission at no additional cost to you.
What Navigation and Communication Tools Do You Need?
Cell service disappears fast on overlanding routes. You need offline navigation and emergency communication tools that work when you're 50 miles from the nearest cell tower.
Essential navigation tools:
- Offline GPS app: Apps like Gaia GPS, onX Offroad, or Avenza Maps download satellite and topo maps for offline use. Load your route and surrounding area before you lose signal.
- Dedicated GPS unit: A Garmin Overlander or similar device provides reliable GPS without draining your phone battery. Prices range from $400–$700.
- Paper maps: Yes, seriously. A USGS topo map of your area is a zero-battery backup that has saved countless trips when electronics fail.
Communication and safety gear:
- Satellite communicator: A Garmin inReach or SPOT device sends SOS signals and text messages via satellite. Annual plans cost $15–$65/month. The U.S. Forest Service recommends carrying a satellite communicator on all backcountry trips.
- CB or GMRS radio: Essential for communicating with your travel group on trails where you can't see each other. GMRS radios require an FCC license ($35, no test) and offer 20+ mile range with repeaters.
- First aid kit: A wilderness-rated kit with trauma supplies, not a basic household kit. Include medications for altitude sickness if you'll be above 8,000 feet.
Before every trip, file a trip plan with someone who isn't going. Include your route, expected return date, and emergency contacts. If you don't check in by your return date, they know to alert authorities.
Download the National Geographic trail maps for popular overlanding areas — they include trail difficulty ratings and seasonal closures that standard GPS apps miss.
How Much Does a Complete Overlanding Build Cost?
Overlanding builds range from $2,000 for a capable starter rig to $20,000+ for a fully kitted expedition vehicle. The key is building in phases — start with safety and reliability, then add comfort as your budget allows.
| Category | Budget Build | Mid-Range Build | Premium Build |
|---|---|---|---|
| Tires (set of 5) | $800–$1,200 | $1,200–$1,600 | $1,600–$2,000 |
| Protection (skid plates, bull bar) | $300–$600 | $800–$1,500 | $1,500–$3,000 |
| Storage (rack, boxes) | $200–$500 | $600–$1,500 | $1,500–$3,000 |
| Recovery gear | $300–$500 | $500–$800 | $800–$1,200 |
| Shelter | $100–$300 | $800–$1,500 | $1,500–$4,000 |
| Power system | $100–$300 | $400–$800 | $800–$2,000 |
| Navigation & comms | $50–$150 | $300–$700 | $700–$1,500 |
| Total | $1,850–$3,550 | $4,600–$8,400 | $8,400–$16,700 |
The biggest mistake new overlanders make is buying everything at once. Build in three phases:
- Phase 1 — Safety: Mechanical service, tires, recovery gear, first aid kit, and a fire extinguisher. Total: $1,500–$2,500.
- Phase 2 — Capability: Skid plates, bed rack or roof rack install, storage system, and basic power setup. Total: $1,000–$3,000.
- Phase 3 — Comfort: Rooftop tent or camper, camp kitchen, solar, upgraded lighting, and communication gear. Total: $1,500–$5,000+.
Don't finance your build with credit cards. Overlanding is supposed to reduce stress, not add financial pressure. Buy quality gear once rather than replacing cheap gear twice — a $600 bed rack outlasts three $150 universal racks.
Related Articles
- Best Truck Bull Bars for Front-End Protection — Referenced when discussing front-end protection upgrades for overlanding trucks
- Best Truck Grille Guards for Front-End Protection — Linked as an alternative front-end protection option alongside bull bars
- Best Truck Mud Flaps for Every Setup — Referenced when discussing body protection and paint preservation on dusty trails
- Best Truck Bed Racks for Overlanding — Linked when discussing storage and organization systems for truck beds
- Best Truck Roof Racks for Camping Gear — Referenced for overflow gear mounting and weight distribution discussion
- How to Install a Roof Rack on Your Truck — Linked in the build cost section when discussing Phase 2 capability upgrades
Conclusion
Recommended Products
AltitudeCraft Automatic Tire Deflators (10-30 PSI)
These adjustable automatic deflators air down all four tires simultaneously to your target PSI, saving time at every trailhead. The brass construction and laser-etched scale provide reliable, repeatable results trip after trip.
Check Price On AmazonIf you click this link and buy, we earn a commission at no additional cost to you.
4 PCS Shovel Rack for Roof Rack
Mount your recovery shovel, axe, or other long-handled tools externally on your roof rack or bed rack. Frees up valuable bed space and keeps recovery gear instantly accessible without digging through cargo.
Check Price On AmazonIf you click this link and buy, we earn a commission at no additional cost to you.
Overland Vehicle Systems Cargo Box Kitchen
This all-in-one cargo box includes a slide-out sink, cooking shelf, and work station that transforms your truck bed into a fully functional camp kitchen. Ideal for overlanders who want organized cooking without a separate kitchen setup.
Check Price On AmazonIf you click this link and buy, we earn a commission at no additional cost to you.
Pickup Truck Pop-Up Bed Camper with Insulated Cabin
An aluminum pop-up camper topper that turns your truck bed into an insulated, weatherproof sleeping cabin. Custom interior layout options make it suitable for four-season overlanding and extended road trips.
Check Price On AmazonIf you click this link and buy, we earn a commission at no additional cost to you.
Frequently Asked Questions
Can you overland in a stock truck?
What is the best truck for overlanding on a budget?
How much does it cost to set up a truck for overlanding?
Do you need a lift kit for overlanding?
What recovery gear do I need for overlanding?
Should I get a rooftop tent or ground tent for overlanding?
How do you navigate without cell service while overlanding?
What PSI should I run for overlanding?
Affiliate Disclosure: This article contains affiliate links. If you purchase through these links, we may earn a commission at no extra cost to you.