How to Mount an Awning on Your Truck
Key Takeaways
- Most truck awning installations take 45-90 minutes with basic hand tools and no permanent drilling required.
- Roof racks and bed racks are the two most common mounting points — your choice depends on where you want shade coverage.
- L-shaped mounting brackets are the universal standard, but always verify bolt spacing matches your rack's crossbar diameter.
- Torque all mounting bolts to 15-20 ft-lbs to avoid cracking bracket welds or stripping threads on aluminum crossbars.
- Always test-deploy your awning before hitting the road to confirm clearance from antennas, lights, and the tailgate.
What Tools and Materials Do You Need?
A truck awning installation requires basic hand tools you likely already own, plus a few mounting-specific items. Plan on gathering everything before you start — running to the hardware store mid-install wastes time and daylight.
- Socket wrench set: 10mm, 13mm, and 17mm sockets cover most bracket hardware
- Allen key set: many crossbar clamps use 5mm or 6mm hex bolts
- Torque wrench: essential for hitting the 15-20 ft-lb range without overtightening
- Tape measure: for marking bracket positions and verifying spacing
- Painter's tape or masking tape: for marking drill points or alignment references
- Level: a small torpedo level ensures your awning sits flat
- Threadlocker (blue Loctite): prevents bolts from vibrating loose on the highway
- Rubbing alcohol and clean rags: for cleaning mounting surfaces
If your truck doesn't already have a rack system, you'll need to install a roof rack first. Most awnings mount to existing crossbars using L-shaped brackets, so confirm your rack is rated for the awning's weight — typically 25-45 lbs depending on size.
For bed rack mounting, you'll need awning mount brackets designed for your specific rack's bolt pattern. Universal brackets like the OTTFF Heavy Duty Universal L Roof Rack Mounting Brackets work with most standard crossbar sizes and save you from hunting down proprietary hardware.
Optional but helpful: a second person to hold the awning while you tighten bolts. These units are awkward to manage solo, especially the 8-foot and larger models.
OTTFF Heavy Duty Universal L Roof Rack Mounting Brackets (2-Pack)
Universal L-brackets that fit most standard crossbar profiles. The heavy-duty steel construction handles highway vibration and wind loads without fatigue cracking.
Check Price On AmazonIf you click this link and buy, we earn a commission at no additional cost to you.

Where Should You Mount Your Truck Awning?

The best mounting location depends on how you use your truck and where you want shade. There are three primary options, each with clear trade-offs in coverage area, accessibility, and aerodynamics.
- Roof rack (driver side): the most popular position — provides shade along the length of the truck and keeps the passenger side clear for camp kitchen setups
- Roof rack (passenger side): ideal if you typically park with the driver side facing traffic or wind
- Bed rack: mounts lower, easier to reach for deployment, and keeps weight centered over the rear axle
For most overlanders, a driver-side roof rack mount is the standard choice. It positions the awning at roof height, maximizing shade coverage and keeping the deployed canopy above head height for most people (6+ feet of clearance).
Bed rack mounting is gaining popularity because it doesn't require a full roof rack and works especially well with trucks that already have a bed rack for overlanding gear. Dedicated brackets like the Overland Axis Truck Bed Rack Awning Mount Brackets bolt directly to most bed rack crossbars and position the awning at an ideal deployment angle.
Consider these factors before choosing:
- Vehicle height: roof-mounted awnings on lifted trucks may be difficult to reach without a step
- Garage clearance: add the awning's folded profile (typically 4-6 inches) to your current roof height
- Weight distribution: roof-mounted awnings raise center of gravity more than bed rack installs
- Tonneau cover compatibility: bed rack mounts keep the awning clear of roll-up covers
Overland Axis Truck Bed Rack Awning Mount Brackets
Purpose-built brackets for mounting awnings to bed racks. Ideal if you prefer a lower mounting point with easier deployment access than a roof rack setup.
Check Price On AmazonIf you click this link and buy, we earn a commission at no additional cost to you.

How Do You Choose the Right Awning Size?
Pick your awning size based on how much shade you actually need and the available mounting length on your rack. An oversized awning adds weight and wind resistance you don't need, while an undersized one leaves you squinting at high noon.
| Awning Size | Shade Coverage | Best For | Weight |
|---|---|---|---|
| 5 ft × 6.5 ft | ~32 sq ft | Solo camping, compact trucks | 15-20 lbs |
| 6.5 ft × 8 ft | ~52 sq ft | Couples, midsize trucks | 25-30 lbs |
| 6.6 ft × 10 ft | ~66 sq ft | Families, full-size trucks | 35-45 lbs |
| 270-degree | ~120+ sq ft | Base camp setups, group trips | 50-70 lbs |
For full-size trucks like the F-150 or Ram 1500, a 6.6 ft × 8 ft awning is the sweet spot — enough coverage for two camp chairs and a small table without excessive weight. The SAMOUT 6.6ft × 8.2ft Rooftop Pullout Awning is a solid example at this size, with UPF50+ fabric and reinforced hinges.
If you regularly camp with family or a group, step up to a 6.6 ft × 10 ft model or consider a 270-degree awning that wraps around the rear of the vehicle. The BUNKER INDUST 270 Degree Awning provides wraparound coverage with built-in LED lighting — a significant upgrade for extended base camp setups.
- Measure your crossbar span: the awning housing must fit between your rack's mounting points
- Check extension depth: make sure the deployed awning won't extend past your truck's width into traffic lanes
- Factor in wind rating: larger awnings catch more wind — look for models rated to at least 25 mph
SAMOUT 6.6ft × 8.2ft Rooftop Pullout Awning
The ideal mid-size awning for full-size trucks. UPF50+ ripstop fabric with reinforced hinges provides reliable shade for two-person camping setups without excessive bulk.
Check Price On AmazonIf you click this link and buy, we earn a commission at no additional cost to you.

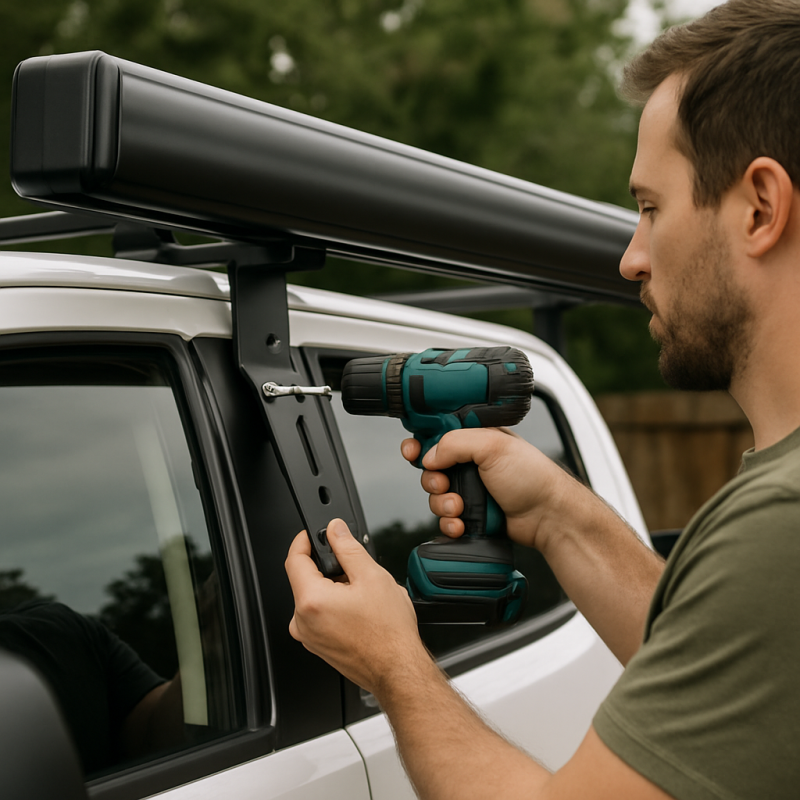
How Do You Install the Mounting Brackets?
Mounting brackets are the foundation of your entire awning install — get this step right and everything else is straightforward. Most truck awnings use L-shaped brackets that clamp to your crossbars and bolt to the awning's mounting channel.
Here's the step-by-step process:
- Clean the crossbars: wipe down mounting surfaces with rubbing alcohol to remove road grime, wax, or oxidation that could reduce grip
- Position the brackets: slide brackets onto the crossbar at roughly equal spacing — most awnings need 3 brackets for units under 8 feet, and 4 brackets for longer models
- Mark your positions: use painter's tape to mark each bracket location on the crossbar, measuring from a fixed reference point
- Hand-tighten first: snug each bracket bolt by hand so you can still slide brackets for fine adjustment
- Check alignment: lay a straightedge across all bracket tops to confirm they're in a straight line and at the same height
- Final torque: tighten all bolts to 15-20 ft-lbs using a torque wrench, working in an alternating pattern (first bracket, last bracket, middle brackets)
For trucks with roof racks designed for camping gear, the crossbars are typically rated for 150+ lbs of dynamic load — more than enough for any awning. Just confirm the crossbar diameter matches your bracket's clamp range.
The BUNKER INDUST 3-Piece Awning Mounting Bracket Set fits most standard crossbar profiles and includes all necessary hardware. Apply a drop of blue threadlocker to each bolt before final tightening — highway vibrations will loosen unprotected hardware within weeks.
BUNKER INDUST 3-Piece Awning Mounting Bracket Set
Complete three-bracket set compatible with both 180° and 270° awnings. Includes all hardware needed for a secure crossbar installation.
Check Price On AmazonIf you click this link and buy, we earn a commission at no additional cost to you.

How Do You Attach the Awning to the Brackets?
With brackets secured, attaching the awning itself takes 15-20 minutes and is the most physically awkward part of the job. Having a helper hold one end makes this dramatically easier.
- Unbox and inspect: lay the awning on a clean surface and check for shipping damage — bent rails, torn fabric, or missing hardware
- Identify the mounting channel: the awning housing has a slotted aluminum rail along the top with pre-drilled holes or a continuous T-slot channel
- Lift the awning into position: with a helper supporting one end, align the mounting channel with your installed brackets
- Insert bolts loosely: thread bolts through the brackets and into the awning channel — finger-tight only at this stage
- Slide and center: adjust the awning's position so it's centered on your truck (or offset to your preferred side if using a side-mount configuration)
- Level check: place a torpedo level on the awning housing — it should be perfectly level or angled very slightly downward toward the deployment side for water runoff
- Final torque: tighten all awning-to-bracket bolts to the manufacturer's spec, typically 12-15 ft-lbs for aluminum channels
A critical detail most guides skip: check that the awning housing clears any rooftop accessories. Antennas, CB radio mounts, and light bars can interfere with deployment.
- Minimum clearance: allow 2 inches between the awning housing and any adjacent equipment
- Hinge side: the deployment hinge needs unobstructed swing arc — test this before final tightening
- Fabric direction: confirm the fabric rolls out toward the side of the vehicle, not toward the front or rear
Once all bolts are torqued, give the awning a firm shake. There should be zero play or rattle. Any movement means a bolt isn't tight enough or a bracket isn't seated properly.
How Do You Test and Adjust Your Awning?
Never hit the road without a full deployment test in your driveway. This catches alignment issues, clearance problems, and hardware defects while you still have your tools out.
- Deploy slowly: unlatch the awning and pull the fabric out to full extension, watching for binding or uneven tension
- Lock the support legs: extend both telescoping legs and lock them at your desired height — most people set these at 6 to 6.5 feet
- Check ground contact: on level ground, both legs should touch down evenly with slight outward angle for stability
- Stake if possible: most awnings include guy ropes — attach and stake them to test the full setup
- Walk underneath: check headroom at various points and confirm no fabric sag in the center
After deployment testing, retract and re-deploy three times. This breaks in the hinges and confirms the mechanism works smoothly. Some awnings are stiff out of the box and need a few cycles before they operate fluidly.
- Fabric tension: when deployed, the fabric should be taut with no wrinkles — wrinkles indicate misaligned brackets
- Water test: spray the deployed awning with a garden hose to check for pooling (adjust leg height to create a drainage slope)
- Retraction check: the awning should retract fully and latch securely with no fabric pinching
If you notice the awning pulling to one side during deployment, your brackets aren't level. Loosen the bracket bolts, re-level using your torpedo level, and re-torque. This is the most common adjustment needed and usually takes less than 10 minutes to fix.
For wind testing, the Outdoorsy overlanding community recommends deploying your awning in moderate wind (10-15 mph) at home before relying on it in remote locations. This teaches you how the awning handles wind loads and which stake positions provide the best stability.
BUNKER INDUST 270 Degree Awning with Built-in LED Light
Premium wraparound awning for serious overlanders who want maximum shade coverage. Built-in tri-color LED lighting eliminates the need for separate camp lights.
Check Price On AmazonIf you click this link and buy, we earn a commission at no additional cost to you.

What Are Common Mistakes to Avoid?
Most awning installation failures come from three preventable mistakes: overtightening hardware, skipping weatherproofing, and ignoring weight ratings. Avoid these and your install will last for years.
- Overtightening bolts: aluminum crossbars and awning channels crack under excessive torque — always use a torque wrench, never an impact driver
- Skipping threadlocker: bare bolts vibrate loose within 500 miles of highway driving, guaranteed
- Wrong bracket spacing: brackets too close together create a pivot point; too far apart stresses the awning channel — follow the manufacturer's recommended spacing
- Ignoring rack weight limits: a 40-lb awning plus 20 lbs of mounting hardware approaches the dynamic load limit on many factory racks
- Mounting to rain gutters without reinforcement: gutter-mount racks flex under awning wind loads — use through-bolt reinforcement plates
Another frequently overlooked issue: driving with the awning unlatched. At highway speeds, wind can catch an unlatched awning and rip it — along with your rack — clean off the truck. Always double-check the latch before driving and consider adding a secondary Velcro strap as a backup retention system.
According to Expedition Portal forums, the most common warranty claim on truck awnings is fabric tearing at the mounting rail — almost always caused by deploying in wind gusts over 30 mph. Know your awning's wind rating and never deploy above it, no matter how sunny it is.
- Don't forget clearance checks: gas station canopies, parking garages, and drive-throughs may not clear your awning's added height
- Don't skip the owner's manual: each awning brand has specific torque specs and bracket requirements — generic advice is a starting point, not a substitute
How Do You Maintain Your Truck Awning?
A well-maintained awning lasts 5-10 years with minimal effort. The two biggest enemies are UV degradation and mildew from storing the awning wet — address both and you'll avoid premature replacement.
- Never store wet: always let the awning dry completely before retracting — even 30 minutes of air drying prevents mildew
- Clean quarterly: mix mild soap (no bleach) with warm water and scrub the fabric with a soft brush, then rinse thoroughly
- Inspect hardware monthly: check all bracket bolts for looseness, especially after long highway trips or rough trail driving
- Lubricate hinges: apply dry silicone spray to all pivot points every 3 months to prevent corrosion and binding
- UV protectant: spray fabric with a UV-blocking treatment like 303 Aerospace Protectant once per season
If you camp frequently in dusty environments, REI's shelter care guide recommends shaking out loose debris before retracting. Sand and grit trapped in the rolled fabric act like sandpaper, wearing through waterproof coatings faster than UV exposure alone.
For the mounting hardware, do a torque check every 1,000 miles for the first 5,000 miles, then every oil change after that. New installations settle during the first few trips, and bolts that were torqued correctly at install may need a quarter-turn adjustment.
- Replacement fabric: most quality awnings sell replacement canopies — you don't need a whole new unit if the fabric tears
- Bracket inspection: look for hairline cracks in aluminum brackets, especially at the bend point of L-brackets
- Zipper care: if your awning has zippered walls or rooms, lubricate zippers with beeswax or zipper lube twice per year
Store your truck indoors or use a fitted vehicle cover during extended off-seasons. Even UPF50+ fabrics degrade over time when exposed to constant direct sunlight while the awning sits folded and unused.
Related Articles
- How to Install a Roof Rack on Your Truck — Prerequisite guide for trucks that don't yet have a roof rack mounting system
- Best Truck Bed Racks for Overlanding — Bed racks serve as an alternative mounting point for truck awnings
- Best Truck Roof Racks for Camping Gear — Roof racks rated for camping loads are the primary mounting platform for awnings
Conclusion
Recommended Products
OTTFF Heavy Duty Universal L Roof Rack Mounting Brackets (2-Pack)
Universal L-brackets that fit most standard crossbar profiles. The heavy-duty steel construction handles highway vibration and wind loads without fatigue cracking.
Check Price On AmazonIf you click this link and buy, we earn a commission at no additional cost to you.
Overland Axis Truck Bed Rack Awning Mount Brackets
Purpose-built brackets for mounting awnings to bed racks. Ideal if you prefer a lower mounting point with easier deployment access than a roof rack setup.
Check Price On AmazonIf you click this link and buy, we earn a commission at no additional cost to you.
SAMOUT 6.6ft × 8.2ft Rooftop Pullout Awning
The ideal mid-size awning for full-size trucks. UPF50+ ripstop fabric with reinforced hinges provides reliable shade for two-person camping setups without excessive bulk.
Check Price On AmazonIf you click this link and buy, we earn a commission at no additional cost to you.
BUNKER INDUST 3-Piece Awning Mounting Bracket Set
Complete three-bracket set compatible with both 180° and 270° awnings. Includes all hardware needed for a secure crossbar installation.
Check Price On AmazonIf you click this link and buy, we earn a commission at no additional cost to you.
BUNKER INDUST 270 Degree Awning with Built-in LED Light
Premium wraparound awning for serious overlanders who want maximum shade coverage. Built-in tri-color LED lighting eliminates the need for separate camp lights.
Check Price On AmazonIf you click this link and buy, we earn a commission at no additional cost to you.
Frequently Asked Questions
Can you mount an awning on a truck without a roof rack?
How much weight does a truck awning add?
Do you need to drill holes to mount a truck awning?
Which side of the truck should an awning mount on?
How long does it take to install a truck awning?
Can a truck awning be used in the rain?
Will a truck awning affect gas mileage?
How do you keep a truck awning from flapping in the wind?
Affiliate Disclosure: This article contains affiliate links. If you purchase through these links, we may earn a commission at no extra cost to you.