How to Wire Trailer Lights
Key Takeaways
- The standard 4-pin flat connector uses white (ground), brown (tail/running), yellow (left turn/brake), and green (right turn/brake) wires.
- Always test trailer lights with a multimeter or test light before hitting the road — a failed brake light can result in a rear-end collision or a traffic citation.
- Newer vehicles with multiplexed wiring systems require a converter module to translate 3-wire signals into the standard 4-wire trailer format.
- Use heat-shrink connectors and dielectric grease on every splice to prevent corrosion — the number one cause of trailer light failure.
- A complete trailer light wiring job takes 1-3 hours depending on whether you're running new wire or splicing into existing harnesses.
Understanding Trailer Light Wire Color Codes
Before you touch a single wire, you need to understand the standard color code system. Every trailer connector in the U.S. follows the same color convention, and memorizing it will save you hours of troubleshooting.
- White: Ground wire — connects to the trailer frame and vehicle chassis
- Brown: Tail lights and running lights — active whenever your headlights are on
- Yellow: Left turn signal and left brake light
- Green: Right turn signal and right brake light
- Blue (5-wire systems): Electric brake controller signal — only needed if your trailer has electric brakes
The most common setup is a 4-pin flat connector, which handles ground, tails, left turn/brake, and right turn/brake. If your trailer has electric brakes or reverse lights, you'll step up to a 5-pin, 6-pin, or 7-pin connector instead.
Here's where it gets tricky. Your tow vehicle may use a 3-wire system where the brake light and turn signal share one filament, or a 2-wire system common on older vehicles. The trailer expects a separated 4-wire signal. If your vehicle and trailer don't match, you'll need a tail light converter to translate the signals.
- 2-wire to 3-wire converter: For older vehicles with combined signals
- 3-wire to 4-wire converter: For modern vehicles with multiplexed wiring
- Direct 4-wire: No converter needed — vehicle already separates all signals
Check your vehicle's factory wiring before buying any parts. Pull the tail light housing or check your owner's manual to see how many wires feed each tail light assembly.
Tools and Materials You'll Need
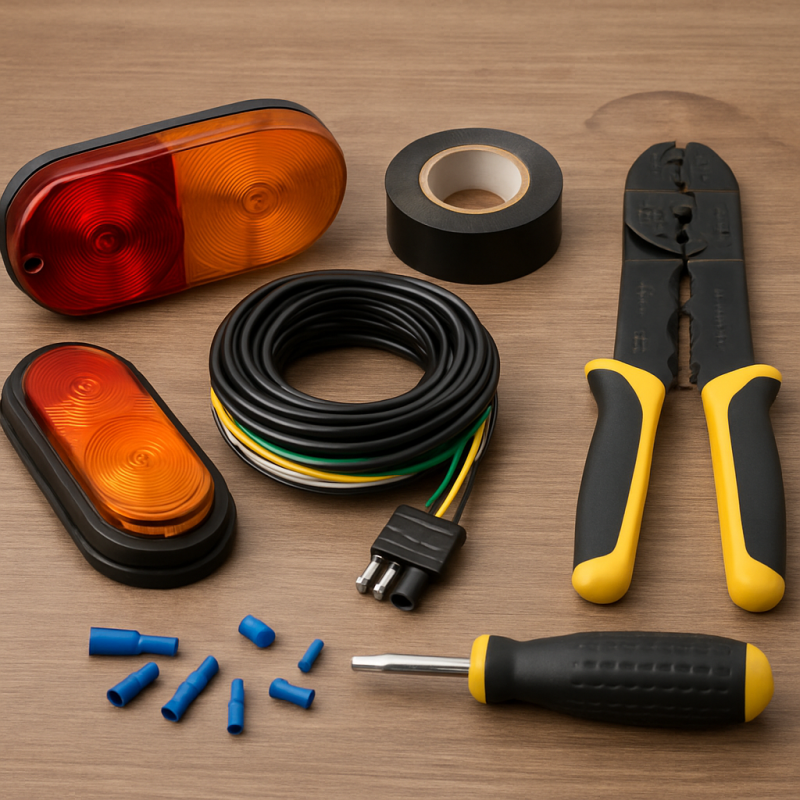
Gather everything before you start. Nothing kills momentum like a trip to the hardware store mid-project. Here's the complete list.
Essential tools:
- Wire strippers: A quality pair that handles 14-18 AWG wire
- Crimping tool: Ratcheting crimpers produce far more reliable connections than cheap squeeze-type crimpers
- Multimeter or test light: For verifying connections and troubleshooting
- Heat gun: For shrinking heat-shrink connectors and tubing
- Drill with bits: For mounting the connector bracket and routing wire through the frame
- Wire fish tape or coat hanger: For pulling wire through frame channels
- Zip ties and wire loom: For securing and protecting the harness
Materials:
- Trailer wiring harness: Pre-made kits include color-coded wire and the connector — much easier than buying bulk wire
- Heat-shrink butt connectors: Waterproof splicing — avoid electrical tape for permanent connections
- Dielectric grease: Apply inside every connector to block moisture
- Self-tapping screws: For grounding and mounting brackets
- Tail light converter (if needed): Match your vehicle's wire count to the trailer's 4-wire system
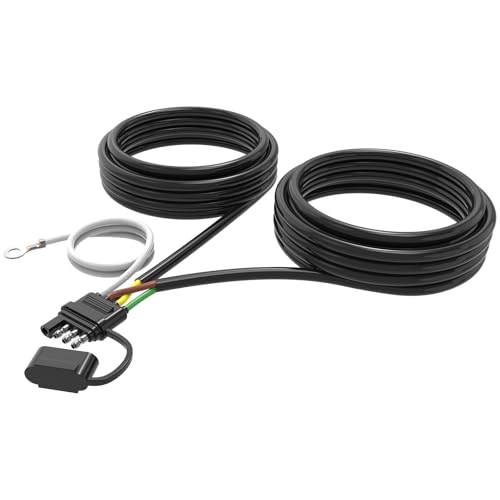
For the wiring harness itself, the Aufind 30FT 4-Pin 5-Wire Trailer Wiring Harness is a solid choice — it uses 18AWG pure copper with tinned ends that resist corrosion. If you need more length for boat trailers or larger rigs, the Serlainxin 50-Foot 4-Pin 5-Wire Harness gives you plenty of slack to work with.
Time estimate: Budget 1-3 hours for a basic 4-wire installation. Add another 30-60 minutes if you need to install a converter module.
Aufind 30FT 4-Pin 5-Wire Trailer Wiring Harness Kit
Pure copper wiring with tinned ends that resist corrosion — the ideal harness for most utility and cargo trailers under 25 feet.
Check Price On AmazonIf you click this link and buy, we earn a commission at no additional cost to you.

Step 1: Prepare the Trailer and Vehicle
Start with a clean workspace and a safe setup. Park your tow vehicle and trailer on a flat, level surface. Engage the parking brake on both.
On the trailer side:
- Inspect existing wiring: If you're replacing old wiring, trace every wire from the connector to each light fixture. Note which wires go where before removing anything.
- Check the ground connection: Scrape paint or rust off the trailer frame at the grounding point. You need bare metal for a solid ground — this is the single most common cause of trailer light problems.
- Clean the light housings: Remove each tail light and inspect the bulb sockets. Look for corrosion, broken filaments, and cracked lenses that let water in.
On the vehicle side:
- Disconnect the battery: Any time you're splicing into vehicle wiring, disconnect the negative terminal first to prevent short circuits.
- Locate your tail light wires: Access the back of each tail light assembly. You'll splice into these or connect through a vehicle-specific harness adapter.
- Check for an existing connector: Many trucks come pre-wired for a trailer connector, especially if they have a factory trailer hitch. Look under the rear bumper near the hitch receiver.
If your vehicle already has a 4-pin or 7-pin connector, you can skip the vehicle-side wiring entirely. Just plug in and test. Most factory tow packages include the connector — check your window sticker or owner's manual for a "Trailer Tow Package" listing.
Step 2: Run the Wiring Harness
Now you'll physically route the wire from the front connector to each light fixture. This step is where patience pays off — a clean wire run prevents chafing, shorts, and future headaches.
On the trailer:
- Start at the tongue: Mount the 4-pin flat connector at the trailer tongue using the included bracket. Position it so it reaches your vehicle's connector without excessive slack.
- Run the main harness along the frame: Follow the trailer's frame rail. Use zip ties every 12-18 inches to secure the wire. Keep it away from moving parts like the axle, springs, and any sharp edges.
- Split at the rear: At the back of the trailer, split the harness — yellow and white go to the left tail light, green and white go to the right. The brown wire (running lights) goes to both sides.
- Use wire loom or conduit: For any exposed sections, slide the wire through split loom tubing. This protects against road debris, UV damage, and abrasion.
On the vehicle (if no pre-existing connector):
- Route from the rear bumper area forward to each tail light: You'll need to access the back of each tail light assembly.
- Keep wiring inside the frame or body: Never let wires hang below the vehicle where they can snag or drag.
- Leave service loops: At each connection point, leave 6-8 inches of extra wire coiled up. This gives you slack for future repairs.
If you're running wire through hollow frame tubes, use a fish tape or stiff wire to pull it through. Tape the trailer harness to the pull wire with electrical tape and gently feed it through the channel.
Step 3: Make the Electrical Connections
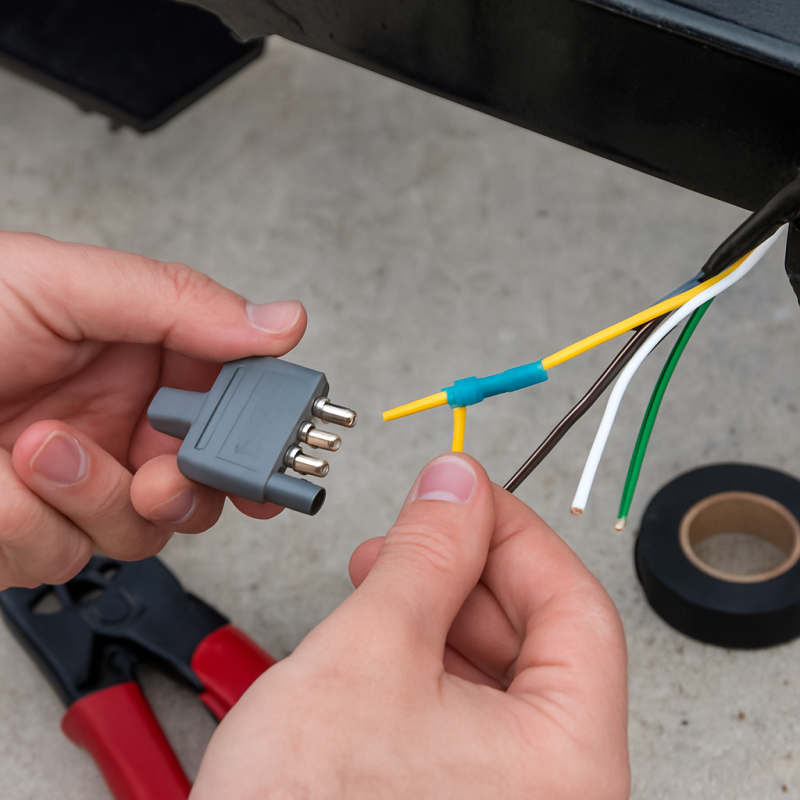
This is the critical step where most mistakes happen. Take your time and double-check every connection against the color code chart.
At each tail light on the trailer:
- Strip 1/2 inch of insulation from the end of each wire — both the harness wire and the light fixture wire.
- Match colors: Connect brown to brown (running light), yellow to yellow (left turn/brake), green to green (right turn/brake), and white to the light fixture's ground wire or a frame bolt.
- Crimp with heat-shrink butt connectors: Slide the connector on, crimp firmly, then shrink the tubing with a heat gun. This creates a waterproof seal that electrical tape simply cannot match.
- Apply dielectric grease: A small dab inside the connector before crimping keeps moisture out for years.
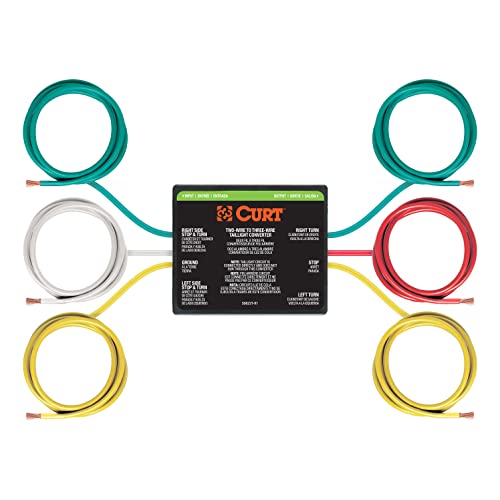
At the vehicle (splice-in method):
- Use a converter if needed: If your vehicle has a 3-wire system, install a CURT 56196 Tail Light Converter between the vehicle wiring and the trailer connector. It splices into your factory tail light wires and outputs the standard 4-wire signal the trailer expects.
- Tap into the correct wires: Use the multimeter to verify which vehicle wire carries which signal before splicing. Colors vary by manufacturer.
- Ground the white wire: Bolt it to bare metal on the vehicle frame with a self-tapping screw and star washer. Sand off any paint or coating first.
For vehicles with newer multiplexed wiring systems (common on 2015+ trucks), a powered converter like the NEW SUN 3-Way to 2-Way Converter handles the signal conversion cleanly without overloading the vehicle's CAN bus system.
CURT 56196 2-to-3-Wire Splice-in Trailer Tail Light Converter
Essential for vehicles that don't output separate turn/brake signals. Splices into factory wiring and converts to the standard 4-wire trailer format.
Check Price On AmazonIf you click this link and buy, we earn a commission at no additional cost to you.
Step 4: Ground Connections — Get This Right
If there's one section in this guide you read twice, make it this one. Bad grounds cause 90% of trailer light problems. A weak ground connection causes dim lights, flickering, lights that work intermittently, or the classic symptom where the turn signal makes the running lights flash.
How to make a proper ground:
- Scrape to bare metal: Use sandpaper or a wire brush to remove paint, rust, and coating from the grounding point on the trailer frame. The contact area should be shiny metal.
- Use a star washer: Place a star washer between the ring terminal and the frame. The teeth bite into the metal and maintain contact even as things vibrate.
- Apply dielectric grease: After bolting down the ground terminal, coat the connection with dielectric grease. This doesn't insulate the connection — it seals out moisture that causes corrosion.
- Use a dedicated ground wire: Don't rely on the trailer frame itself as a ground path. Run a physical white ground wire from each light fixture back to the connector. Frame-only grounds fail when rust or paint interrupts the path.
Ground on both sides:
- Vehicle side: Ground to the vehicle frame or a factory ground bolt — never to body panels or bumper brackets that may be isolated by rubber mounts.
- Trailer side: Ground each light fixture individually AND run the main ground back to the connector. Use ring terminals on self-tapping screws into the frame.
After completing all ground connections, use your multimeter to check continuity between the trailer connector's ground pin and each light fixture's ground point. You should see less than 0.5 ohms of resistance. Anything higher means a poor connection that will cause problems down the road.
Step 5: Test the Complete System
Never hit the road without a thorough test. This takes five minutes and can prevent a dangerous situation or an expensive ticket.
Testing procedure:
- Reconnect the vehicle battery if you disconnected it earlier.
- Plug in the trailer connector.
- Turn on headlights: All running lights (brown wire) on the trailer should illuminate. Walk around and check every light — front markers, side markers, and tail lights.
- Press the brake pedal: Have a helper press the brakes while you watch from behind. Both trailer brake lights should light up brighter than the running lights.
- Test left turn signal: Activate the left blinker. Only the left trailer light should flash. If the right side also flashes or the running lights flicker, you have a ground issue.
- Test right turn signal: Same check on the right side.
- Test hazard lights: Both sides should flash simultaneously.
Common test failures and fixes:
- No lights at all: Check the vehicle-side fuse for the trailer circuit. Check the ground connection at the connector.
- Dim lights: Poor ground — clean and re-do the ground connections.
- Turn signal activates wrong side: Yellow and green wires are swapped — switch them at the connector.
- Running lights flash with turn signal: Bad ground on the trailer side forcing current to backfeed through the running light circuit.
- Lights work sometimes: Loose crimp or corroded connection — inspect every splice point.
If your trailer has electric brakes, this is also the time to verify your brake controller is sending signal through the blue wire. Activate the manual override and check for voltage at the trailer-side blue wire terminal.
Troubleshooting Persistent Trailer Light Issues
Even after a careful installation, trailer lights can develop problems over time. Here are the most common issues and how to diagnose them systematically.
Intermittent operation:
- Vibration-related failures: Trailer wiring takes a beating from road vibration. Check every splice and connector for looseness. Tug gently on each connection — if it moves, redo it.
- Connector corrosion: The flat 4-pin connector is exposed to road spray. Unplug it and inspect the pins. Clean with electrical contact cleaner and apply dielectric grease.
- Bulb socket issues: Incandescent bulb sockets corrode internally. Clean with fine sandpaper or upgrade to LED tail lights that draw less current and last far longer.
Blown fuses:
- Short circuit: A wire chafed through its insulation and touching the frame will blow fuses immediately. Trace the entire harness looking for bare wire contacting metal.
- Overloaded circuit: If you've added extra lights beyond the original setup, the vehicle circuit may not have enough capacity. Check the fuse rating and the total current draw of all connected lights.
Upgrade options for reliability:
- LED conversion: LEDs draw 80% less current, generate no heat, and last 50,000+ hours versus 1,000 for incandescent bulbs. They're also brighter, which improves visibility.
- Sealed wiring harness: If you're replacing a corroded harness, invest in a quality kit with jacketed cable like the Malictele 22FT 16AWG Jacketed Trailer Wiring Kit. The outer jacket protects all five wires together, reducing chafing and moisture intrusion.
- Waterproof connectors: Upgrade from the basic flat 4-pin to a sealed connector if you regularly submerge the trailer (boat trailers especially).
When all else fails, use your multimeter methodically. Test for voltage at the vehicle connector first, then at the trailer connector, then at each light. The point where voltage disappears is your problem area.
Malictele 22FT 16AWG Jacketed Cable Trailer Light Kit
Heavy-duty 16AWG jacketed cable protects all five wires in a single outer sheath — ideal for boat trailers and harsh environments where corrosion is a constant threat.
Check Price On AmazonIf you click this link and buy, we earn a commission at no additional cost to you.
Related Articles
- Best Trailer Hitches for Trucks — Referenced when discussing vehicles that come pre-wired for trailer connectors alongside factory hitch installations
- Best Trailer Brake Controllers for Safe Towing — Referenced when testing the blue wire for electric brake signal through a brake controller
- Best Truck Tail Lights for Safe Towing — Referenced when discussing LED upgrades for corroded incandescent bulb sockets
Conclusion
Recommended Products
Aufind 30FT 4-Pin 5-Wire Trailer Wiring Harness Kit
Pure copper wiring with tinned ends that resist corrosion — the ideal harness for most utility and cargo trailers under 25 feet.
Check Price On AmazonIf you click this link and buy, we earn a commission at no additional cost to you.
CURT 56196 2-to-3-Wire Splice-in Trailer Tail Light Converter
Essential for vehicles that don't output separate turn/brake signals. Splices into factory wiring and converts to the standard 4-wire trailer format.
Check Price On AmazonIf you click this link and buy, we earn a commission at no additional cost to you.
Malictele 22FT 16AWG Jacketed Cable Trailer Light Kit
Heavy-duty 16AWG jacketed cable protects all five wires in a single outer sheath — ideal for boat trailers and harsh environments where corrosion is a constant threat.
Check Price On AmazonIf you click this link and buy, we earn a commission at no additional cost to you.
Frequently Asked Questions
What color wires go to trailer lights?
Can I wire trailer lights without a converter?
Why do my trailer lights work sometimes but not others?
How do I wire a 4-pin trailer connector to my truck?
What gauge wire should I use for trailer lights?
Do I need to wire trailer lights to the battery?
Why does my turn signal make the running lights flash on the trailer?
How long does it take to wire trailer lights?
Affiliate Disclosure: This article contains affiliate links. If you purchase through these links, we may earn a commission at no extra cost to you.