How to Install a Trailer Hitch on Your Truck
Key Takeaways
- Most receiver-style trailer hitches can be installed in 1-2 hours with basic hand tools and no drilling required.
- Always verify your hitch's weight class matches your towing needs — Class I handles up to 2,000 lbs while Class V supports 12,000+ lbs.
- Torque specs are critical for safety — under-torqued bolts can loosen during towing and cause catastrophic failure.
- You'll need to remove the spare tire and possibly lower the exhaust on many truck models to access the frame mounting points.
- After installation, test the hitch with a short loaded drive and re-torque all bolts after the first 100 miles of towing.
Choosing the Right Hitch Class for Your Truck
Before you buy a single bolt, you need to match the hitch class to your towing requirements. Installing the wrong class is the most expensive mistake you can make — it either limits your capability or creates a dangerous mismatch.
- Class I (1-1/4" receiver): Up to 2,000 lbs gross trailer weight. Ideal for small utility trailers and bike racks.
- Class II (1-1/4" receiver): Up to 3,500 lbs. Handles jet skis, small boat trailers, and cargo carriers.
- Class III (2" receiver): Up to 8,000 lbs. The most popular class for trucks — covers mid-size boat trailers, campers, and car haulers.
- Class IV (2" receiver): Up to 10,000 lbs. Built for heavier travel trailers and equipment haulers.
- Class V (2-1/2" receiver): 12,000+ lbs. Heavy-duty gooseneck and fifth-wheel territory.
Check your truck's owner's manual for its maximum tow rating. Your hitch class should never exceed what your vehicle can safely pull. If you're shopping for a new hitch, our roundup of the best trailer hitches for trucks breaks down the top options by class and vehicle fit.
For trucks with a 2-1/2" receiver that occasionally need to use 2" accessories, a TOPTOW hitch reducer sleeve lets you step down without swapping the entire hitch. It comes with a pin and clip for secure fitment.
TOPTOW Trailer Hitch Adapter 2-1/2" to 2" Reducer Sleeve
Essential adapter if your truck has a 2-1/2" Class V receiver but you need to use standard 2" accessories like ball mounts and bike racks. Includes pin and clip for secure fitment.
Check Price On AmazonIf you click this link and buy, we earn a commission at no additional cost to you.

Tools and Materials You'll Need
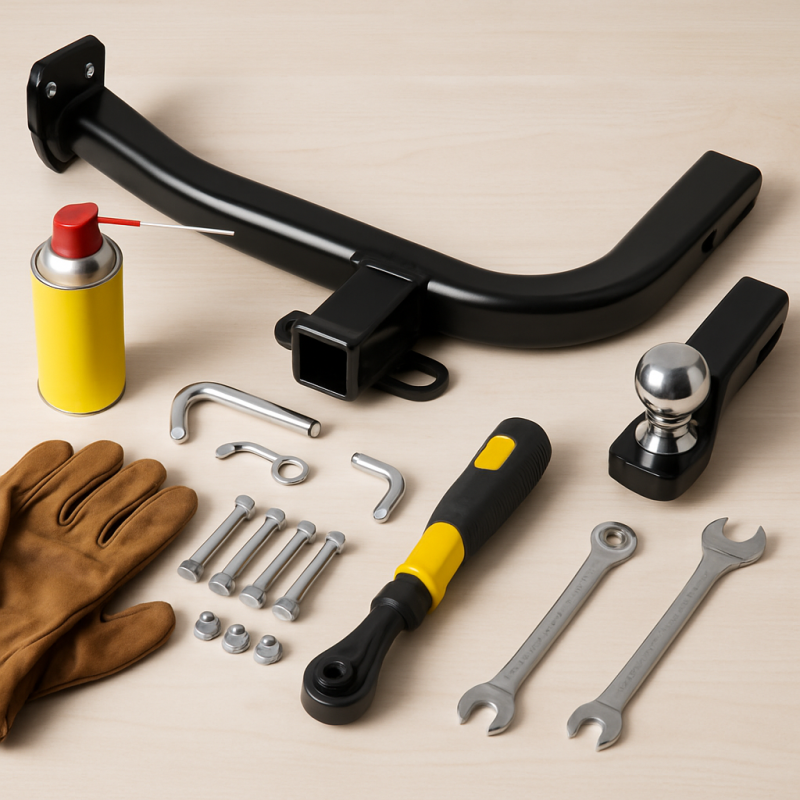
One of the best things about a bolt-on hitch install is the short tool list. You likely already own most of what you need. Gather everything before you start so you're not crawling out from under the truck mid-job.
- Socket wrench set: 3/8" and 1/2" drive with metric and SAE sockets (18mm, 19mm, and 3/4" are most common)
- Torque wrench: Capable of at least 100 ft-lbs — this is non-negotiable for safety
- Ratcheting wrenches: For tight spaces where a socket won't fit
- Floor jack and jack stands: If you need to raise the truck for clearance
- Penetrating oil (PB Blaster): For loosening existing frame bolts or rusted hardware
- Wire brush: To clean frame mounting surfaces
- Safety glasses and gloves: Rust flakes and sharp edges are guaranteed
- Drop light or headlamp: You'll be working in dark spaces under the truck
Your hitch kit should include all necessary mounting hardware — bolts, nuts, lock washers, and fish wire for threading bolts through the frame. If anything is missing, contact the manufacturer before improvising with hardware store bolts. Hitch hardware is Grade 8 for a reason.
If you plan on towing a travel trailer, you'll also want a lift tool kit for weight distribution hitches to make hookup and adjustment much easier down the road.
Aussio Lift Tool Kit for Weight Distribution Hitches
Makes connecting and adjusting weight distribution hitches dramatically easier. A must-have if you're towing a travel trailer and need to hook up spring bars regularly.
Check Price On AmazonIf you click this link and buy, we earn a commission at no additional cost to you.

Preparing Your Truck for Installation
Proper preparation saves you time and frustration. Most installation headaches come from skipping this step and jumping straight to bolts.
Step 1: Park on a flat, level surface. Engage the parking brake and chock the front wheels. Never work under a truck supported only by a jack.
Step 2: Remove the spare tire. On most trucks, the spare hangs beneath the bed directly where the hitch mounts. Lower it using the jack tool from your truck's toolkit. Set it aside completely.
Step 3: Lower the exhaust if needed. Some vehicles route the exhaust through the hitch mounting area. You may need to unbolt the rear hangers and gently lower the exhaust pipe for clearance. Rubber exhaust hangers pop off easily with a flathead screwdriver and some spray lubricant.
- Clean the frame rails: Use a wire brush to remove dirt, rust, and undercoating from the mounting points. Clean metal-to-metal contact ensures a secure fit.
- Inspect for rust damage: If your frame rails show serious corrosion or flaking, consult a professional before mounting a hitch. Compromised frame integrity is a safety hazard.
- Locate mounting holes: Many trucks come with pre-drilled frame holes covered by plastic plugs. Pop these out with a flathead screwdriver. If your vehicle doesn't have pre-drilled holes, your hitch kit may require drilling — follow the template exactly.
Take a photo of the underside of your truck before starting. This gives you a reference if you need to route wiring later or remember where exhaust hangers connect.
Step-by-Step Hitch Installation
With prep done, it's time to mount the hitch. This is the core of the job and typically takes 45-90 minutes depending on your truck model and experience level.
Step 1: Position the hitch. Slide the hitch assembly under the truck and roughly align it with the frame mounting holes. Most hitches are heavy — 50-80 lbs for a Class III — so use a floor jack or have a helper lift one end.
Step 2: Thread the fish wire. Most kits include a thin wire or string to pull bolts through frame channels. Thread the fish wire through the frame hole from the inside, attach it to the bolt, and pull the bolt back through. This is the trickiest part of the entire install.
- Tip: Use masking tape to attach the bolt to the fish wire securely. A dropped bolt inside the frame rail means starting over.
- Tip: Magnetic retrieval tools are lifesavers if you do drop hardware inside the frame.
Step 3: Hand-tighten all bolts first. Insert all bolts, washers, and nuts but only finger-tight. This lets you shift the hitch for alignment before committing. Never fully tighten one bolt before the others are in place — you'll bind the hitch and misalign the remaining holes.
Step 4: Torque to spec. Once all bolts are hand-tight, torque them in a star pattern (like tightening a wheel) to the manufacturer's specification. Most Class III hitches call for 75-110 ft-lbs depending on bolt size. Check your instruction sheet — this number varies.
Step 5: Reinstall removed components. Rehang the exhaust, raise the spare tire back into position, and replace any plastic covers or splash guards you removed.
Wiring the Trailer Electrical Connection
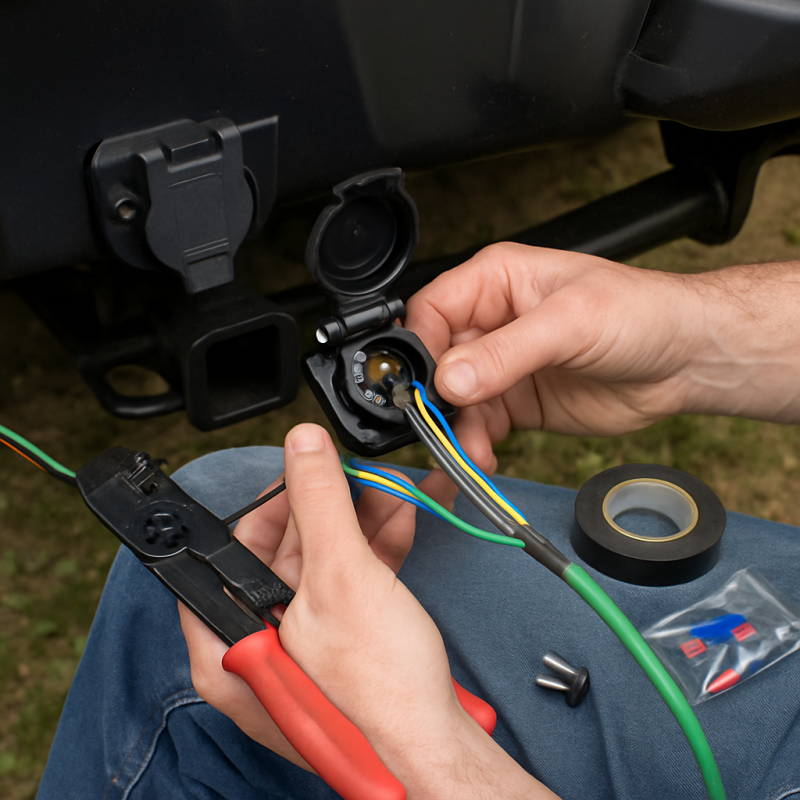
A hitch without wiring is only half the job. Every state requires functioning trailer lights — brake lights, turn signals, and running lights — before you tow on public roads.
- 4-pin flat connector: Covers basic lighting — tail, brake, and turn signals. Sufficient for utility trailers and small boats.
- 7-pin round connector: Adds backup lights, 12V power, and electric brake signal. Required for travel trailers and larger loads.
For most modern trucks, a plug-and-play wiring harness is the easiest route. These harnesses tap into your vehicle's existing wiring at the taillight assembly — no wire splicing needed. Match the harness to your exact year, make, and model.
If you're towing anything over 3,000 lbs, you'll also need a trailer brake controller installed inside the cab. Electric trailer brakes are required by law in most states for trailers over a certain weight, and they dramatically improve stopping distance and safety.
- Route wiring carefully: Keep wires away from exhaust components, moving parts, and sharp edges. Use zip ties to secure the harness to the frame.
- Test before towing: Have someone stand behind the truck while you cycle through brake lights, turn signals, and running lights. Fix any issues now — not on the highway.
- Carry spare fuses: Trailer wiring circuits blow fuses more often than you'd expect, especially with LED-to-incandescent mismatches.
While you're setting up your tow rig, it's also worth investing in proper towing mirrors if your trailer is wider than your truck. Visibility is everything when merging and changing lanes.
Post-Installation Safety Checks
You've torqued every bolt and connected the wiring — but the job isn't done yet. These safety checks separate a professional-quality install from a risky one.
- Visual inspection: Get under the truck one more time. Confirm every bolt has a washer and nut, nothing is cross-threaded, and no wiring hangs below the frame line.
- Receiver tube test: Insert a ball mount or hitch pin into the receiver. It should slide in smoothly with minimal play. If the receiver is misaligned, the hitch may be shifted — loosen and re-center.
- Rattle check: Some play in the receiver is normal, but excessive movement creates noise and wear. A DEEAGLE anti-rattle hitch tightener eliminates wobble and keeps your ball mount locked solid.
- Ground clearance: Measure the distance from the bottom of the hitch to the ground. Compare it to your truck's stock departure angle. A low-hanging hitch can catch on steep driveways or boat ramps.
The 100-mile re-torque rule: After your first towing trip (or first 100 miles), crawl back under and re-torque every bolt. Vibration and load settling can cause hardware to loosen slightly during the break-in period. This single step prevents the most common hitch failures.
Keep a copy of the installation instructions and torque specs in your glovebox. If you ever need warranty service or sell the truck, documentation proves the hitch was properly installed.
DEEAGLE Anti-Rattle Hitch Tightener Stabilizer
Eliminates annoying receiver wobble and rattle that's common with ball mounts, cargo carriers, and bike racks. Simple clamp design installs in seconds without tools.
Check Price On AmazonIf you click this link and buy, we earn a commission at no additional cost to you.

Common Mistakes and How to Avoid Them
Even experienced DIYers make these errors. Knowing them upfront saves you a second trip under the truck — or worse, a roadside emergency.
- Using the wrong hardware grade: Hitch bolts are Grade 8 hardened steel. Never substitute with Grade 5 or hardware store bolts. They can shear under towing loads.
- Skipping the torque wrench: "Tight enough" isn't a torque spec. Under-torqued bolts loosen. Over-torqued bolts stretch and weaken. Use the wrench every time.
- Ignoring the fish wire: Trying to thread bolts through frame rails without fish wire wastes hours. Use the tool provided — it exists for a reason.
- Forgetting to re-torque: As mentioned above, the first 100 miles settle everything. Mark your calendar or set a phone reminder.
- Mounting to the bumper instead of the frame: Bumper-mounted hitches are for light-duty only (Class I). For real towing, the hitch must bolt to the frame rails.
Rust and seized bolts are the biggest time killers on older trucks. If you encounter a bolt that won't budge, soak it in penetrating oil for 15-20 minutes before trying again. Applying heat with a propane torch is a last resort — keep it away from fuel lines and brake lines.
Another common oversight is not checking tongue weight capacity separately from gross towing capacity. Your hitch might handle 8,000 lbs of gross trailer weight, but tongue weight is typically only 10-15% of that. Overloading the tongue puts dangerous stress on the hitch and rear axle.
When to Call a Professional
DIY hitch installation makes sense for most trucks with bolt-on kits. But there are situations where professional installation is the smarter move.
- Severe frame rust: If wire brushing reveals thin or flaking frame metal, a welder or chassis shop should evaluate structural integrity before any hitch goes on.
- Custom or drill-required installs: Some vehicles — especially unibody SUVs and crossovers — need precise drilling. One wrong hole weakens the structure permanently.
- Fifth-wheel or gooseneck hitches: These mount through the truck bed and require cutting, drilling, and often welding. The margin for error is slim and the stakes are high.
- Wiring integration issues: Some newer trucks with advanced lighting systems (sequential turn signals, adaptive lighting) need professional wiring harnesses that integrate with the vehicle's computer.
Professional installation typically costs $150-$350 depending on the hitch class and vehicle. That includes the labor, hardware check, and a torque verification you can trust. For a hitch you'll use for years, that's reasonable insurance.
If you're building out a full tow rig, don't overlook recovery gear. A quality tow strap and recovery kit belongs behind the seat of every truck that tows — because getting stuck with a loaded trailer is a matter of when, not if.
Also consider keeping a portable air compressor in your truck. Towing adds stress to your tires, and maintaining correct pressure is essential for safe loaded driving.
Related Articles
- Best Trailer Hitches for Trucks — Comprehensive review of top-rated trailer hitches by class and vehicle compatibility
- Best Trailer Brake Controllers for Safe Towing — Essential for towing loads over 3,000 lbs — covers wired and wireless brake controllers
- Best Towing Mirrors for Chevy, GMC & Ford Trucks — Towing mirrors improve visibility when hauling wide trailers
- Best Tow Straps and Recovery Kits for Trucks — Recovery gear is essential for any truck that tows regularly
- Best Portable Air Compressors for Trucks — Maintaining correct tire pressure is critical when towing heavy loads
Conclusion
Recommended Products
TOPTOW Trailer Hitch Adapter 2-1/2" to 2" Reducer Sleeve
Essential adapter if your truck has a 2-1/2" Class V receiver but you need to use standard 2" accessories like ball mounts and bike racks. Includes pin and clip for secure fitment.
Check Price On AmazonIf you click this link and buy, we earn a commission at no additional cost to you.
Aussio Lift Tool Kit for Weight Distribution Hitches
Makes connecting and adjusting weight distribution hitches dramatically easier. A must-have if you're towing a travel trailer and need to hook up spring bars regularly.
Check Price On AmazonIf you click this link and buy, we earn a commission at no additional cost to you.
DEEAGLE Anti-Rattle Hitch Tightener Stabilizer
Eliminates annoying receiver wobble and rattle that's common with ball mounts, cargo carriers, and bike racks. Simple clamp design installs in seconds without tools.
Check Price On AmazonIf you click this link and buy, we earn a commission at no additional cost to you.
Frequently Asked Questions
How long does it take to install a trailer hitch?
Can I install a trailer hitch myself?
Do I need to drill holes to install a trailer hitch?
How much does professional trailer hitch installation cost?
What size trailer hitch do I need?
Do I need a wiring harness with my trailer hitch?
How tight should trailer hitch bolts be?
Can a trailer hitch be installed on any vehicle?
Affiliate Disclosure: This article contains affiliate links. If you purchase through these links, we may earn a commission at no extra cost to you.