How to Use a Portable Air Compressor
Key Takeaways
- Always check your tire's recommended PSI on the driver's door jamb sticker before inflating — overinflation causes uneven wear and blowout risk.
- Let the compressor cool down for 15-20 minutes after every 20-30 minutes of continuous use to prevent motor damage.
- Match your compressor's CFM rating to your air tool's requirements — underpowered compressors stall tools and burn out motors.
- Keep the air hose and fittings clean and dry to prevent moisture contamination that degrades internal seals over time.
- A basic air accessory kit with a blow gun, tire gauge, and quick-connect fittings covers 90% of portable compressor tasks.
What You Need Before Getting Started
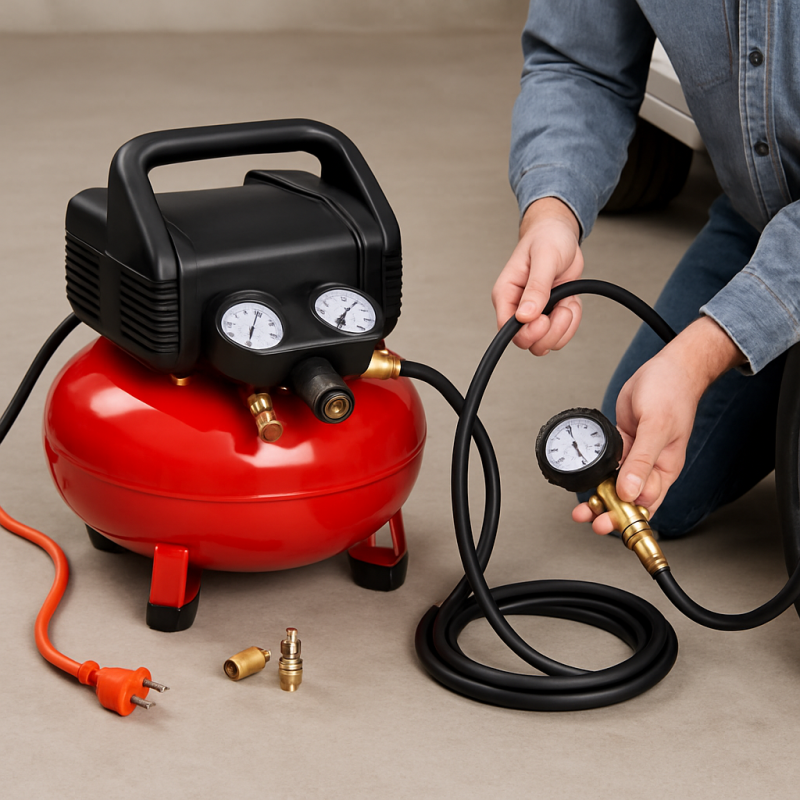
Before you fire up your portable air compressor, gather the right accessories and understand what you're working with. A few minutes of preparation prevents frustration and keeps you safe.
- Air compressor: Fully charged battery (cordless models) or access to a 12V outlet or wall socket depending on your unit
- Air hose: Most portables include a short hose, but a 25-foot coil hose gives you much better reach
- Tire chuck or inflation nozzle: Needed to connect the hose to your tire valve stem
- Tire pressure gauge: Even if your compressor has a built-in gauge, a standalone gauge is more accurate
- Quick-connect fittings: 1/4-inch NPT fittings are the standard — these let you swap between tools in seconds
- Safety glasses: Compressed air can kick up debris unexpectedly
If your compressor didn't come with accessories, an air accessory kit like the WYNNsky 20-piece set gives you a coil hose, blow gun, tire gauge, and all the fittings you need in one box. It's a smart buy if you're starting from scratch.
You should also know two key specs about your compressor:
- Maximum PSI: The highest pressure the tank can hold — most portables max out between 90 and 150 PSI
- CFM (Cubic Feet per Minute): How much air volume the compressor delivers — this matters when running air tools
Check your owner's manual for both numbers. You'll reference them throughout every task.
WYNNsky 1/4 Inch NPT Air Accessory Kit - 20 Piece
A complete starter kit with a coil hose, blow gun, tire gauge, and quick-connect fittings. Covers every basic compressor task in one affordable package.
Check Price On AmazonIf you click this link and buy, we earn a commission at no additional cost to you.

How to Set Up Your Portable Air Compressor
Setting up a portable air compressor correctly takes about 5 minutes and ensures safe, efficient operation every time.
- Place the compressor on a flat, stable surface. Uneven ground causes vibration and can tip smaller units. Keep it away from water, flammable materials, and excessive dust.
- Check the oil level (oil-lubricated models only). Most portable compressors are oil-free, but if yours has a sight glass, verify the oil is between the min and max lines.
- Inspect the air filter. A clogged filter makes the motor work harder and overheat. Pull it out, tap off loose dust, and replace it if it looks discolored.
- Connect your air hose. Thread the hose onto the compressor's outlet fitting. If you're using quick-connect fittings, push the male plug into the female coupler until it clicks.
- Close the drain valve. The drain valve sits at the bottom of the tank. Make sure it's finger-tight before powering on — an open valve means zero pressure buildup.
- Power on the compressor. Plug it in or turn the battery on. The motor will start building pressure automatically. Wait until the gauge reaches the unit's maximum PSI before using it.
For cordless models like the DEWALT 20V MAX tire inflator, setup is even simpler — insert the battery, attach the hose, and press the power button. These units are designed for grab-and-go convenience.
Once the tank is full, the motor shuts off automatically. Your compressor is now ready to use.
DEWALT 20V MAX Portable Air Compressor (DCC020IB)
A cordless tire inflator with automatic shutoff and LED light — ideal for roadside emergencies and quick tire top-offs without any setup hassle.
Check Price On AmazonIf you click this link and buy, we earn a commission at no additional cost to you.

How to Inflate Tires with a Portable Compressor
Tire inflation is the most common use for a portable air compressor. Here's how to do it correctly in under 5 minutes per tire.
Step 1: Find your target PSI. Open your driver's side door and look at the sticker on the door jamb. It lists the recommended tire pressure for front and rear tires. Do not use the number stamped on the tire sidewall — that's the maximum, not the recommended pressure.
Step 2: Remove the valve cap. Unscrew the small plastic cap from the tire's valve stem and put it in your pocket so you don't lose it.
Step 3: Check the current pressure. Press your tire gauge onto the valve stem for a quick reading. Note how much air you need to add.
Step 4: Attach the chuck. Press the tire chuck firmly onto the valve stem. You'll hear a brief hiss as it seats. Lock the lever if your chuck has one — this creates an airtight seal.
Step 5: Set your desired PSI (if your compressor has a regulator or digital preset). Many modern portables let you dial in a target pressure and auto-shutoff when reached.
Step 6: Inflate. Turn on the compressor or press the trigger. Watch the gauge and add air in short bursts if you don't have auto-shutoff. It's easy to overshoot.
- Passenger tires: Typically 30-35 PSI
- Light truck tires: Typically 35-45 PSI
- Heavy-duty truck tires: Can require 50-80 PSI depending on load
Step 7: Disconnect and recheck. Remove the chuck, then verify the pressure with your standalone gauge. Add or release air as needed by pressing the valve stem pin briefly. Replace the valve cap.
If you frequently air up truck tires on the road, having a reliable portable compressor rated for higher PSI saves you from gas station air pumps that never seem to work.
Using a Portable Compressor with Air Tools
Beyond tire inflation, portable air compressors can power a range of pneumatic tools — but only if the compressor's output matches the tool's demand.
Check the CFM requirement first. Every air tool has a CFM rating at a specific PSI (usually 90 PSI). Your compressor needs to meet or exceed that number for the tool to function properly.
| Air Tool | CFM Required (at 90 PSI) | Suitable for Portables? |
|---|---|---|
| Tire inflator | 0.5-1.0 CFM | Yes — any portable |
| Brad nailer | 0.5-1.0 CFM | Yes — most portables |
| Blow gun | 2-3 CFM | Yes — most portables |
| Impact wrench (3/8") | 3-5 CFM | Marginal — needs 6+ gallon tank |
| Impact wrench (1/2") | 5-8 CFM | No — needs larger compressor |
| Paint sprayer | 6-12 CFM | No — needs shop compressor |
Here's how to connect and use air tools:
- Set the regulator. Turn the pressure regulator knob to match the tool's recommended PSI. Running a tool above its rated pressure can damage it or create a safety hazard.
- Connect via quick-connect fitting. Push the tool's male plug into the coupler on your hose. You'll hear a click when it locks.
- Test before working. Give the trigger a short pull to verify the tool is operating at the right speed and pressure.
- Watch the tank gauge. When pressure drops below the tool's minimum requirement, stop and let the compressor recover.
A good air compressor accessories kit from Hromee includes a 25-foot hybrid hose with quick-connect fittings, a blow gun, and a tire gauge — everything you need to switch between inflation and cleaning tasks quickly.
For heavier work like lug nut removal, you'll want a compressor paired with a floor jack. Check out the best truck floor jacks if you're building a mobile tire change setup.
Hromee 19 Pieces Air Compressor Accessories Kit
Includes a 25-foot hybrid hose with quick-connect fittings, blow gun, and tire gauge. The longer hose gives you excellent reach for workshop and garage use.
Check Price On AmazonIf you click this link and buy, we earn a commission at no additional cost to you.

Adjusting Pressure Settings and Using the Regulator
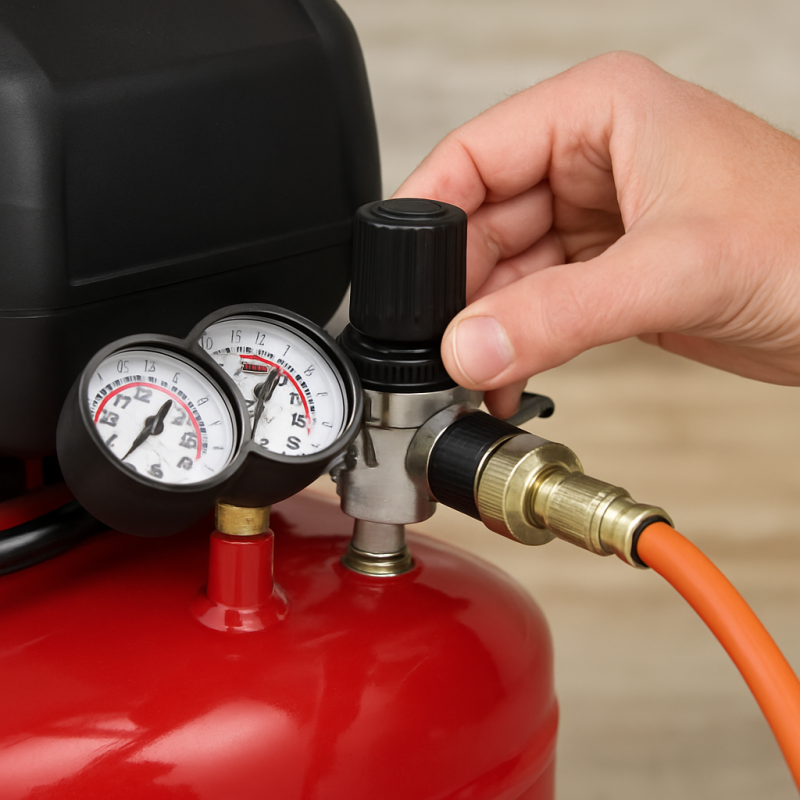
Understanding your compressor's pressure controls is critical. Most portable compressors have two gauges and one regulator knob — here's what each does.
- Tank gauge: Shows the total pressure stored in the tank. This number rises as the compressor runs and drops as you use air.
- Output gauge (regulated): Shows the actual pressure being delivered through the hose. This is what your tool or tire receives.
- Regulator knob: Controls the output pressure. Turn clockwise to increase, counterclockwise to decrease.
Some smaller cordless compressors skip the dual-gauge setup entirely. Instead, they use a digital display where you set your target PSI with buttons. These are simpler but less versatile.
How to set the right pressure:
- Start with the compressor running and the tank pressurized. The regulator doesn't work accurately on an empty tank.
- Open the air line by pulling the trigger on your blow gun or tool briefly. This lets air flow so you can see the output gauge respond.
- Turn the regulator knob until the output gauge reads your desired PSI. For tire inflation, match your target tire pressure. For tools, match the tool's rated operating pressure.
- Lock the setting. Some regulators have a pull-to-adjust, push-to-lock mechanism. Push the knob in to prevent accidental changes.
Common pressure settings by task:
- Car tires: 30-35 PSI
- Truck tires: 35-80 PSI depending on load rating
- Brad nailers: 70-90 PSI
- Blow gun cleaning: 30-50 PSI (higher pressures can damage sensitive components)
- Air mattresses and inflatables: 1-3 PSI (use a low-pressure nozzle)
Never exceed a tool's maximum rated PSI. Overpressure can crack housings, blow seals, and turn pneumatic tools into safety hazards.
Safety Precautions You Should Never Skip
Compressed air isn't a toy. At 100+ PSI, it can cause serious injuries. Follow these safety rules every time you use your portable compressor.
- Wear safety glasses: Compressed air launches dust, metal shavings, and debris at high speed. Eye protection is non-negotiable.
- Never point compressed air at yourself or others: Air injection injuries are real — compressed air can penetrate skin and enter the bloodstream.
- Don't exceed rated pressure: Every tank has a maximum PSI rating stamped on it. The pressure switch should prevent overfilling, but a malfunctioning switch can cause a tank rupture.
- Inspect hoses before each use: Cracked, kinked, or swollen hoses can burst under pressure. Replace them immediately if you see damage.
- Drain the tank after every use: Moisture collects inside the tank during compression. Open the drain valve after each session and let all water and air escape. Rust from undrained tanks eventually weakens the steel.
Heat management is equally important. Portable compressors, especially cordless models, generate significant heat during extended use.
- Follow the duty cycle: Most portable compressors are rated for 20-30 minutes of run time followed by a 15-20 minute cool-down. Running beyond the duty cycle overheats the motor and shortens its lifespan.
- Feel the motor housing: If it's too hot to touch comfortably, stop immediately and let it cool.
- Use in ventilated areas: Don't operate gas-powered portable compressors indoors — carbon monoxide is deadly. Even electric models benefit from good airflow.
Having the right tools nearby also matters. A well-stocked truck tool set ensures you can handle fittings, connections, and minor repairs without scrambling for the right wrench.
Maintenance Tips to Extend Compressor Life
A well-maintained portable air compressor lasts 10-15 years. A neglected one fails in 2-3. Here's how to keep yours running strong.
After every use:
- Drain the tank completely. Open the drain valve and tilt the tank to remove all moisture. This is the single most important maintenance step — skip it and you'll get rust inside the tank within months.
- Wipe down the unit. Remove dust and debris from the motor housing and air vents. Clogged vents cause overheating.
- Coil the hose loosely. Tight coils stress the hose walls and create weak points that eventually burst.
Monthly checks:
- Inspect the air filter. Pull it out, tap off dust, and hold it up to light. If you can't see light through it, replace it. Filters cost $3-5 and save you from a burned-out motor.
- Check all fittings and connections. Apply soapy water around fittings while the tank is pressurized. Bubbles indicate a leak. Tighten or replace leaking connections with Teflon tape on the threads.
- Test the safety valve. Pull the ring on the pressure relief valve briefly. It should release air with a sharp hiss and reseal when you let go. A stuck safety valve is extremely dangerous.
Every 6 months:
- Change the oil (oil-lubricated models only). Use the manufacturer's recommended compressor oil — never substitute motor oil.
- Inspect the power cord and plug for fraying, cracks, or loose prongs.
- Clean the tank exterior and check for rust spots, dents, or corrosion.
For cordless models, battery health is key. Store batteries at 40-60% charge if you won't use the compressor for more than a month. Full or empty storage degrades lithium-ion cells faster.
Troubleshooting Common Problems
Even reliable compressors act up occasionally. Here are the most common issues and how to fix them fast.
Problem: Compressor runs but won't build pressure.
- Check the drain valve: It may be open or not sealing properly. Tighten it firmly.
- Inspect hose connections: Loose fittings leak air faster than the pump can replace it. Use soapy water to find leaks.
- Replace the intake valve or gasket: Worn valves can't seal, causing air to escape during compression. This is the most common failure point on older units.
Problem: Compressor keeps tripping the breaker.
- Use a dedicated circuit: Compressors draw high startup amps. Sharing a circuit with other tools causes trips.
- Check the extension cord: Use a 12-gauge cord, 25 feet or shorter. Thin or long extension cords cause voltage drop, making the motor draw more amps.
- Motor may be failing: If the breaker trips immediately on startup, the motor's start capacitor could be shot.
Problem: Air has moisture or oil in it.
- Drain the tank more frequently. In humid climates, drain after every single use.
- Add an inline water separator between the hose and tool. These cost $10-15 and catch moisture before it reaches your equipment.
- Check for overfilled oil (oil-lubricated models). Too much oil gets pushed into the air stream.
Problem: Compressor is unusually loud or vibrating.
- Tighten mounting bolts: Vibration loosens hardware over time.
- Check for debris in the pump: Small rocks or metal shavings can enter through a damaged air filter.
- Place on rubber mat: A rubber pad absorbs vibration and reduces noise significantly.
If your compressor is beyond repair and you're shopping for a replacement, our guide to the best portable air compressors covers top-rated models across every budget.
Related Articles
- Best Portable Air Compressors for Trucks — Comprehensive review of top portable compressors — relevant for readers choosing a new unit or upgrading
- Best Truck Floor Jacks for Heavy Lifting — Floor jacks pair with portable compressors for mobile tire change setups
- Best Truck Tool Sets for Roadside Repairs — A complete tool set complements a portable compressor for roadside repairs and maintenance tasks
Conclusion
Recommended Products
WYNNsky 1/4 Inch NPT Air Accessory Kit - 20 Piece
A complete starter kit with a coil hose, blow gun, tire gauge, and quick-connect fittings. Covers every basic compressor task in one affordable package.
Check Price On AmazonIf you click this link and buy, we earn a commission at no additional cost to you.
DEWALT 20V MAX Portable Air Compressor (DCC020IB)
A cordless tire inflator with automatic shutoff and LED light — ideal for roadside emergencies and quick tire top-offs without any setup hassle.
Check Price On AmazonIf you click this link and buy, we earn a commission at no additional cost to you.
Hromee 19 Pieces Air Compressor Accessories Kit
Includes a 25-foot hybrid hose with quick-connect fittings, blow gun, and tire gauge. The longer hose gives you excellent reach for workshop and garage use.
Check Price On AmazonIf you click this link and buy, we earn a commission at no additional cost to you.
Frequently Asked Questions
Can I leave air in my portable compressor tank overnight?
How long does it take a portable air compressor to fill a tire?
What size portable air compressor do I need for home use?
Is it safe to use a portable air compressor in the rain?
Why does my portable air compressor keep shutting off?
Can I use a portable air compressor to inflate bike tires?
How often should I drain my air compressor tank?
What's the difference between PSI and CFM on an air compressor?
Affiliate Disclosure: This article contains affiliate links. If you purchase through these links, we may earn a commission at no extra cost to you.