How to Set a Torque Wrench Correctly
Key Takeaways
- Always set your torque wrench to the lowest setting before storing it to preserve spring calibration and accuracy.
- Click-type torque wrenches require you to align the main scale and micrometer scale to reach your target torque value.
- Digital torque wrenches offer the easiest setup — just punch in your number — but click-type models are more affordable and widely used.
- Never exceed your torque wrench's maximum rated capacity, as this permanently damages the internal calibration mechanism.
- Re-calibrate your torque wrench every 12 months or after 5,000 cycles, whichever comes first, to maintain accuracy within ±4%.
What You Need Before You Start
Setting a torque wrench takes less than two minutes once you know the process. Before you begin, gather a few essentials and confirm one critical detail: your target torque specification.
- Your torque wrench — click-type, beam, digital, or dial
- The correct socket — matched to your fastener size
- Owner's manual or service spec — for the exact torque value in ft-lbs or Nm
- Clean cloth — to wipe the wrench head and socket connection
- Calibration certificate — if available, confirm your wrench is still within spec
The most common mistake beginners make is guessing the torque value. Every fastener has a manufacturer-specified torque, and these vary wildly.
- Lug nuts: typically 80–100 ft-lbs for passenger vehicles
- Spark plugs: 12–18 ft-lbs depending on material
- Oil drain plugs: 25–35 ft-lbs for most cars
- Truck bed accessories: 20–40 ft-lbs depending on the mounting hardware
Always check your vehicle's service manual or the component manufacturer's documentation. Using an online torque spec database is fine as a backup, but the official spec is king.
Time estimate: 1–2 minutes to set the wrench, plus whatever time your actual fastening job requires. First-timers should budget an extra 5 minutes to practice reading the scale.
How to Set a Click-Type Torque Wrench
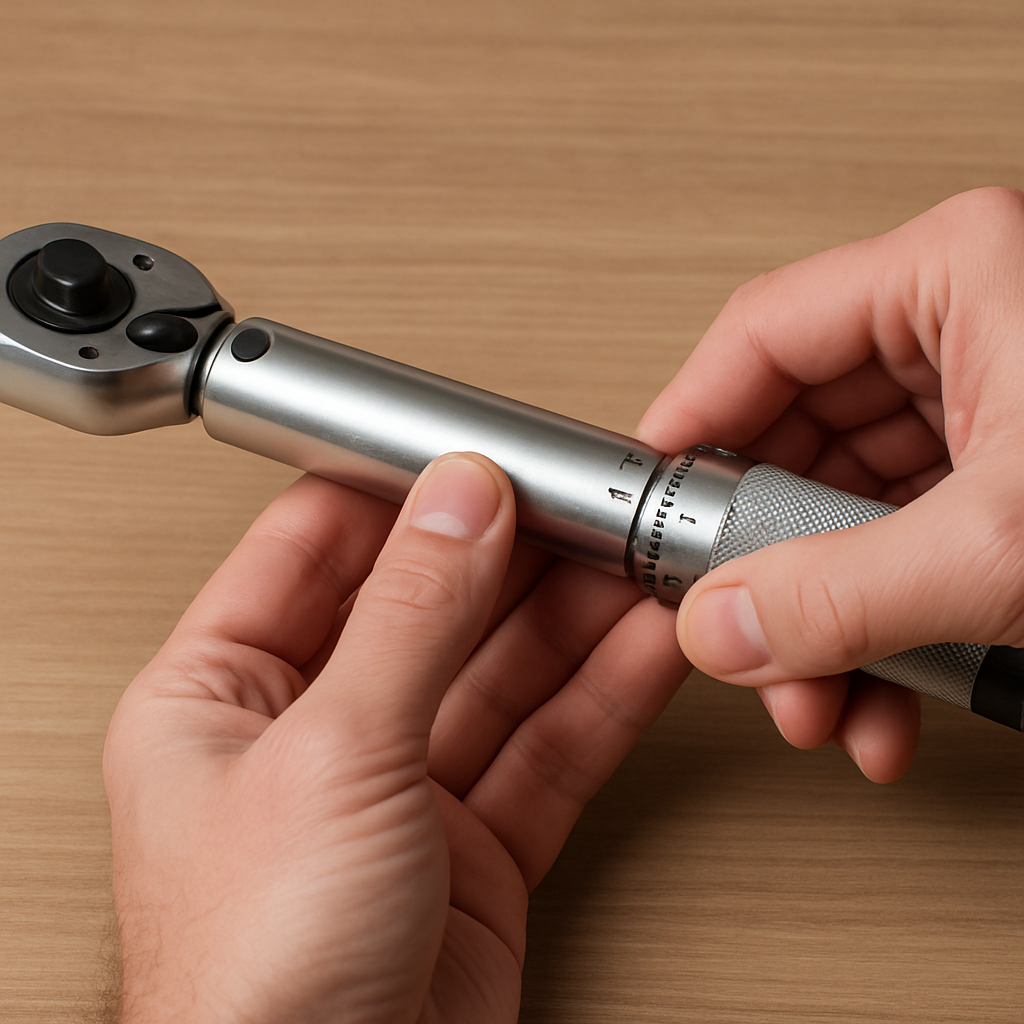
The click-type torque wrench is the most popular style for DIY mechanics and professionals alike. It uses a spring-loaded mechanism inside the handle and "clicks" audibly when you reach the set torque. Here's how to set it.
Step 1: Unlock the handle. Most click-type wrenches have a lock knob at the base of the handle. Turn it counterclockwise to unlock. You won't be able to adjust the setting while it's locked.
Step 2: Read the main scale. Look at the vertical shaft above the handle. You'll see numbers stamped in increments — typically every 10 ft-lbs. Rotate the handle until the edge aligns with the closest major number below your target torque.
Step 3: Read the micrometer scale. The handle itself has a secondary scale wrapped around it, usually in increments of 1 ft-lb. This scale adds to the main scale. Rotate the handle until the micrometer line matches the remaining value.
- Example: To set 85 ft-lbs, align the main scale to 80, then rotate the handle until the micrometer reads 5
- Example: To set 100 ft-lbs, align the main scale to 100, micrometer to 0
- Example: To set 37 ft-lbs, main scale to 30, micrometer to 7
Step 4: Lock the handle. Once your value is dialed in, turn the lock knob clockwise until it's snug. This prevents accidental adjustment during use.
Step 5: Test the click. Apply force slowly and steadily to a test fastener. When you hear and feel the distinct "click," stop immediately. Do not continue pulling — over-torquing defeats the purpose.
How to Set a Digital Torque Wrench
Digital torque wrenches are the easiest to set and read. They display the target and live torque on an LCD screen, and most beep or vibrate when you hit the mark. If budget isn't a constraint, digital is the most user-friendly option.
Step 1: Power on the wrench. Press the power button, usually located near the head or on the handle. Wait for the display to initialize.
Step 2: Select your unit of measurement. Use the mode or unit button to toggle between:
- ft-lbs — most common in the United States
- Nm (Newton-meters) — standard in Europe and for many import vehicles
- kg-cm — occasionally used for small fasteners
- in-lbs — used for precision work like electronics or small engine components
Step 3: Enter your target torque. Use the up/down arrows or dial to set your desired value. The display shows the number in real time. Some models let you store preset values for repeated use.
Step 4: Set the alert mode. Most digital wrenches let you choose between a buzzer, LED flash, vibration, or a combination. Pick whichever signal you'll notice while working — in a noisy garage, vibration is often best.
Step 5: Apply torque. As you pull, the screen displays live torque. When you reach the target, the wrench alerts you. Stop pulling immediately.
Digital wrenches typically offer ±1–2% accuracy, compared to ±3–4% for a quality click-type. They also eliminate the scale-reading errors that trip up beginners on analog models.
How to Set a Beam-Type Torque Wrench
The beam-type torque wrench is the simplest and most affordable design. There's no setting to dial in — you read the torque live as you apply force. It uses a flexible beam and a pointer that moves across a fixed scale.
Step 1: Inspect the pointer. Before use, hold the wrench horizontally with no load applied. The pointer should rest exactly at zero on the scale. If it doesn't, the wrench may need recalibration or the pointer may need bending back to zero.
Step 2: Attach your socket and position the wrench. Place the socket on the fastener and position yourself so you can clearly see the scale while pulling. This is critical — beam wrenches require a direct line of sight to read accurately.
Step 3: Pull slowly and watch the pointer. As you apply force, the main beam flexes while the pointer stays straight, indicating the current torque on the scale. Pull slowly and steadily.
- Read the scale at eye level — viewing from an angle introduces parallax error
- Pull in a smooth, continuous motion — jerky pulls give inaccurate readings
- Stop when the pointer reaches your target value
Beam-type wrenches don't click or beep, so you need to pay close attention. They're best for situations where you don't need to hit an exact number but want to get in the right range.
Pros of beam-type wrenches:
- No calibration drift over time — the beam is always accurate if not bent
- No settings to lock or unlock
- Extremely affordable — often under $25
Cons:
- Harder to use in tight spaces where you can't see the scale
- No audible or tactile alert at target torque
- Slower for repetitive fastening jobs
Understanding Torque Units and Conversions

Mismatched units are one of the most common causes of incorrect torque settings. Your vehicle manual says 140 Nm, but your wrench reads in ft-lbs — now what? Understanding the conversion keeps you out of trouble.
- 1 ft-lb = 1.3558 Nm
- 1 Nm = 0.7376 ft-lbs
- 1 ft-lb = 12 in-lbs
- 1 in-lb = 0.1130 Nm
For quick mental math, multiply ft-lbs by 1.36 to get Nm, or multiply Nm by 0.74 to get ft-lbs. But for safety-critical fasteners, always use a calculator or conversion chart rather than rounding.
Common torque specs by application:
- Wheel lug nuts (cars): 80–100 ft-lbs (108–135 Nm)
- Wheel lug nuts (trucks/SUVs): 120–150 ft-lbs (163–203 Nm)
- Head bolts: varies widely, often 60–75 ft-lbs in stages
- Intake manifold bolts: 15–25 ft-lbs (20–34 Nm)
- Truck bed accessory mounting: 20–45 ft-lbs depending on hardware type
Many torque wrenches have dual scales printed on the shaft — ft-lbs on one side and Nm on the other. If yours does, double-check you're reading the correct side before setting your value. It sounds obvious, but this mistake happens more often than you'd think, especially on wrenches where the two scales are printed close together.
When installing accessories like tonneau covers or bed liners, always check the included hardware instructions for torque specs — they often differ from generic bolt charts.
Common Mistakes That Ruin Accuracy
Even an expensive torque wrench gives bad readings if you use it wrong. Here are the most frequent mistakes and how to avoid every one of them.
1. Storing the wrench at a high setting.
This is the number-one accuracy killer. When you leave a click-type wrench set at 80 ft-lbs in your toolbox, the internal spring stays compressed. Over time, this causes permanent spring fatigue and throws off calibration. Always dial your wrench back to the lowest setting before storing.
2. Using an extension that changes effective length.
- Socket extensions (adding length to the socket) — these do NOT affect torque readings and are perfectly fine to use
- Handle extensions (adding a pipe or cheater bar) — these DO change the effective lever arm and make your torque reading inaccurate. Never use them.
- Crow's foot adapters — these change the effective length. You need to recalculate using the formula: Adjusted torque = Desired torque × (wrench length ÷ (wrench length + adapter length))
3. Pulling at an angle. Torque wrenches are calibrated for force applied perpendicular to the handle. Pulling at an angle reduces the effective torque. Keep your pull straight and centered on the grip.
4. Going past the click. When a click-type wrench clicks, the fastener is at spec. Continuing to pull adds torque beyond your target. This over-torques the fastener and can stretch or break bolts.
5. Using a torque wrench to loosen fasteners.
Torque wrenches are tightening-only tools. Using them to break loose seized or over-tightened bolts can damage the ratchet mechanism and knock the wrench out of calibration. Use a breaker bar for loosening.
Calibration and Maintenance Tips
A torque wrench is a precision instrument, not a regular ratchet. Treat it accordingly and it will stay accurate for years. Neglect it and you might as well be guessing.
When to calibrate:
- Every 12 months of regular use
- After 5,000 click cycles, whichever comes first
- After the wrench is dropped on a hard surface
- If you suspect inaccurate readings — fasteners coming loose or bolts stretching
How calibration works: A calibration lab applies known weights at a fixed distance to verify your wrench reads within ±4% of the true value (the ISO 6789 standard). They adjust the internal mechanism if needed and issue a certificate. Cost is typically $25–$75 per wrench.
DIY calibration check:
- Secure the wrench head in a vise so it can't move
- Hang a known weight from the handle at a measured distance from the pivot
- Calculate expected torque: weight × distance = torque
- Compare to the wrench's indicated setting
- If the reading is off by more than 4%, send it for professional calibration
Storage best practices:
- Always return the setting to the lowest value after use
- Store in the original case — not loose in a drawer where it can get knocked around
- Keep it clean and dry — wipe the head and ratchet mechanism with a light oil periodically
- Never store in extreme temperatures — heat and cold affect spring tension
A well-maintained torque wrench can last 10–20 years. Skipping calibration might save you $50 now but could cost you a wheel coming off at highway speed.
Troubleshooting: When Your Torque Wrench Isn't Working Right
If something feels off during use, don't ignore it. Here are the most common issues and how to diagnose them.
Problem: No click at all.
- Cause: Handle is set below the fastener's resistance, or the lock knob isn't engaged and the setting slipped during use
- Fix: Verify your setting, lock the handle, and try again. If it still won't click, the internal spring may be broken — send it for service
Problem: Click feels soft or inconsistent.
- Cause: Worn internal cam or dried-out lubrication
- Fix: Some wrenches can be disassembled for re-lubrication. Check your manual. Otherwise, professional service is needed
Problem: Ratchet head slips or won't engage.
- Cause: Worn ratchet pawls or debris inside the head
- Fix: Clean the ratchet head with solvent and a brush. If pawls are visibly worn, replace the ratchet head assembly — most brands sell replacement heads
Problem: Digital display won't turn on.
- Cause: Dead batteries (usually AAA or CR2032)
- Fix: Replace batteries. If the display still doesn't work, check the battery contacts for corrosion. Clean with rubbing alcohol and a cotton swab
Problem: Readings seem off — fasteners are either too tight or come loose.
- Cause: Calibration drift, or you're unknowingly using a handle extension
- Fix: Perform a DIY calibration check (described in the previous section). If readings are off by more than 4%, get the wrench professionally calibrated
When in doubt, don't guess. An inaccurate torque wrench is worse than no torque wrench because it gives you false confidence. For critical applications like wheel lug nuts, engine components, or mounting hardware on truck bed covers, accuracy matters.
Related Articles
- Best Tonneau Covers for Trucks — Torque wrenches are commonly used when installing tonneau covers and other truck bed accessories, which require specific torque specs for mounting hardware.
Conclusion
Frequently Asked Questions
What happens if you don't set a torque wrench correctly?
Do you set a torque wrench to foot-pounds or Newton-meters?
Should you double-click a torque wrench?
How often should a torque wrench be calibrated?
Can you use a torque wrench to loosen bolts?
Why does my torque wrench click before reaching the set value?
What is the proper way to store a torque wrench?
Is a digital or click torque wrench more accurate?
Affiliate Disclosure: This article contains affiliate links. If you purchase through these links, we may earn a commission at no extra cost to you.