How to Install an LED Light Bar on Your Truck
Key Takeaways
- Most LED light bar installations take 2-4 hours with basic hand tools and no professional experience required.
- A proper wiring harness with a relay and fuse is non-negotiable — wiring directly to the battery without protection risks electrical fires.
- Mounting location affects both light output and legality — check your state's laws before drilling any holes.
- Always disconnect your truck's negative battery terminal before starting any electrical work to prevent shorts and shocks.
- Sealing all wire connections with heat-shrink tubing or liquid electrical tape prevents corrosion and future failures.
Tools and Materials You'll Need
Before you start, gather everything on this list. Running to the hardware store mid-install wastes time and kills momentum.
- LED light bar: Choose the right size for your truck — 20" to 52" depending on mounting location. Check our guide to the best LED light bars for trucks if you haven't picked one yet.
- Wiring harness kit: Includes relay, fuse, switch, and pre-terminated wires. The Nilight 16AWG Wiring Harness Kit is a reliable budget option that fits most setups.
- Mounting brackets: Usually included with the light bar — verify before ordering
- Drill with metal and plastic bits: For bracket holes and switch panel cutout
- Socket wrench set: 10mm, 13mm, and 17mm cover most truck bolts
- Wire strippers and crimpers: For any custom connections
- Heat-shrink tubing or liquid electrical tape: For weatherproofing connections
- Zip ties: For clean wire routing along the frame
- Multimeter: For testing connections and troubleshooting
- Rubbing alcohol and clean rags: For cleaning mounting surfaces
A magnetic parts tray helps keep bolts organized. If your light bar mounts on the roof, you'll also need a step stool or ladder for safe access.
Time estimate: 2-4 hours for a complete install. Bumper mounts are faster (1.5-2 hours). Roof mounts take longer due to interior headliner routing.
Nilight 16AWG Off-Road LED Light Bar Wiring Harness Kit
A complete plug-and-play wiring harness with 12V relay, blade fuse, and rocker switch. Fits most LED light bars up to 180W and includes weatherproof connectors for a clean installation.
Check Price On AmazonIf you click this link and buy, we earn a commission at no additional cost to you.

Choosing the Right Mounting Location
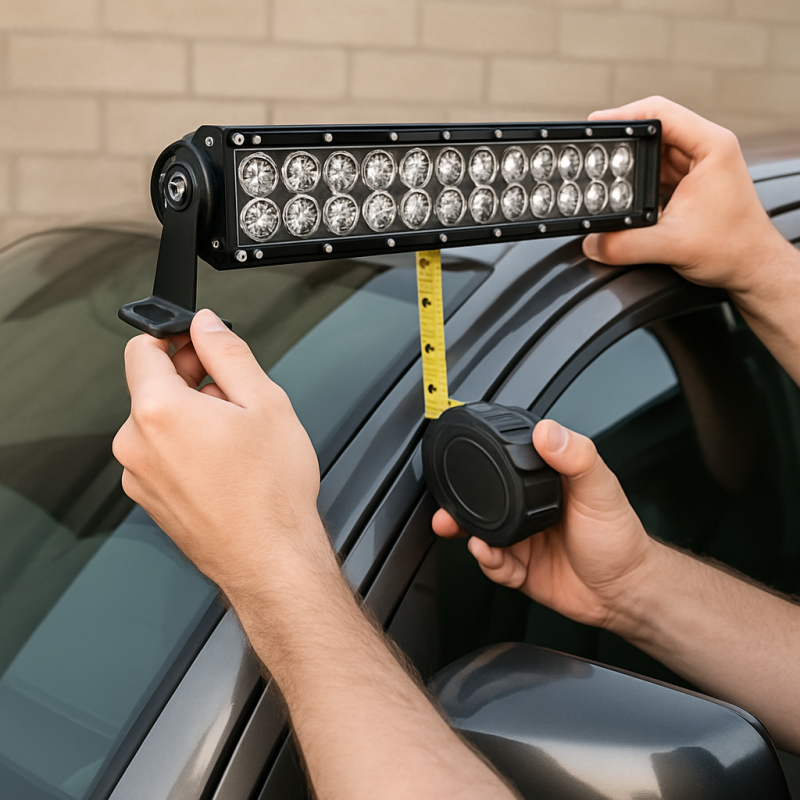
Where you mount your light bar determines its effectiveness, how it looks, and whether it's street legal. There are three main options, each with trade-offs.
- Roof mount (above windshield): Maximum visibility and flood coverage. Best for off-road use. Drawback — produces significant glare on the hood and is illegal for on-road use in most states.
- Bumper mount (front bumper or behind grille): Cleaner look, easier install, less wind noise. Great for a combination of off-road and daily driving. Limited to smaller bars (20"-32").
- Pillar mount (A-pillars): Good for adding smaller pod lights alongside a main bar. Requires drilling into the body.
Before drilling a single hole, check your state and local laws. Many states prohibit forward-facing light bars on public roads, or require covers when not in use. Fines range from $50 to $500 depending on jurisdiction.
Pro tip: Use painter's tape to mock up the light bar position before committing. Stand back 20 feet and check alignment. It's much easier to reposition tape than to fill unwanted drill holes.
For most truck owners, a bumper or grille mount offers the best balance of performance and practicality. Roof mounts make sense if you regularly drive unlit trails or need a work site floodlight. If you're also upgrading your truck's factory lighting, consider pairing a light bar with better fog lights for complete coverage in poor conditions.
Mounting the Light Bar
With your location chosen, it's time to physically attach the light bar to your truck. The process varies by mount type, but the fundamentals are the same.
For bumper/grille mounts:
- Position the brackets: Hold the mounting brackets against the bumper and mark hole locations with a center punch or marker.
- Drill pilot holes: Use a small bit (1/8") first, then step up to the final size. Go slow — rushing cracks paint and creates jagged edges.
- Install the brackets: Bolt them in place using the provided hardware. Use lock washers or thread locker to prevent vibration loosening.
- Attach the light bar: Slide it into the brackets and hand-tighten the adjustment bolts. Don't fully tighten yet — you'll aim it later.
For roof mounts:
- Remove any necessary trim pieces around the roof edge where brackets will sit.
- Mark and drill bracket holes through the roof skin. Apply rust-preventive primer to any exposed metal immediately.
- Use rubber gaskets between brackets and the roof to prevent leaks and vibration noise.
- Bolt brackets down from the outside, with nuts and washers on the inside. Seal around each bolt with silicone.
Critical tip: Apply a bead of silicone sealant around every hole you drill into the body or frame. Water intrusion causes rust, and rust on a truck roof spreads fast under paint where you can't see it.
Leave the light bar loosely attached for now. You'll tighten and aim it after wiring is complete and you can see the beam pattern at night.
Wiring the LED Light Bar
Wiring is the step that intimidates most people, but a pre-made wiring harness makes it straightforward. Never wire a light bar directly to the battery without a relay and fuse. LED bars draw 10-30 amps depending on size — that's enough to melt wires and start fires without proper protection.
Step-by-step wiring with a harness kit:
- Disconnect the negative battery terminal. This is non-negotiable. One accidental short circuit can fry your truck's electronics.
- Connect the harness to the light bar. Most harnesses use a weatherproof DT connector that plugs directly in. If yours requires bare-wire connections, use butt connectors and seal with heat-shrink tubing.
- Route the wires. Run them along existing wire looms or frame rails. Avoid routing near exhaust components (heat melts insulation) or moving parts (steering linkage, suspension).
- Mount the relay. Bolt it to a flat surface in the engine bay — the inner fender or firewall works well. The relay acts as a heavy-duty switch controlled by your cabin switch.
- Connect the power wire to the positive battery terminal. The harness fuse should sit within 12 inches of the battery.
- Connect the ground wire to a clean, bare-metal point on the frame or engine block. Sand the contact point first for a solid connection.
If your light bar mounts far from the battery, you may need wiring harness extensions to bridge the distance. Using undersized wire on a long run causes voltage drop, which dims the light bar and generates heat.
Secure all wires with zip ties every 12-18 inches. Loose wires snag on moving parts and chafe through insulation over time.
Nilight 2PCS 16AWG 20 Feet Wiring Harness Extension Kit
Essential for roof-mounted light bars or long-distance wiring runs. These 20-foot extensions prevent voltage drop issues that cause dim output on installations far from the battery.
Check Price On AmazonIf you click this link and buy, we earn a commission at no additional cost to you.

Installing the Switch
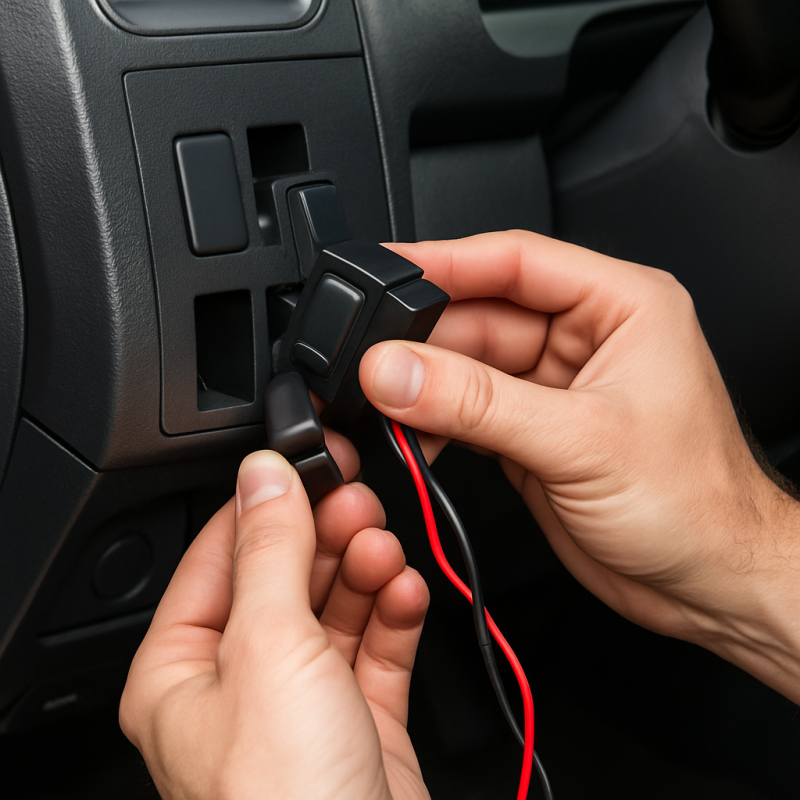
The switch gives you cabin control over the light bar. Most wiring harness kits include a rocker switch, but you can upgrade to a backlit panel switch for a cleaner look.
Switch placement options:
- Dash blank panel: Many trucks have unused switch cutouts on the dash — the ideal spot. Check your owner's manual for blank locations.
- A-pillar or overhead console: Out of the way but easy to reach
- Custom bracket near the steering column: Works when no blanks are available
Installation steps:
- Choose your location and verify there's clearance behind the panel for the switch body and wiring.
- Drill or cut the opening. Measure the switch dimensions first. A step drill bit creates clean holes in plastic dash panels.
- Route the switch wire from the engine bay through the firewall. Look for existing rubber grommets — most trucks have unused pass-throughs near the steering column or brake booster.
- Connect the switch wires to the harness trigger leads. Typically, one wire runs to the relay trigger and the other to ground.
- Snap the switch into place and test the fit before reassembling trim panels.
Warning: Don't drill through the firewall blindly. Check the other side first to avoid hitting brake lines, HVAC components, or the wiring harness. Use a small pilot bit and go slowly.
If your harness kit doesn't include a switch you like, the Nilight LED Light Bar Wiring Harness with Rocker Switch is a complete kit with a clean-looking switch that fits most standard dash cutouts.
Nilight LED Light Bar Wiring Harness with Rocker Switch
Budget-friendly harness kit with a built-in on/off rocker switch and blade fuse holder. Great for single light bar installs where you want a simple, clean switch setup.
Check Price On AmazonIf you click this link and buy, we earn a commission at no additional cost to you.

Aiming and Testing Your Light Bar
With everything wired, it's time to reconnect the battery and test your install. Do this at night or in a dark garage so you can see the actual beam pattern.
Testing procedure:
- Reconnect the negative battery terminal.
- Flip the switch. The light bar should illuminate immediately. If nothing happens, see the troubleshooting section below.
- Check for flickering or dim sections — both indicate a loose connection.
- Verify the relay clicks when the switch is toggled. A silent relay means the trigger circuit isn't connected properly.
Aiming the light bar:
- Park on flat ground facing a wall or garage door, about 25 feet away.
- The brightest spot (hot spot) should sit at bumper height on the wall. Too high blinds oncoming traffic. Too low wastes output on the road immediately ahead.
- Tighten the adjustment bolts once you're satisfied with the aim. Use thread locker on these — vibration shifts the angle over time.
- For flood-pattern bars, a slightly downward angle (5-10 degrees) is ideal. Spot patterns need a more level aim for maximum throw distance.
Take your truck for a short drive to confirm nothing rattles, vibrates loose, or makes wind noise. Roof-mounted bars sometimes whistle at highway speeds — aerodynamic wind deflectors solve this if it's an issue.
This is also a good time to add other lighting upgrades if you're already working with wiring. A set of quality truck bed lights pairs well with a forward-facing light bar for full coverage around your truck.
Common Mistakes to Avoid
Even experienced DIYers make these errors. Learning from others' mistakes saves you a headache — or a trip to the auto electrician.
- Skipping the relay: Wiring a high-draw light bar through a basic toggle switch melts the switch. Always use a relay — it handles the heavy current while the switch just sends a low-amp signal.
- Poor ground connections: This is the number one cause of flickering, dim output, and intermittent operation. Sand paint off the ground contact point. Use a star washer to bite into bare metal.
- Undersized wire gauge: 16AWG works for bars under 180W. Larger bars (200W+) need 14AWG or 12AWG. Using thin wire on a big bar creates heat and voltage drop.
- Not sealing connections: Exposed butt connectors corrode within months. Use adhesive-lined heat-shrink tubing on every connection, no exceptions.
- Ignoring state laws: A light bar that's illegal on public roads can result in a fix-it ticket, equipment violation, or failed inspection. Know your local rules.
- Drilling without checking behind the panel: Brake lines, fuel lines, and factory wiring live behind body panels. Always check the back side before drilling.
- Routing wires near exhaust: Exhaust manifolds and downpipes reach 800°F+. Wire insulation melts at around 200°F. Keep at least 6 inches of clearance from exhaust components.
Take your time with the install. Rushing leads to crooked mounts, sloppy wiring, and problems that show up weeks later. A clean install takes 3-4 hours. A sloppy install takes 2 hours plus 4 hours of fixing issues later.
Troubleshooting Common Issues
If your light bar doesn't work perfectly on the first try, don't panic. Most problems have simple fixes.
- Light bar doesn't turn on at all:
- Check the fuse — it may have blown during installation from a momentary short
- Verify the relay is getting trigger voltage from the switch (use a multimeter, should read 12V)
- Confirm the ground wire has a clean, tight connection to bare metal
- Check the DT connector is fully seated — they require firm pressure to click
- Light bar flickers or dims intermittently:
- Loose ground connection — sand and retighten the ground bolt
- Corroded butt connectors — replace with sealed connections
- Voltage drop from undersized or too-long wire runs
- Relay clicks but light bar stays off:
- The relay is working, but power isn't reaching the light bar. Check the output side of the relay and trace the wire to the bar for a break or loose connection.
- Light bar stays on when switch is off:
- Relay is stuck in the closed position — replace the relay
- Switch wiring is connected to constant power instead of the trigger circuit
- Excessive wind noise at highway speed:
- Add an aerodynamic shield or wind deflector above the bar
- Ensure mounting brackets are tight — loose brackets vibrate and amplify noise
A multimeter is your best friend for electrical troubleshooting. Learn to test for continuity (checking wire connections) and DC voltage (confirming 12V at each point in the circuit). These two tests solve 90% of light bar wiring issues.
Related Articles
- Best LED Light Bars for Trucks — Comprehensive review of top-rated LED light bars to help readers choose the right bar before installation
- Best Truck Fog Lights for Safe Driving — Fog lights complement a light bar for complete visibility coverage in poor weather conditions
- Best Truck Bed Lights for Nighttime Loading — Truck bed lights pair well with a forward-facing light bar for full truck lighting coverage
Conclusion
Recommended Products
Nilight 16AWG Off-Road LED Light Bar Wiring Harness Kit
A complete plug-and-play wiring harness with 12V relay, blade fuse, and rocker switch. Fits most LED light bars up to 180W and includes weatherproof connectors for a clean installation.
Check Price On AmazonIf you click this link and buy, we earn a commission at no additional cost to you.
Nilight LED Light Bar Wiring Harness with Rocker Switch
Budget-friendly harness kit with a built-in on/off rocker switch and blade fuse holder. Great for single light bar installs where you want a simple, clean switch setup.
Check Price On AmazonIf you click this link and buy, we earn a commission at no additional cost to you.
Nilight 2PCS 16AWG 20 Feet Wiring Harness Extension Kit
Essential for roof-mounted light bars or long-distance wiring runs. These 20-foot extensions prevent voltage drop issues that cause dim output on installations far from the battery.
Check Price On AmazonIf you click this link and buy, we earn a commission at no additional cost to you.
Frequently Asked Questions
How long does it take to install an LED light bar?
Can I install an LED light bar without drilling?
Do I need a relay to wire an LED light bar?
Is it legal to have an LED light bar on your truck?
What gauge wire do I need for an LED light bar?
Where is the best place to mount an LED light bar?
Why is my LED light bar flickering after installation?
Can I wire two LED light bars to one switch?
Affiliate Disclosure: This article contains affiliate links. If you purchase through these links, we may earn a commission at no extra cost to you.