How to Set Up a 12V Power System in Your Truck
Key Takeaways
- A dual-battery isolator setup prevents your starter battery from draining while powering accessories overnight.
- Use at least 4-gauge wiring for your main power runs and always install an inline fuse within 18 inches of the battery.
- Pure sine wave inverters are worth the extra cost — they safely power sensitive electronics like laptops and CPAP machines.
- A complete 12V truck power system costs between $300 and $800 depending on battery type and inverter wattage.
- Plan your power budget before buying — add up the watts of every device you intend to run simultaneously to size your system correctly.
What Is a 12V Truck Power System and Why Do You Need One?
A 12V truck power system is an auxiliary electrical setup that lets you run accessories — lights, coolers, chargers, inverters — without relying solely on your vehicle's starter battery. It typically includes a secondary battery, an isolator or DC-DC charger, wiring, fuses, and outlets or an inverter for AC power.
The main reason to set one up is battery protection. Running a 12V cooler or phone charger off your starter battery overnight can leave you stranded with a dead battery. A dual-battery system isolates your accessories so your engine always starts.
- Overlanding and camping: power lights, fans, coolers, and charge devices at camp without idling
- Jobsite use: run power tools, charge drill batteries, and keep a phone or tablet going all day
- Road trips: keep laptops, cameras, and entertainment systems charged during long hauls
- Emergency preparedness: have a reliable backup power source during storms or breakdowns
The entire project takes 3-5 hours for a basic setup and costs between $300 and $800 depending on your component choices. No permanent vehicle modifications are required for most configurations — you can remove the system if you sell the truck.
According to Explorist Life's wiring guides, the most common mistake beginners make is undersizing their wiring, which creates heat buildup and potential fire hazards. Following proper gauge charts eliminates this risk entirely.
What Tools and Materials Do You Need?
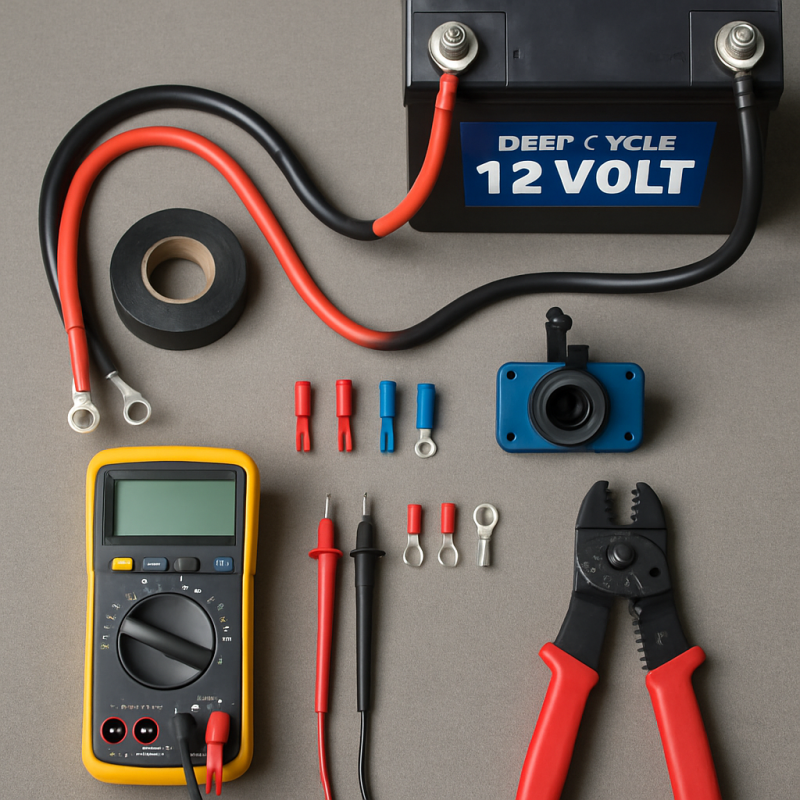
You need basic hand tools and a handful of electrical components to set up a 12V power system in your truck. Most truck owners already have the tools — the electrical parts are the main investment.
Tools Required
- Socket wrench set: 10mm, 12mm, and 13mm for battery terminals and mounting brackets
- Wire strippers and crimpers: for making clean, secure electrical connections
- Heat shrink tubing and heat gun: to waterproof every connection point
- Multimeter: essential for testing voltage, continuity, and diagnosing issues
- Drill with step bit: if mounting a fuse block or running wires through the firewall
- Zip ties and adhesive cable clamps: for clean wire routing
Electrical Components
- Deep-cycle auxiliary battery: AGM or lithium (100Ah minimum recommended)
- Battery isolator or DC-DC charger: prevents starter battery drain (140A minimum)
- 4-gauge or 2-gauge wiring: for main battery-to-battery runs
- Inline ANL fuse holder + fuse: sized to your wire gauge (typically 100-150A)
- Fuse block or bus bar: to distribute power to multiple accessories
- Ring terminals and butt connectors: marine-grade, adhesive-lined preferred
- Power inverter: if you need 120V AC outlets (sized to your load)
Budget approximately $150-$250 for the battery, $50-$120 for the isolator, and $30-$60 for wiring and fuses. Keep your truck's cab organized during the install by laying out all components on a clean surface before you start.
How Do You Plan Your Power Budget?
Before buying anything, calculate your total power draw by adding up the watts of every device you plan to run. This determines what battery capacity and inverter size you actually need — and prevents overspending on components you won't use.
Step 1: List Every Device
Write down every accessory you'll power and its wattage. Check the label on the device or its manual. Here are common truck accessories and their typical draws:
| Device | Watts | Amps at 12V | Daily Use (hrs) | Daily Ah |
|---|---|---|---|---|
| 12V Cooler/Fridge | 45-65 | 3.75-5.4 | 24 (cycling) | 30-40 |
| LED Light Strip | 12-24 | 1-2 | 4 | 4-8 |
| Phone Charger (x2) | 10-20 | 0.8-1.7 | 3 | 2.5-5 |
| Laptop (via inverter) | 45-65 | 3.75-5.4 | 3 | 11-16 |
| CPAP Machine | 30-60 | 2.5-5 | 8 | 20-40 |
| Portable Fan | 15-25 | 1.25-2 | 6 | 7.5-12 |
Step 2: Calculate Total Amp-Hours
Add up your daily amp-hour totals. For most truck camping setups, you'll land between 50 and 120Ah per day.
- AGM batteries: only discharge to 50%, so double your daily Ah need (100Ah daily need = 200Ah battery)
- Lithium (LiFePO4): can safely discharge to 80-90%, so a 100Ah battery delivers 80-90Ah usable
- Rule of thumb: buy 1.5x your calculated daily draw for a comfortable buffer
As Battle Born Batteries explains, lithium batteries cost more upfront but last 3-5x longer than AGM, making them cheaper per cycle over their lifespan.
How Do You Choose and Install the Right Battery?
Your auxiliary battery is the heart of the system. Choose between AGM (affordable, proven) and lithium LiFePO4 (lighter, more usable capacity, longer lifespan) based on your budget and power needs.
| Feature | AGM | Lithium (LiFePO4) |
|---|---|---|
| Price (100Ah) | $150-$250 | $400-$800 |
| Weight | 60-70 lbs | 25-30 lbs |
| Usable Capacity | 50% (50Ah from 100Ah) | 80-90% (80-90Ah from 100Ah) |
| Cycle Life | 300-500 cycles | 2,000-5,000 cycles |
| Charging Speed | Slower (C/5 rate) | Faster (C/2 rate) |
| Temperature Range | Works below freezing | Won't charge below 32°F without heater |
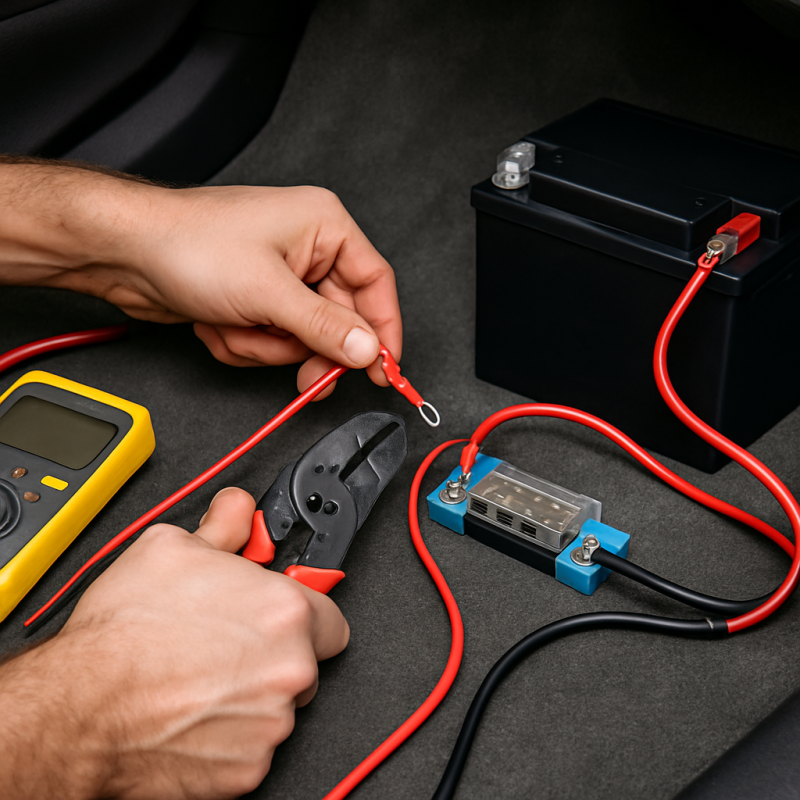
Installation Steps
- Choose a mounting location: under the rear seat, in the bed, or in a bed-mounted toolbox are the most common spots. Ensure ventilation for AGM batteries.
- Secure the battery: use a battery box or tray with a hold-down strap. The battery must not move during driving or off-road use — a loose battery is a fire hazard.
- Connect the isolator: run 4-gauge wire from your starter battery's positive terminal to the isolator input, then from the isolator output to the auxiliary battery positive terminal.
- Ground the auxiliary battery: run a ground wire of equal gauge to the chassis or directly back to the starter battery's negative terminal.
Always install an inline ANL fuse within 18 inches of each battery's positive terminal. This protects against short circuits if a wire chafes through its insulation against the frame.
How Do You Wire the System Safely?
Proper wiring is the most critical part of setting up a 12V power system in your truck. Undersized wires create resistance, generate heat, and can start fires. Oversized wires cost a few dollars more but eliminate any risk.
Wire Gauge Selection
- Battery-to-battery run (main power): 4-gauge minimum for runs under 10 feet, 2-gauge for 10-20 feet
- Fuse block to accessories: 10-14 gauge depending on the accessory's amp draw
- Inverter connections: match the inverter manufacturer's recommendation (typically 2-gauge or 1/0 for 2000W+)
Step-by-Step Wiring Process
- Disconnect the starter battery's negative terminal before doing any wiring work. This prevents accidental shorts.
- Route your main power wire from the engine bay to the auxiliary battery location. Use existing wire channels, grommets, and frame rails. Avoid exhaust components and moving parts.
- Install inline fuses at both ends — one within 18 inches of the starter battery, one within 18 inches of the auxiliary battery.
- Connect the isolator/DC-DC charger between the two batteries following the manufacturer's wiring diagram.
- Install a fuse block on the auxiliary battery's positive terminal. This gives you multiple fused outputs for accessories.
- Use heat shrink on every connection. Marine-grade adhesive-lined heat shrink creates a waterproof seal that prevents corrosion.
The Blue Sea Systems wire gauge calculator is an excellent free tool for determining the exact gauge you need based on your wire length and amperage.
A common mistake is running positive and negative wires on different sides of the vehicle. Keep them bundled together to reduce electromagnetic interference and make troubleshooting easier.
How Do You Install a Power Inverter?
A power inverter converts your 12V DC battery power into 120V AC household power, letting you plug in standard devices like laptops, power tools, and kitchen appliances. Choose your inverter based on your maximum simultaneous AC load.
Modified Sine Wave vs. Pure Sine Wave
- Modified sine wave: cheaper ($50-$150), works for simple devices like phone chargers and basic power tools
- Pure sine wave: cleaner power ($150-$400+), required for sensitive electronics like laptops, CPAP machines, and variable-speed tools
For most truck setups, a pure sine wave inverter is worth the extra investment. The BELTTT 3000W Pure Sine Wave Inverter is a solid option that includes dual AC outlets, USB ports, and a remote controller for convenient on/off switching from the cab.
If you need serious wattage for jobsite tools or heavy camping use, the LANDERPOW 3000W Pure Sine Wave Inverter offers three AC outlets, a 30W USB-C port, and 6000W surge capacity to handle high-draw startup loads.
Installation Steps
- Mount the inverter in a ventilated location — never in a sealed compartment. Inverters generate heat and need airflow.
- Use the shortest cable run possible between the auxiliary battery and inverter. Every foot of cable adds resistance and voltage drop.
- Connect with properly sized cables: 2-gauge for inverters up to 1500W, 1/0-gauge for 2000W+.
- Install an ANL fuse on the positive cable between battery and inverter, sized per the inverter manual.
- Mount the remote switch inside the cab so you can turn the inverter on/off without climbing into the bed.
For moderate power needs, the Tundra M2000 Modified Sine Wave Inverter provides 2000W at a budget-friendly price point — ideal if you're only powering basic tools and chargers.
BELTTT 3000W Pure Sine Wave Inverter
A reliable pure sine wave inverter with dual AC outlets, USB ports, and a 23-foot remote cable — ideal for truck bed installations where the inverter sits far from the cab.
Check Price On AmazonIf you click this link and buy, we earn a commission at no additional cost to you.

LANDERPOW 3000W Pure Sine Wave Inverter
Three AC outlets, USB-C fast charging, and 6000W surge capacity make this inverter a powerhouse for jobsite and heavy camping use.
Check Price On AmazonIf you click this link and buy, we earn a commission at no additional cost to you.

Tundra M2000 Modified Sine Wave Inverter
Budget-friendly 2000W option for truck owners who primarily power basic tools and chargers without needing clean sine wave output.
Check Price On AmazonIf you click this link and buy, we earn a commission at no additional cost to you.

How Do You Add Outlets, USB Ports, and Accessories?
Once your battery and inverter are installed, the final step is creating convenient access points for your devices. A well-planned outlet layout means you're not running extension cords across your truck bed every time you need to charge something.
12V DC Outlets
- Cigarette-style 12V sockets: flush-mount them in your bed panel, toolbox, or behind the rear seat for direct 12V access
- Anderson PowerPole connectors: popular in the overlanding community for quick-connect/disconnect of accessories like coolers and lights
- Marine-grade switch panel: gives you individually switched and fused circuits for multiple accessories
USB Charging
- Dual USB panels: flush-mount near sleeping or seating areas for phone and tablet charging
- USB-C with Power Delivery: essential for fast-charging modern phones and powering laptops directly from 12V
Practical Layout Tips
Think about where you'll actually use each device. If you're building a truck camping setup, you'll want USB ports near the sleeping area and 12V outlets near your cooler location.
- Run each accessory circuit from the fuse block with appropriately sized wire (14-gauge for under 10A, 12-gauge for 10-15A).
- Label every circuit at the fuse block. You'll thank yourself later when troubleshooting.
- Use waterproof connectors and outlets for anything exposed to rain, dust, or moisture in the bed.
- Leave 2-3 spare fuse slots for future accessories you haven't planned yet.
If you need to step up voltage for specific accessories, a DC 12V to 24V step-up converter lets you power 24V devices from your 12V system without a separate battery.
DC 12V to 24V Step-Up Converter
Lets you run 24V accessories from your 12V truck system — useful for specific tools, pumps, and equipment that require higher voltage.
Check Price On AmazonIf you click this link and buy, we earn a commission at no additional cost to you.

How Do You Test and Troubleshoot Your 12V System?
Before relying on your new power system, run through a complete test sequence to catch wiring mistakes, loose connections, and component issues while you're still in the driveway — not at a remote campsite.
Initial Testing Checklist
- Check voltage at the auxiliary battery: should read 12.6-12.8V for a fully charged AGM or 13.2-13.4V for lithium. Anything below 12.4V means the battery isn't fully charged.
- Start the engine and verify charging: voltage at the auxiliary battery should climb to 13.5-14.5V within 30 seconds, confirming the isolator is passing charge.
- Test each outlet and circuit: plug in a known-working device to every outlet. Check that each fuse block circuit delivers power.
- Load test the inverter: plug in a high-draw device (hair dryer, space heater on low) to verify the inverter handles its rated load without shutting down.
- Turn off the engine and run overnight: leave your normal accessories running overnight, then check battery voltage in the morning. This reveals if your power budget calculations are accurate.
Common Problems and Fixes
- Auxiliary battery not charging: check isolator wiring, verify the ignition trigger wire (if applicable), and test voltage at each connection point with a multimeter
- Inverter shutting off under load: usually caused by voltage drop from undersized cables or a partially discharged battery — check cable gauge and battery voltage
- Fuse blowing repeatedly: indicates a short circuit or overloaded circuit — disconnect all accessories and reconnect one at a time to isolate the problem
- Voltage reading low after charging: check ground connections — a poor ground is the most common cause of charging issues in vehicle electrical systems
- Buzzing or humming from inverter: normal for modified sine wave inverters — if using pure sine wave and hearing buzz, check grounding
Keep a dash cam running during your first few trips with the new system. If something trips a fuse or causes an electrical issue while driving, the footage helps pinpoint when it happened relative to road conditions.
As the 12 Volt Planet troubleshooting guide recommends, invest in a clamp-style DC ammeter — it lets you measure current flow on any wire without disconnecting anything, making diagnosis dramatically faster.
Related Articles
- Best 12V Truck Coolers for Camping — 12V coolers are one of the most common accessories powered by truck auxiliary power systems
- Best Truck Cab Organizers for Road Trips — Keeping tools and components organized during installation and daily use
- Best Truck Camping Mattress Pads — Truck camping setups benefit from USB ports and 12V outlets near the sleeping area
- Best Truck Dash Cams for Road Protection — Dash cams can help diagnose electrical issues by timestamping when problems occur
Conclusion
Recommended Products
BELTTT 3000W Pure Sine Wave Inverter
A reliable pure sine wave inverter with dual AC outlets, USB ports, and a 23-foot remote cable — ideal for truck bed installations where the inverter sits far from the cab.
Check Price On AmazonIf you click this link and buy, we earn a commission at no additional cost to you.
LANDERPOW 3000W Pure Sine Wave Inverter
Three AC outlets, USB-C fast charging, and 6000W surge capacity make this inverter a powerhouse for jobsite and heavy camping use.
Check Price On AmazonIf you click this link and buy, we earn a commission at no additional cost to you.
Tundra M2000 Modified Sine Wave Inverter
Budget-friendly 2000W option for truck owners who primarily power basic tools and chargers without needing clean sine wave output.
Check Price On AmazonIf you click this link and buy, we earn a commission at no additional cost to you.
DC 12V to 24V Step-Up Converter
Lets you run 24V accessories from your 12V truck system — useful for specific tools, pumps, and equipment that require higher voltage.
Check Price On AmazonIf you click this link and buy, we earn a commission at no additional cost to you.
Frequently Asked Questions
Can I run a 12V power system without a second battery?
How long will a 100Ah battery power my accessories?
Do I need a pure sine wave or modified sine wave inverter?
Will a 12V power system void my truck's warranty?
Can I charge the auxiliary battery with solar panels?
What size inverter do I need for my truck?
How do I prevent my 12V system from draining while parked for weeks?
Is it safe to install a 12V system myself or should I hire a professional?
Affiliate Disclosure: This article contains affiliate links. If you purchase through these links, we may earn a commission at no extra cost to you.